

How do I set up my Public Booking Page?
Your Public Booking Page is a shareable link where new prospects can book sessions you choose to make public, no account required. Once it’s live, it works 24/7 so new people can book time with you directly.
This guide walks you through the steps to set up, publish, and share your page.
What You’ll Need Before You Start
- At least one session type created (e.g., Discovery Call, 60-minute coaching session).
- Your availability set and confirmed (we pre-fill Mon–Fri, 9–5, but you can adjust anytime).
Step 1: Create a Session Type
- In the left menu, click Offers, then Session Types.
- Choose a starter session (Free Discovery Call, 60 minute call or 90 minute call) or create your own.
- In the session form, find Show on Public booking page? and choose Yes. Under Publication settings, set Status to Published.
- Click Save & continue.
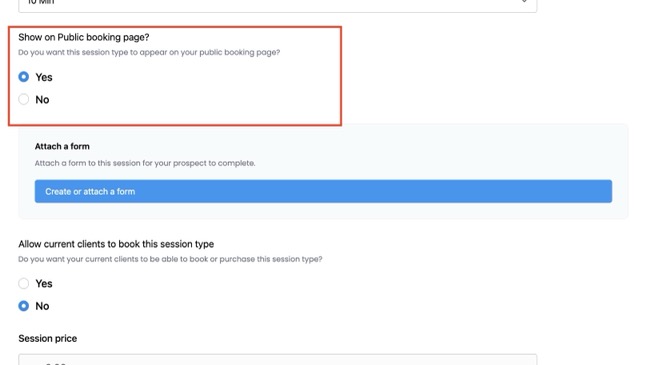
✅ Once a session is marked Public, it will be eligible to appear on your Public Booking Page.
Step 2: Confirm Your Availability
- In the left menu, click Calendar & Booking, then Public Booking Page. Find Confirm your availability in the Steps to Go Live checklist.
- Click Review Availability to check the default hours (Mon–Fri, 9–5) and adjust them if you need to.
- Click Confirm Availability. It’s right in the checklist, and also in the blue banner at the top of the Availability page when you get there through Review Availability.
✅ You only need to confirm once. You can edit your hours later without losing confirmation.
Step 3: Publish Your Public Booking Page
- In the left menu, click Calendar & Booking, then Public Booking Page. (You can also get there from Profile & Booking > Public Booking Page.)
- Complete the Steps to Go Live checklist:
- At least one Public session ✅
- Availability confirmed ✅
- Toggle Publish Page ON (in the header card).
✅ Your page is now live!
Step 4: Share Your Link
- Once published, your page gets a unique link:
https://app.lifecoachhub.com/book/your-name - Click Copy Link to share:
- Add a prominent link on your website or landing page.
- Include it in your social profiles (Instagram link-in-bio, Facebook About, LinkedIn Contact).
- Add it to your email signature.
- Print it on business cards or share it at networking events so people can schedule with you instantly.
Previewing Your Page
- You can always click Preview Page to see how it looks.
- If your page isn’t published yet, the preview shows a banner: “Preview Mode – This page is not live yet.”
- If live, you’ll see the booking options exactly as prospects do.
What visitors see, and what stays private
Your meeting details stay private until someone books.
- Visitors only see the type of meeting, like “Zoom Meeting”, “Google Meet”, “Phone Call” or “In Person”.
- Your actual Zoom or Google Meet link and your phone number are never shown on the public page. For in-person sessions, the address is shared after booking.
- Once someone books, their confirmation email includes the meeting details you saved on that session type.
- For Zoom sessions with your Zoom account connected, we create a fresh meeting for each booking. The link appears on the confirmation screen and in the email.
- If you didn’t add any location to the session type, your visitor sees: “Your coach will contact you regarding the way to access this meeting (call, video link, location etc).” In that case, remember to send them the details yourself.
To change what gets shared, go to Offers > Session Types, edit the session and update its location.
Note: the Public Booking Page only offers free sessions right now. Paid booking is coming in a future release.
How your calendar keeps you from being double-booked
Your Public Booking Page only shows times when you’re actually free.
These things block a time slot:
- Any session already in your LCH Core calendar, one-to-one or group. Cancelled sessions don’t count.
- Busy events in your connected Google Calendar or Outlook Calendar.
- The buffer times you set on the session type, before and after each session and busy event.
A few details:
- Only events marked Busy block time. Events marked Free (Google calls it “Available”) don’t.
- An all-day event marked Busy blocks that whole day.
- Before a booking goes through, we check your calendar one more time. If the slot was taken in the meantime, the visitor is asked to pick another time.
To choose which calendars count:
- Click your profile picture (top right), then Integrations.
- Open your Google or Outlook connection.
- Under Calendars to check for conflicts, pick every calendar you want to block your page, like your personal and family calendars.
- Click Save Calendar Settings.
If we can’t reach your connected calendar for a moment, your page shows no available times rather than risk a double booking. It fixes itself as soon as the connection is back. If it lasts, reconnect your calendar on the Integrations page.
FAQ
Q: Why don’t I see my session on the Public Booking Page?
A: Make sure the session’s Status is Published and Show on Public booking page? is set to Yes. For more help, see Why isn’t my session showing on my Public Booking Page?
Q: Do I need a Public Store too?
A: No. The Public Store is for selling packages, courses, and digital products. The Public Booking Page is just for sessions.
Q: What happens if a prospect cancels or reschedules?
A: They’ll get links in their confirmation email to cancel or pick a new time. You’ll see the changes automatically under Calendar & Booking > Sessions.
 Frequently Asked Questions
  Contact Support