


Talk to a coach about Organizational coaching

Crystal Faulk
ACC
I help overwhelmed women in transition gain clarity, confidence, and...

Terrie Hein
Certified Life Coach, Certified Insight Coach Practitioner
Coaching to declutter your life, organize your goals, and cook...

Dr Charlene Ashley
Doctorate - Behaviours
I coach individuals to design fulfilling lives through structure, clarity,...

Paloma Chiara

Lana's Gymnastics Club
"Where the best in gymnastics meets fun. Where every child is a star"
lgclubny.com

Anna Sosnina
ICF (ACC)
ICF ACC certified coach, founder of EssorVie Coaching, passionate about...

Tyler Fink
B.A. in Religion, Anthropology, and Philosophy. Master of Divinity (M.Div.) in Missiology
Pastor, husband, and father helping Christian men pursue faithful growth...

Travis Brown
Professional Life coach
With experience in guiding clients to achieve goals, build confidence,...



Shelf-and-Bin Handbag Wall for Walk-In Closets
Are you all about style, decor and organization? Download a copy of our Clutter Reset Guide.
*****
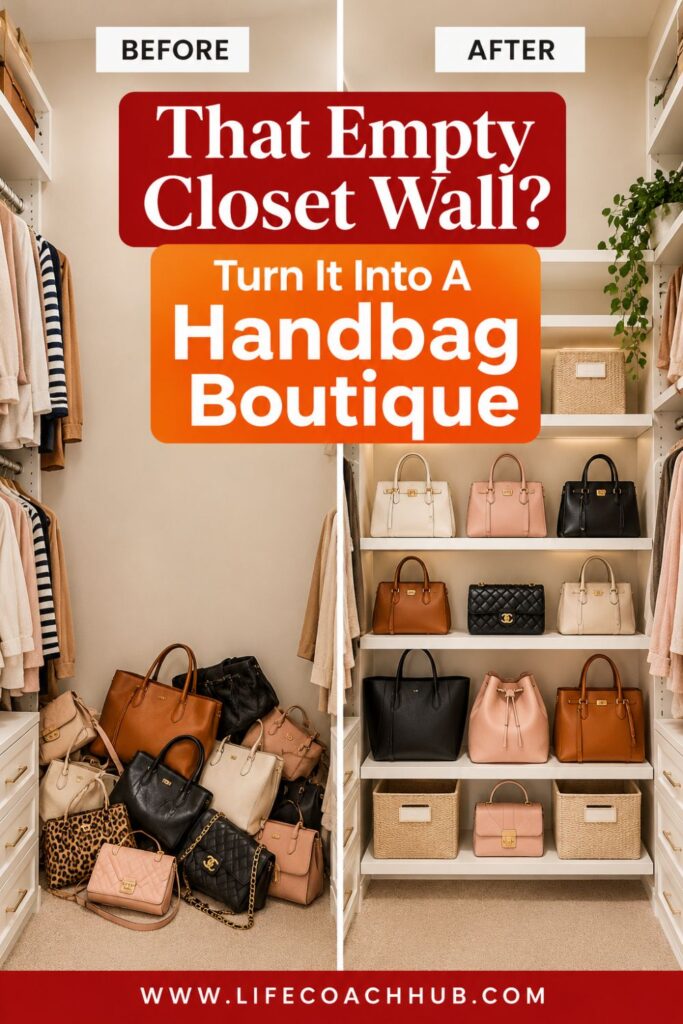
One Empty Closet Wall Could Be Your Best Handbag Storage Solution
A walk-in closet can have plenty of space and still feel crowded when handbags have nowhere specific to go. Totes end up on the floor, crossbody bags disappear behind clothing, and smaller purses get buried beneath larger ones. Before long, finding the right handbag becomes another frustrating part of getting dressed.
The surprising part is that you may not need a bigger closet or expensive custom cabinetry. One underused wall can become a dedicated handbag storage area with the right combination of shelves, bins, and thoughtful spacing.
A shelf-and-bin handbag wall gives every bag a designated place while turning part of your collection into an attractive display. Instead of squeezing handbags into whatever space remains, you create a system designed around their actual sizes and how often you use them.
The secret is treating the wall as a complete storage system rather than simply installing a few shelves.
Start by thinking about three things:
- What you want to display: Choose the handbags you reach for regularly or enjoy seeing arranged neatly on open shelves.
- What you want to contain: Identify seasonal purses, clutches, detachable straps, and accessories that would work better inside coordinated bins.
- How much space you actually need: Consider the sizes and shapes of your handbags before deciding how many shelves to install.
- How you want the wall to function: Decide whether convenience, maximum storage, or a boutique-style appearance matters most.
The best handbag walls balance all three priorities. They keep everyday essentials within reach, protect less-used pieces, and create a sense of order without looking overcrowded.
If you want to get more from your life, and are looking for concrete action steps to get you there, check out our Request a Coach page. It’s a “cut the fence-sitting and take action” way to tackle your issues and actually find success. To get off the fence and start to take action, click or tap here.
You also don’t need to transform your entire closet at once. A single wall section can make a noticeable difference, especially when you use consistent shelving finishes and containers that visually connect the different storage zones.
The following steps explain how to measure, plan, install, and organize a handbag wall that looks intentional and stays practical long after the initial makeover.
Need some in depth help with organization and productivity ? Drop on by our directories choc full of productivity coaches, minimalist coaches, and work/life balance coaches to get your life organized! Or click here to have us match you to the best.
Find the Best Closet Wall Before Buying a Single Shelf
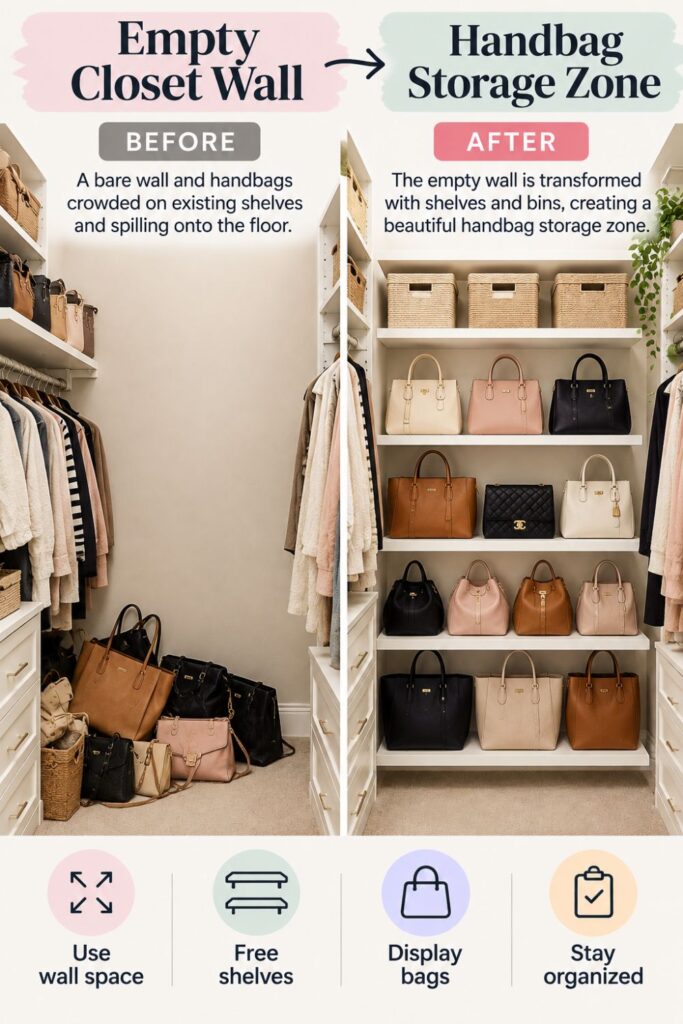
Choosing the right wall is the first step toward a handbag display that looks custom rather than squeezed into leftover space. A wall may appear empty, but that doesn’t automatically mean it can accommodate shelves without creating problems elsewhere in the closet.
Start by standing at the entrance and looking for unused vertical space. Side walls, areas beside existing cabinets, and sections without clothing rods can all offer possibilities.
Identify the most practical location: Look for a wall where handbags will be easy to see and retrieve without moving clothing or squeezing past other storage. Avoid positions that interfere with closet doors, pull-out drawers, or the normal walking path.
Measure the usable wall space: Record the width and height of the available area, then determine how far shelves could project without making the walkway uncomfortable. Include measurements for baseboards, trim, outlets, and nearby closet fixtures.
Check the surrounding clearance: Open closet doors and drawers completely to confirm that the planned shelving won’t obstruct them. Remember that handbags may extend beyond the shelf edge, especially if they have wide handles or structured sides.
If you want to get more from your life, and are looking for concrete action steps to get you there, check out our Request a Coach page. It’s a “cut the fence-sitting and take action” way to tackle your issues and actually find success. To get off the fence and start to take action, click or tap here.
Inspect the mounting surface: Determine whether the wall is drywall, masonry, or another material and identify suitable attachment points. The finished shelves must support the combined weight of the bags, bins, and shelving components, so check the hardware requirements before purchasing anything.
Once you have the measurements, outline the proposed storage area with painter’s tape. This creates a temporary guide that helps you judge whether the display will feel balanced within the closet.
For example, a narrow side wall might work beautifully with three or four shelves and a few small bins. A wider wall could support several vertical sections with dedicated spaces for totes, smaller handbags, and accessories.
Resist the temptation to use every available inch. Leaving space around the shelving makes it easier to reach for bags and helps the finished arrangement look more deliberate.
The goal is to choose a wall that supports everyday use, not simply one that can physically accommodate more storage.
Measure Your Handbags So Every Shelf Fits the Collection
One of the easiest ways to end up with disappointing closet shelves is to purchase them before measuring what they need to hold. Handbags vary considerably in height, width, depth, and structure, so equally spaced shelves don’t always provide practical storage.
Before shopping, gather your handbags in one place and sort them into groups. This gives you a clearer picture of the collection and prevents you from designing a wall around only the bags you currently use.
Group bags by shape and size: Separate large totes, structured shoulder bags, crossbody purses, small handbags, and clutches. You don’t have to store them in these exact groups later, but sorting them makes the measurements easier.
If you want to get more from your life, and are looking for concrete action steps to get you there, check out our Request a Coach page. It’s a “cut the fence-sitting and take action” way to tackle your issues and actually find success. To get off the fence and start to take action, click or tap here.
Measure each size category: Record the height, width, and depth of the largest bag in each group. Include handles when they need to remain upright, and check how much space is required to lift the bag off a shelf comfortably.
Plan for clearance: Leave room above the bags so they don’t scrape against the next shelf. Allow enough horizontal space that neighboring handbags aren’t constantly rubbing against each other or being pushed out of shape.
Test your storage capacity: Arrange several handbags side by side on a table or existing shelf. Measure the total width of a comfortable arrangement rather than calculating how many bags could fit if they were pressed tightly together.
A useful planning trick is to identify the bag with the most demanding dimensions first. A tall tote might determine the height of one shelf, while several compact shoulder bags may fit comfortably within a shorter opening.
Think about how the bags will be removed, too. A handbag that technically fits into an opening can still be frustrating to use if you need to tilt or squeeze it every time.
Once you know the approximate space requirements, sketch your proposed wall layout on paper. Mark the available wall dimensions, the planned shelf positions, and the bags that will occupy each section.
This simple preparation helps prevent wasted purchases and makes the finished display feel genuinely tailored to your collection.
Divide One Wall Into Three Handbag Storage Zones
A beautiful handbag wall needs more than attractive shelving. It needs a layout that makes sense when you’re getting dressed, changing bags, or putting things away at the end of a busy day.
If you want to get more from your life, and are looking for concrete action steps to get you there, check out our Request a Coach page. It’s a “cut the fence-sitting and take action” way to tackle your issues and actually find success. To get off the fence and start to take action, click or tap here.
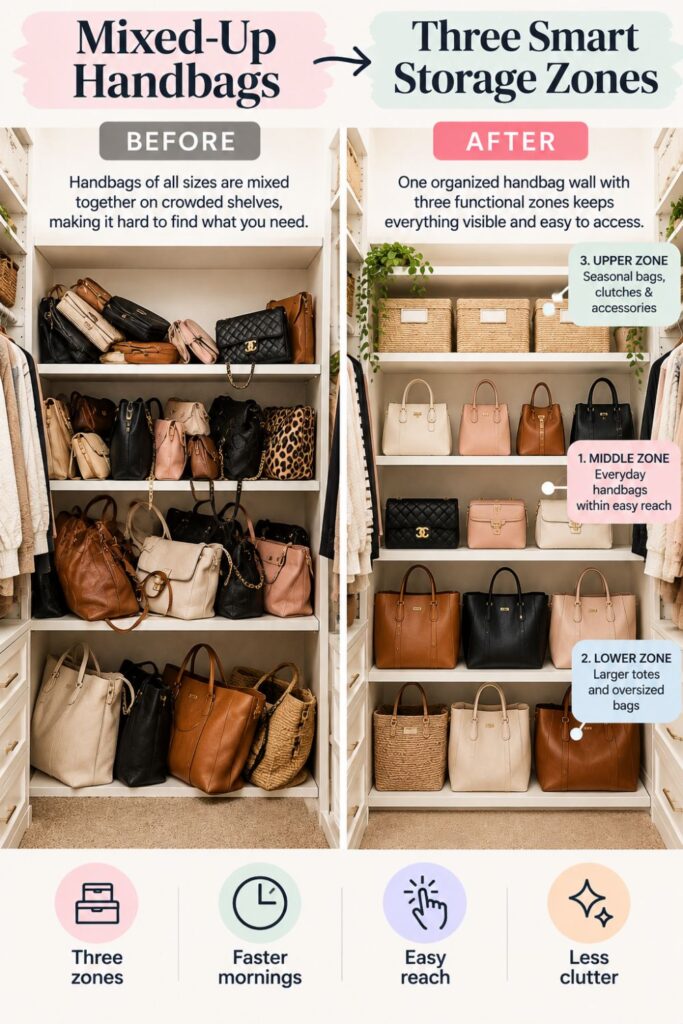
Dividing the wall into three functional zones is a simple way to accomplish that. Each zone serves a different purpose, allowing you to combine display storage with practical containment.
Zone 1: Eye-Level Everyday Display
Reserve the easiest-to-reach shelves: Place the handbags you carry most often in the section between roughly waist and eye height. These bags should be visible immediately and accessible without reaching around other items.
Give each favorite its own space: Arrange everyday shoulder bags, crossbody purses, and medium-sized handbags upright with enough room to lift them out comfortably.
This zone becomes the functional centerpiece of your handbag wall. Because these bags move in and out frequently, convenience matters more than squeezing in extra storage.
Zone 2: Lower Storage for Larger Bags
Keep bulky handbags at comfortable heights: Use lower shelves for oversized totes, larger structured bags, and pieces that are heavier to lift. This reduces awkward reaching and helps keep the wall visually grounded.
Avoid stacking large bags together: Position them side by side whenever space allows, using appropriate inserts to maintain their shapes.
Lower storage is especially useful for bags that are too tall or wide to fit comfortably on narrower display shelves.
Zone 3: Upper Bins for Occasional Use
Contain less-used pieces: Assign upper shelves to seasonal handbags, small evening purses, detachable straps, and accessories stored inside coordinated bins.
If you want to get more from your life, and are looking for concrete action steps to get you there, check out our Request a Coach page. It’s a “cut the fence-sitting and take action” way to tackle your issues and actually find success. To get off the fence and start to take action, click or tap here.
Keep upper storage lightweight: Avoid placing heavy handbags or containers where they would be difficult or unsafe to retrieve.
After assigning the zones, mark their approximate positions on your wall sketch. Check whether the arrangement leaves enough room for the tallest bags and whether the most frequently used items are genuinely easy to access.
The result is a storage wall that has a clear purpose at every level. Your favorite handbags remain visible, larger pieces have appropriate support, and smaller accessories stay contained instead of spreading across the shelves.
Choose Shelves and Bins That Look Like One Custom System
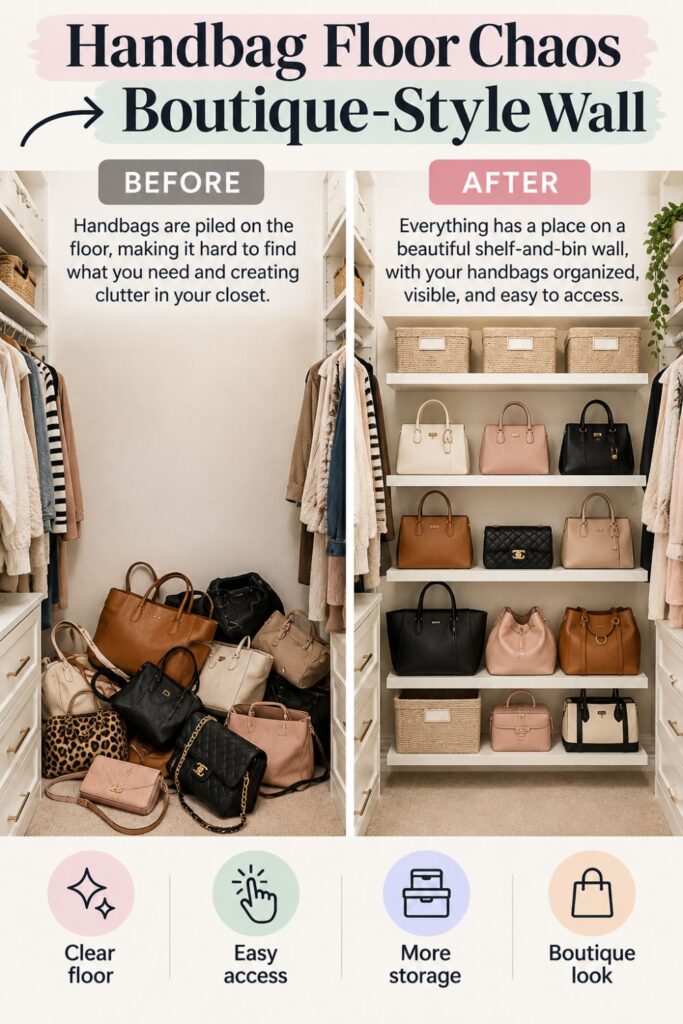
The difference between a collection of random organizers and a custom-looking handbag wall often comes down to consistency. When shelves, brackets, and bins share a coordinated appearance, even an affordable modular system can look carefully designed.
Start with the shelving itself. Adjustable wall-mounted shelves are useful because you can change their positions as your handbag collection evolves, while fixed shelves can create a more streamlined appearance when their spacing is planned correctly.
Choose one main finish: Select white, natural wood, or another finish that works with the existing closet. Keeping the shelves consistent helps the entire wall feel like one installation.
Match shelf depth to your bags: Look for shelves that support the full base of your handbags without projecting unnecessarily into the walkway. A deeper shelf may work for totes, while smaller purses may require less depth.
Coordinate the storage bins: Choose bins with similar colors, materials, and shapes. Matching containers create a cohesive appearance even when they hold different categories of items.
If you want to get more from your life, and are looking for concrete action steps to get you there, check out our Request a Coach page. It’s a “cut the fence-sitting and take action” way to tackle your issues and actually find success. To get off the fence and start to take action, click or tap here.
Think about accessibility: Select containers that are easy to lift, open, and return to their shelves. Handles or pull tabs are particularly helpful for bins placed above eye level.
Protect delicate handbags: Use clean, breathable storage for leather and other materials that benefit from airflow. Avoid compressing handbags into tightly packed containers or leaving delicate materials against rough surfaces.
For an especially polished appearance, limit the wall to one or two main storage finishes. White shelves with natural woven-look bins, for example, can create a warm and simple arrangement without complicated decorating.
The quality of the installation matters just as much as the products. Even basic shelves can look more expensive when they are level, evenly aligned, and mounted with hardware that matches the design.
Before buying, lay out your selections together or compare their dimensions and finishes. Make sure the bins will fit comfortably on the chosen shelves and leave enough room to remove them.
You don’t need the most expensive closet organizers to create a custom effect. You need components that work together visually and physically.
Install the Shelves With Spacing That Looks Professionally Planned
Shelf installation is where your measurements become an actual handbag storage system. Taking extra care with alignment and spacing can make simple materials look significantly more polished.
Before drilling, transfer your planned shelf positions onto the wall. Painter’s tape is useful for testing heights and seeing how the arrangement will look from the closet entrance.
If you want to get more from your life, and are looking for concrete action steps to get you there, check out our Request a Coach page. It’s a “cut the fence-sitting and take action” way to tackle your issues and actually find success. To get off the fence and start to take action, click or tap here.
Mark the shelf locations: Use your wall measurements and handbag size groups to identify the intended shelf heights. Place temporary tape at each position and confirm that larger bags have enough vertical clearance.
Check horizontal alignment: Use a level to keep the shelves straight, and align their ends or supporting rails where possible. Consistent lines create the orderly appearance associated with custom closet installations.
Locate appropriate mounting points: Identify wall studs or other suitable structural attachment points according to the shelving manufacturer’s requirements. Use hardware designed for the wall material and the weight the shelves will carry.
Follow the installation instructions: Install the brackets, rails, or shelf supports using the recommended fixings and spacing. Check for hidden wiring or plumbing before drilling, and seek qualified installation help if the wall construction or mounting requirements are uncertain.
Test stability before loading: Confirm that every shelf is securely attached, level, and within its rated load capacity before adding handbags or storage bins.
Pay particular attention to the spaces between shelves. Taller openings should accommodate large totes and bags with upright handles, while shorter openings may work better for clutches and compact purses.
You don’t need every opening to be identical. In fact, varying the vertical spacing to match your collection can make the wall more useful without sacrificing its coordinated appearance.
If you’re using adjustable shelving, install the support system first and experiment with shelf positions before settling on the final layout.
If you want to get more from your life, and are looking for concrete action steps to get you there, check out our Request a Coach page. It’s a “cut the fence-sitting and take action” way to tackle your issues and actually find success. To get off the fence and start to take action, click or tap here.
Once the shelves are installed, stand back and look at the overall arrangement. Check whether the lines feel balanced and whether the wall leaves enough room for comfortable movement.
The goal is not just to get everything attached. It’s to create a secure, thoughtfully spaced foundation that makes the handbags look as though the storage was designed specifically for them.
Arrange the Handbags So the Wall Looks Styled, Not Stuffed
Once your shelves are installed, the arrangement of your handbags determines whether the wall feels like an organized display or another crowded storage area.
Begin with the largest bags rather than filling the shelves randomly. Bigger pieces establish the visual structure and help you see how much space remains for smaller handbags.
Position the larger handbags first: Place tall totes and substantial shoulder bags on shelves with appropriate clearance. Keep them upright and avoid forcing them into openings that are too short or shallow.
Arrange everyday favorites within reach: Give frequently used handbags clear positions on your most accessible shelves. Avoid placing them behind other bags, even if doing so would create a more symmetrical display.
Use spacing to create visual order: Leave small, consistent gaps between handbags whenever possible. This makes individual pieces easier to identify and prevents the wall from looking overcrowded.
Support bags that lose their shape: Use suitable handbag inserts or clean, acid-free tissue to help softer bags retain their form. Avoid overstuffing, which can stretch the material or distort the bag.
If you want to get more from your life, and are looking for concrete action steps to get you there, check out our Request a Coach page. It’s a “cut the fence-sitting and take action” way to tackle your issues and actually find success. To get off the fence and start to take action, click or tap here.
Separate small accessories: Put detachable straps, pouches, bag charms, and similar items in their assigned bins rather than leaving them scattered between handbags.
You can also use color to make the display feel more intentional. Grouping similar shades together or repeating colors across different shelves can create a calm arrangement without requiring you to reorganize everything by appearance alone.
Remember that a handbag wall should be functional before it is decorative. If your favorite everyday bag is positioned somewhere inconvenient simply because it looks attractive there, the arrangement may become frustrating.
A practical compromise is to organize primarily by frequency of use and size, then refine the appearance through spacing and color.
When you’re finished, try removing and replacing several handbags. Notice whether handles catch on shelves, bags knock into each other, or you need to move one item to reach another.
These small tests reveal problems that may not be obvious when the display is freshly arranged. Adjust the spacing until the wall feels as easy to use as it is attractive.
Add the Small Finishing Details That Make the Wall Feel Custom
You don’t need decorative molding or expensive cabinetry to make a handbag wall look thoughtfully finished. Small, repeated details can connect the shelves and bins into a single visual system.
The most important detail is consistency. When the shelf edges line up, storage containers match, and handbags have room around them, the wall naturally looks more intentional.
If you want to get more from your life, and are looking for concrete action steps to get you there, check out our Request a Coach page. It’s a “cut the fence-sitting and take action” way to tackle your issues and actually find success. To get off the fence and start to take action, click or tap here.
Repeat the same finishes: Choose one primary shelf color and a coordinated bin style. Avoid introducing too many competing textures or finishes that distract from the handbags themselves.
Keep container placement consistent: Position bins neatly along shelf edges and arrange them in predictable groups. For example, two matching bins on one side of a shelf can balance several displayed handbags on the other.
Use discreet labels: Add simple labels to bins containing evening bags, seasonal pieces, or accessories. Keep the wording short and the label style consistent so the storage remains practical without looking busy.
Consider protective shelf liners: Choose smooth, clean, non-staining materials where handbags need protection from abrasive shelf surfaces. Test materials for compatibility with delicate finishes before using them.
Leave some intentional empty space: Avoid filling every shelf simply because room is available. A little unused space helps the collection look organized and gives you flexibility when your handbag needs change.
Another useful detail is the relationship between shelf heights. Rather than choosing arbitrary distances, repeat similar heights for similar handbag categories while reserving larger openings for oversized bags.
This creates a subtle sense of rhythm across the wall. The arrangement appears cohesive even when different shelves hold bags of different shapes and sizes.
If the closet already has cabinetry, try aligning the new shelving with existing horizontal or vertical lines where practical. Matching those visual boundaries can make the addition feel more integrated with the surrounding space.
If you want to get more from your life, and are looking for concrete action steps to get you there, check out our Request a Coach page. It’s a “cut the fence-sitting and take action” way to tackle your issues and actually find success. To get off the fence and start to take action, click or tap here.
Finally, take a few steps back and view the wall from the closet entrance. Look for awkward gaps, crowded sections, or containers that interrupt the overall balance.
The best finishing touches don’t make the system more complicated. They make it look cleaner while helping each handbag remain easy to find, protect, and return to its proper place.
Create a Simple Handbag Return System That Keeps Everything Organized
A handbag wall can look beautiful immediately after installation, but its real value comes from how easily it stays organized.
The biggest challenge is often not the amount of storage. It’s what happens after you switch handbags, return from work, or put away accessories in a hurry.
If every bag has a clear home, returning it should require very little thought. The system works best when the correct storage location is also the easiest option.
Assign permanent spaces: Give frequently used handbags specific positions on open shelves and reserve certain bins for occasional-use pieces. Avoid moving categories around unnecessarily once the layout is working.
Create a handbag-switching habit: When changing bags, transfer your essentials, remove loose receipts or unwanted items, and return the previous handbag to its designated shelf.
Keep accessories contained: Return removable straps, small pouches, and other accessories to their assigned containers rather than leaving them on nearby shelves.
If you want to get more from your life, and are looking for concrete action steps to get you there, check out our Request a Coach page. It’s a “cut the fence-sitting and take action” way to tackle your issues and actually find success. To get off the fence and start to take action, click or tap here.
Make quick resets part of your routine: Spend a few minutes periodically checking whether handbags are upright, bins are in place, and the shelves remain clear of unrelated clutter.
Review overcrowded areas: If bags repeatedly end up on the floor or stacked in front of each other, investigate whether that section needs more space or a different arrangement.
It’s important to make the system realistic for your lifestyle. Someone who changes handbags every day may need several easily accessible display positions, while someone who uses one favorite bag for weeks may prefer more contained storage.
A good return system doesn’t require perfect habits. It removes unnecessary decisions by making the next action obvious.
Avoid adding unrelated accessories or clothing to the handbag wall just because an empty shelf is available. Once the area becomes general-purpose storage, its original organization system can quickly lose clarity.
An occasional wipe-down and a brief inventory check will help maintain the appearance without turning the project into another demanding chore.
When the system is working properly, your handbags should be as easy to put away as they are to retrieve. That convenience is what allows a one-time closet makeover to create lasting benefits.
How to Adapt Your Handbag Wall as Your Collection Changes
A handbag storage system should accommodate changes without requiring you to redesign the entire closet. Seasonal preferences shift, new handbags enter the collection, and bags that were once everyday favorites may eventually be used less often.
If you want to get more from your life, and are looking for concrete action steps to get you there, check out our Request a Coach page. It’s a “cut the fence-sitting and take action” way to tackle your issues and actually find success. To get off the fence and start to take action, click or tap here.
Building flexibility into your wall from the beginning makes those adjustments easier. This is especially helpful when you use adjustable shelving and bins that can serve several different purposes.
Rotate handbags by season: Keep bags suited to the current season on your most accessible shelves. Move less-used pieces into appropriate protective storage until you need them again.
Reconfigure shelf heights when necessary: If a new tote is taller than your existing shelf openings, adjust a movable shelf instead of squeezing the bag into an unsuitable space.
Reassign bins as your needs change: A container that once held seasonal clutches might later hold detachable straps or small handbags. Maintain consistent labels so the contents remain easy to identify.
Use available space intentionally: Before purchasing another handbag, consider where it will live. If every shelf is already crowded, reassess the collection rather than automatically adding more storage.
Check for unnecessary duplication: Periodically review handbags that serve nearly identical purposes, especially those you rarely use. Decide whether each one still deserves space in the collection.
Storage needs also change with lifestyle. Someone who begins commuting to an office might need more accessible space for work totes, while someone working remotely might rely more heavily on compact everyday bags.
The arrangement should reflect those changes rather than forcing you to maintain an outdated system.
If you want to get more from your life, and are looking for concrete action steps to get you there, check out our Request a Coach page. It’s a “cut the fence-sitting and take action” way to tackle your issues and actually find success. To get off the fence and start to take action, click or tap here.
One useful approach is to leave a little unused capacity in the initial layout. That doesn’t mean keeping large sections empty, but allowing enough flexibility to accommodate a new handbag without immediately rearranging everything.
Remember that different materials also require different storage conditions. Store delicate handbags according to their care instructions, protect them from prolonged direct sunlight, and avoid environments that encourage moisture buildup or material deterioration.
A well-designed handbag wall isn’t frozen in its original arrangement. It’s a flexible storage foundation that can continue working as your collection and everyday routines evolve.
How an Organization Coach Can Help You Build Storage Habits That Last
Sometimes the hardest part of getting organized isn’t installing shelves or choosing storage containers. It’s understanding why previous organization attempts haven’t lasted.
You might already have attractive shelves, matching bins, and enough closet space, yet still find handbags piling up in inconvenient places. When that happens, the issue may have more to do with habits, routines, or storage decisions than with the physical layout.
An organization coach, or a life coach who works with personal routines and goals, can help you examine those patterns and develop a more manageable approach.
Identify the real source of clutter: Explore whether handbags are difficult to put away, frequently used bags lack convenient spaces, or unused items are taking up valuable storage capacity.
Set a clear organization goal: Instead of aiming for a perfectly arranged closet, define a practical outcome. This might mean finding the right handbag quickly, keeping the closet floor clear, or returning bags after every use.
If you want to get more from your life, and are looking for concrete action steps to get you there, check out our Request a Coach page. It’s a “cut the fence-sitting and take action” way to tackle your issues and actually find success. To get off the fence and start to take action, click or tap here.
Connect new habits to existing routines: Build a simple handbag reset into something you already do, such as preparing clothes for the following day or organizing your essentials after work.
Develop realistic accountability: Use occasional check-ins or simple progress tracking to see whether the system is making daily life easier. Adjust the routine when it becomes too complicated to maintain.
Work through decision-making challenges: If letting go of unused handbags feels difficult, a coach can help you clarify priorities and develop a decision process that respects both practical needs and sentimental attachments.
The benefit of coaching is not that someone else decides how your closet should look. It’s that you gain support in creating a system that reflects how you actually live.
For example, a busy professional who changes handbags frequently may need a more accessible rotation system than someone who primarily uses one everyday tote.
A coach can also help turn an ambitious closet makeover into smaller, manageable actions rather than an overwhelming weekend project.
The physical handbag wall provides the storage structure. Thoughtful habits and realistic expectations help that structure remain useful long after the installation is complete.
The Handbag Wall That Makes Your Closet Work Better Every Day

A well-organized handbag wall can change how your entire walk-in closet feels. Instead of searching through crowded shelves or moving piles of bags, you have a dedicated area where everything is visible, accessible, and intentionally arranged.
If you want to get more from your life, and are looking for concrete action steps to get you there, check out our Request a Coach page. It’s a “cut the fence-sitting and take action” way to tackle your issues and actually find success. To get off the fence and start to take action, click or tap here.
What makes this project particularly useful is that it doesn’t require a full closet renovation. A single wall, carefully chosen shelving, coordinated bins, and practical spacing can create a storage system with the appearance of a custom installation.
The most successful results come from planning around your actual collection rather than trying to copy a decorative display that may not suit your needs.
Start by measuring the available wall and identifying the handbags you want to store. Then choose shelving that accommodates their sizes, group the collection into functional zones, and use matching containers to organize smaller or less frequently used items.
Keep these three principles in mind as you finish your project:
- Make access a priority: Everyday handbags should be easy to see, lift, and return without moving other items.
- Give every bag enough space: Proper clearance helps protect handbags, reduces crowding, and creates a more polished appearance.
- Keep the system simple to maintain: Clearly assigned spaces and occasional resets should prevent the need for frequent major reorganizing sessions.
It’s also worth remembering that your handbag wall doesn’t need to be filled from edge to edge. Leaving some open space can make the display look more refined while giving your collection room to change.
If you’re starting with a small section, that’s perfectly fine. You can begin with a few secure shelves and coordinated bins, test the arrangement, and expand only if your storage needs justify it.
The real achievement isn’t creating a closet that looks perfect for a photograph. It’s building a space that supports your daily routine and makes your belongings easier to care for.
When your handbags have proper homes, your closet becomes easier to navigate and maintaining order requires less effort.
If you want to get more from your life, and are looking for concrete action steps to get you there, check out our Request a Coach page. It’s a “cut the fence-sitting and take action” way to tackle your issues and actually find success. To get off the fence and start to take action, click or tap here.
One thoughtfully planned wall can bring together attractive display storage, practical organization, and everyday convenience without making the rest of your closet more complicated.
*****
Are you all about style, decor and organization? Download a copy of our Clutter Reset Guide.
Need some in depth help with organization and productivity ? Drop on by our directories choc full of productivity coaches, minimalist coaches, and work/life balance coaches to get your life organized! Or click here to have us match you to the best.
If you want to get more from your life, and are looking for concrete action steps to get you there, check out our Request a Coach page. It’s a “cut the fence-sitting and take action” way to tackle your issues and actually find success. To get off the fence and start to take action, click or tap here.
Read this next

8 Small Closet Fixes That Instantly Create More Space
Tiny closet? These simple layout fixes help you find extra room, clear clutter, and make your closet feel bigger fast.
Read More
Easter Flower Arrangements That Feel Luxe Without The Florist Price Tag
Create luxe-looking Easter flower arrangements with grocery store blooms, simple vases, and easy tricks that make your table feel fresh fast.
Read More
The DIY Christmas Wreaths Formula for Busy Holiday Weekends
Are you all about style, decor and organization? Download a copy of our Decluttering Workbook. Why We Love a Quick Holiday Project There’s something magical about creating a Christmas wreath […]
Read More