


Talk to a coach about Organizational coaching

Jennifer Loehding
Success Architect | Certified DreamBuilder Coach | Certified NEUROFIT Trainer™ | Certified Keto, Carnivore, PSMF and Supplement Coach
Life, business, health, and wellness coaching for balanced personal and...

Crystal Faulk
ACC
I help overwhelmed women in transition gain clarity, confidence, and...

Terrie Hein
Certified Life Coach, Certified Insight Coach Practitioner
Coaching to declutter your life, organize your goals, and cook...

Dr Charlene Ashley
Doctorate - Behaviours
I coach individuals to design fulfilling lives through structure, clarity,...

Paloma Chiara

Lana's Gymnastics Club
"Where the best in gymnastics meets fun. Where every child is a star"
lgclubny.com

Anna Sosnina
ICF (ACC)
ICF ACC certified coach, founder of EssorVie Coaching, passionate about...

Travis Brown
Professional Life coach
With experience in guiding clients to achieve goals, build confidence,...


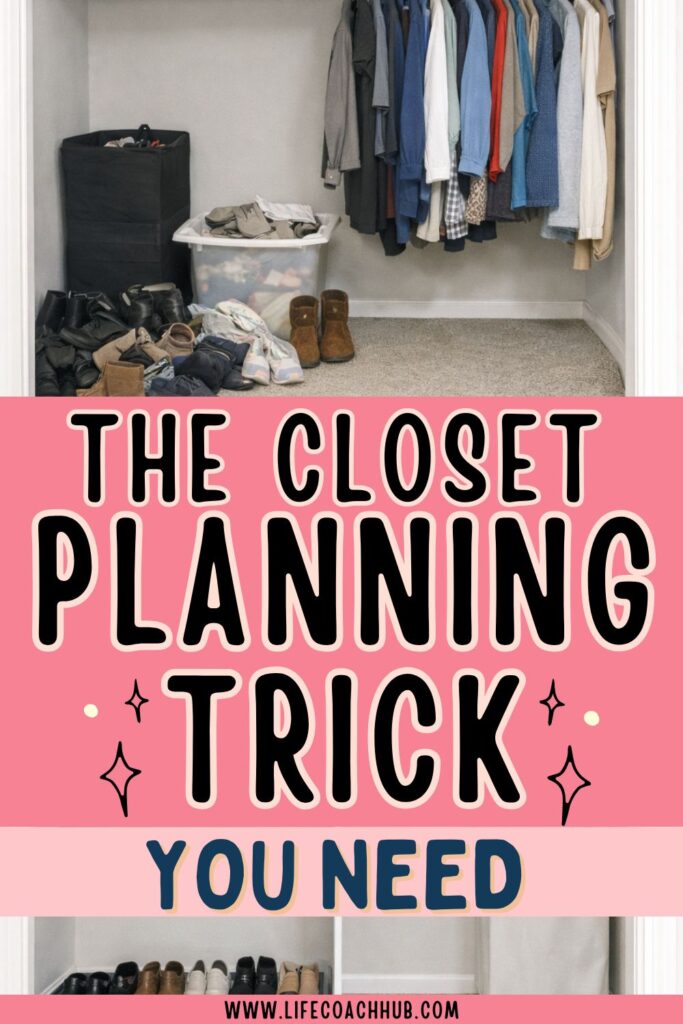
The 5-Step Small Closet Reset (From Overflow to Functional)
Are you all about style, decor and organization? Download a copy of our Decluttering Workbook.
*****
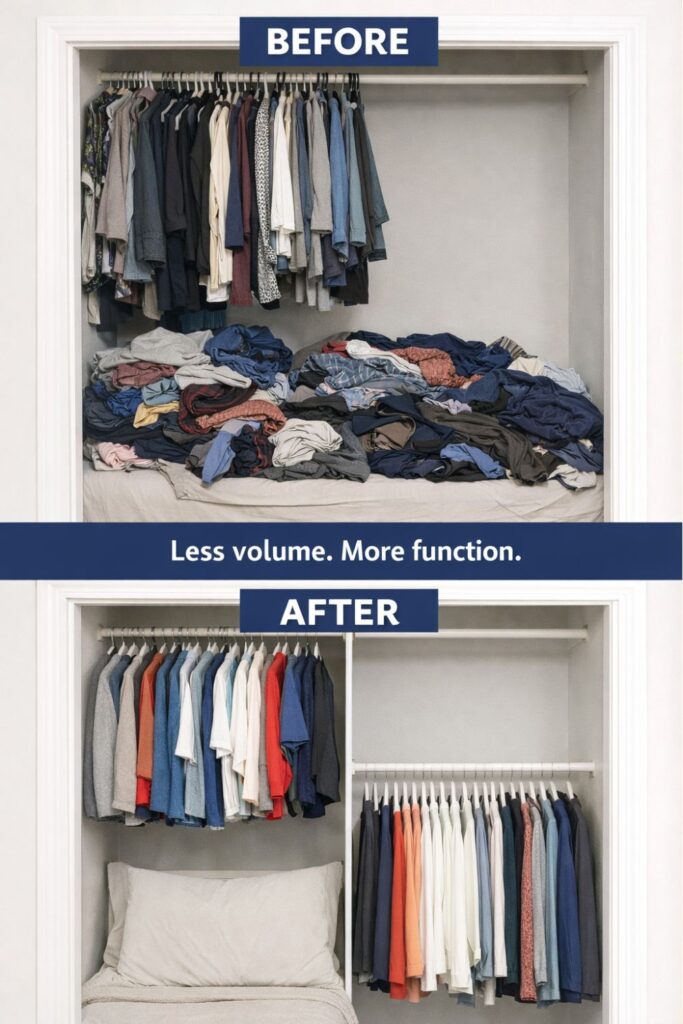
Small closets rarely fail because they’re too small.
They fail because they were never intentionally reset.
Over time, clothing accumulates gradually. A few extra hangers appear. A random bin gets added to the floor. A top shelf becomes a catch-all for items that “don’t have a place yet.” Before long, the closet feels cramped, chaotic, and frustrating to use.
The good news is that a full renovation isn’t necessary to fix it.
What most small closets need is a structured reset — a clear process that moves from clutter to clarity. This five-step approach walks you through the transformation from overflowed to functional, following a simple sequence: declutter, measure, redesign, install, and style.
Imagine the visual timeline:
Before → Mid-Reset → Final Styled Closet.
Each stage builds on the previous one so the final result feels organized and sustainable instead of temporary.
If you want to get more from your life, and are looking for concrete action steps to get you there, check out our Request a Coach page. It’s a “cut the fence-sitting and take action” way to tackle your issues and actually find success. To get off the fence and start to take action, click or tap here.
In our roundup of small closet fixes, we included this reset as the foundation for turning an overstuffed closet into a functional one. Now we’re breaking down the full step-by-step process that clears clutter, redesigns the layout, and rebuilds the closet so it actually works long-term.
Need some in depth help with organization and productivity ? Drop on by our directories choc full of productivity coaches, minimalist coaches, and work/life balance coaches to get your life organized! Or click here to have us match you to the best.
Step 1: Declutter (Clear the Overload First)
Before any organizing system can work, excess clothing must be removed.
You cannot organize clutter. You can only move it around.
Remove everything from the closet: Start by taking every item out of the closet — clothing, shoes, bins, and accessories. Clear the rods and shelves completely so you’re working with an empty space. Lay the items out on your bed or floor in visible groups.
Seeing everything together helps you understand the true volume of what the closet has been holding.
An empty closet frame also provides a visual reset. Instead of trying to reorganize around existing clutter, you can evaluate the space objectively.
Sort items into three simple categories: Create three piles: Keep, Relocate, and Remove. The Keep category includes items you wear regularly and want accessible in your closet. Relocate includes seasonal clothing or special items that can be stored elsewhere. Remove includes pieces that no longer fit, feel outdated, or haven’t been worn in a long time.
If you want to get more from your life, and are looking for concrete action steps to get you there, check out our Request a Coach page. It’s a “cut the fence-sitting and take action” way to tackle your issues and actually find success. To get off the fence and start to take action, click or tap here.
Avoid overthinking this step. The purpose is not perfect decision-making — it’s reducing volume so the closet can breathe again.
When unnecessary items leave the closet, the rest of the system becomes much easier to build.
Step 2: Measure the Actual Space
Once the clutter is cleared, the next step is understanding the closet itself.
Most people skip measuring and rely on guesswork. Unfortunately, guesswork often leads to wasted vertical space or storage purchases that don’t fit properly.
Measure the closet dimensions carefully: Use a tape measure to record the closet’s width, height, and depth. Measure the length of the hanging rod and the depth of each shelf. Also note the vertical clearance above and below the rod.
Write these measurements down so you can reference them while planning the layout.
Knowing the true dimensions of your closet helps you identify areas where space is being underused.
Measure the clothing you plan to store: Count how many items need to hang and estimate how many pieces will be folded. Pay attention to bulky garments like coats or thick sweaters, which require more space.
If you want to get more from your life, and are looking for concrete action steps to get you there, check out our Request a Coach page. It’s a “cut the fence-sitting and take action” way to tackle your issues and actually find success. To get off the fence and start to take action, click or tap here.
You are essentially matching your wardrobe inventory to the available square inches of the closet.
When you know both the closet’s dimensions and the clothing volume, you can design a layout that fits the space logically instead of trying to force everything back inside.
Step 3: Redesign Based on How You Actually Dress
This stage is where the closet begins transforming from storage to a functional system.
Instead of returning items randomly to the rod, design zones based on how you actually use your clothing.
Divide the closet into usage categories: Rather than organizing by clothing type, group items by how often they’re worn. Create a daily-wear zone for the clothing you use most often, an occasion-wear zone for special outfits, and a seasonal storage zone for items that aren’t currently in rotation.
Daily clothing should occupy the most accessible part of the closet.
This arrangement allows you to open the closet and immediately see the items you reach for most often.
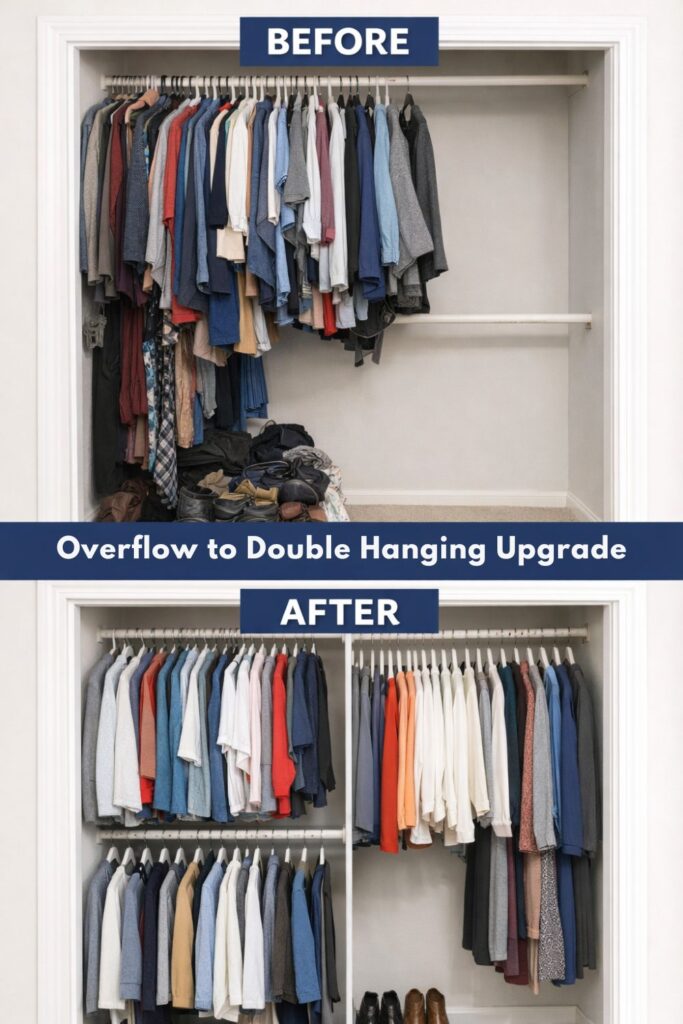
Plan vertical efficiency intentionally: Look for opportunities to use the closet’s height more effectively. Adding a second rod beneath the existing one can create double hanging space for shorter items like shirts or folded pants. Reserve upper shelves for rarely used pieces, and designate specific areas for bins before purchasing anything.
If you want to get more from your life, and are looking for concrete action steps to get you there, check out our Request a Coach page. It’s a “cut the fence-sitting and take action” way to tackle your issues and actually find success. To get off the fence and start to take action, click or tap here.
A simple sketch of your closet layout can help visualize where each section should go.
At this stage, the closet begins to shift from a random collection of storage spots to a structured system designed around your real routine.
Step 4: Install Smart Structure
Once the layout is planned, it’s time to install the elements that support it.
These structural pieces keep the system from collapsing back into clutter.
Add double rods or adjustable hardware: Installing a second rod is one of the most effective ways to increase hanging capacity in a small closet. Position the lower rod so shirts and folded pants hang comfortably without touching the floor. Adjustable brackets or rods allow you to reposition the system later if your wardrobe changes.
Double hanging can nearly double usable rod space.
Add bins, dividers, and slim hangers: Use matching slim hangers to reduce bulk and create clean visual lines. Labeled bins can store accessories, workout gear, or seasonal items without creating loose piles. Shelf dividers help prevent stacked clothing from tipping over and creating chaos on upper shelves.
These containment tools transform open space into organized zones.
If you want to get more from your life, and are looking for concrete action steps to get you there, check out our Request a Coach page. It’s a “cut the fence-sitting and take action” way to tackle your issues and actually find success. To get off the fence and start to take action, click or tap here.
Structure doesn’t just make the closet look better — it makes it easier to maintain over time.
Step 5: Style for Visibility and Flow
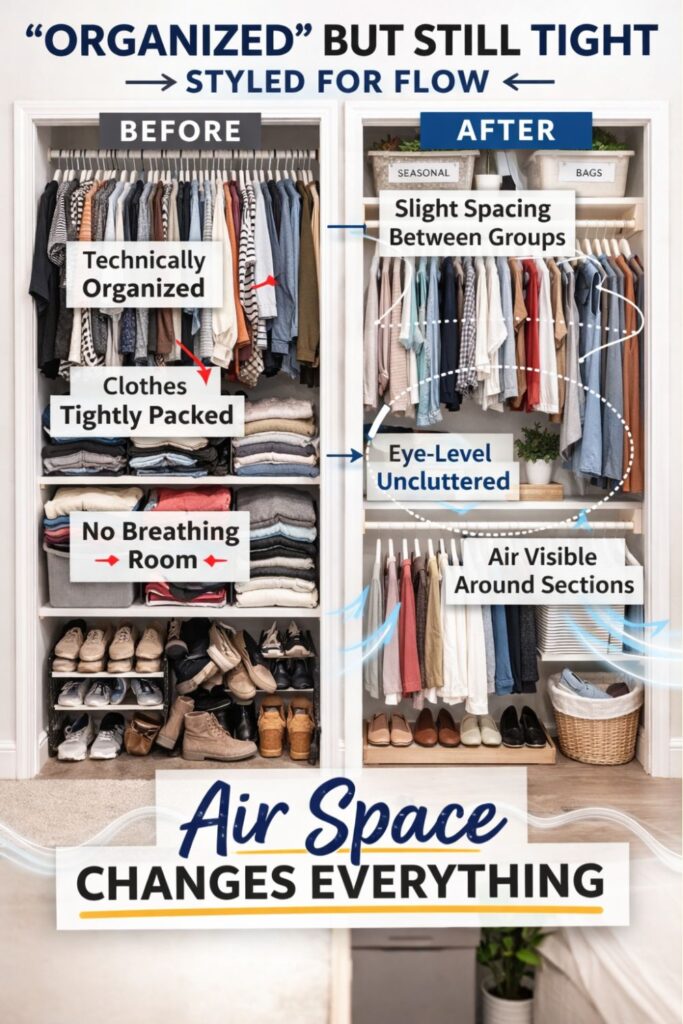
Styling is the final stage of the reset, but it serves an important functional purpose.
The goal isn’t decoration. It’s clarity.
Space clothing intentionally along the rod: Leave small gaps between sections of clothing so items aren’t packed tightly together. Slim hangers and consistent spacing help garments hang evenly and make it easier to see what you own.
Visual breathing room makes a small closet feel larger.
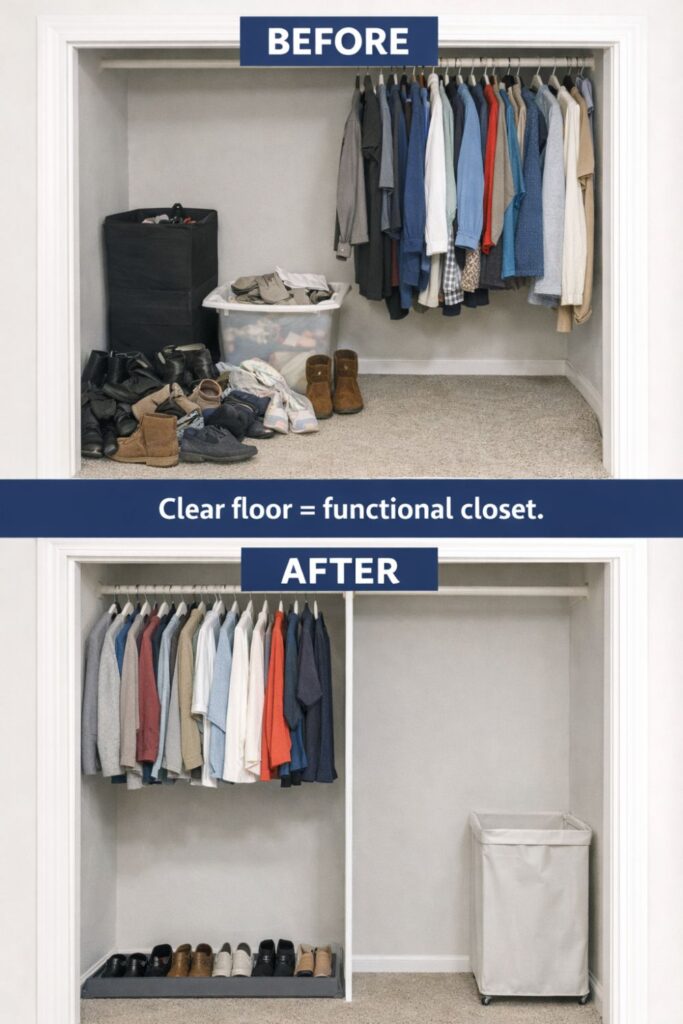
Keep the closet floor clear and purposeful: Avoid storing random bins or piles directly on the floor. If you need a hamper or shoe tray, assign one clearly defined location for it. Large bulk items should be stored elsewhere if they crowd the space.
An open floor instantly makes the closet feel more functional.
At this point, the transformation becomes visible: a closet that once felt cramped and overwhelming now feels structured, accessible, and easy to navigate.
If you want to get more from your life, and are looking for concrete action steps to get you there, check out our Request a Coach page. It’s a “cut the fence-sitting and take action” way to tackle your issues and actually find success. To get off the fence and start to take action, click or tap here.
How to Keep the Closet From Re-Overflowing
A successful reset only lasts if the closet stays within its capacity.
Adopt a one-in, one-out habit: Whenever a new clothing item enters the closet, remove one item that you no longer wear. This keeps your wardrobe size aligned with the closet’s limits.
Small closets thrive when volume remains controlled.
Schedule a quick weekly reset: Spend five minutes once a week returning misplaced items to their zones and straightening shelves. These quick adjustments prevent clutter from accumulating again.
Small maintenance prevents large reorganizing sessions later.
How to Adapt This Reset for Shared Closets
If your closet is shared with another person, the same reset process still works — it just needs clearer boundaries.
Divide the closet into clear personal zones: Assign left and right sections or upper and lower sections so each person has a defined area for their clothing. This prevents items from blending together.
Clear zones create fairness.
If you want to get more from your life, and are looking for concrete action steps to get you there, check out our Request a Coach page. It’s a “cut the fence-sitting and take action” way to tackle your issues and actually find success. To get off the fence and start to take action, click or tap here.
Use visual cues to maintain separation: Different hanger colors, labeled bins, or shelf dividers can help distinguish each person’s section without confusion.
Shared closets function best when boundaries are visible and respected.
Why This Reset Works
A small closet reset isn’t just about installing rods or buying bins.
It’s about creating a system that reflects how you actually live.
When the clutter is cleared, the space is measured, the layout is intentional, and the structure supports daily routines, everything becomes easier.
You open the closet and immediately know where things are.
Mornings move faster.
The space works with you instead of against you.
And that’s the real transformation: turning a small closet from a daily frustration into a functional part of your home.
Are you all about style, decor and organization? Download a copy of our Decluttering Workbook.
*****
If you want to get more from your life, and are looking for concrete action steps to get you there, check out our Request a Coach page. It’s a “cut the fence-sitting and take action” way to tackle your issues and actually find success. To get off the fence and start to take action, click or tap here.
Need some in depth help with organization and productivity ? Drop on by our directories choc full of productivity coaches, minimalist coaches, and work/life balance coaches to get your life organized! Or click here to have us match you to the best.
If you want to get more from your life, and are looking for concrete action steps to get you there, check out our Request a Coach page. It’s a “cut the fence-sitting and take action” way to tackle your issues and actually find success. To get off the fence and start to take action, click or tap here.
Read this next

8 Gorgeous Holiday Color Schemes That Reveal Your Style (Which One Are You?)
Are you all about style, decor and organization? Download a copy of our Decluttering Workbook. **** Holiday décor goes far beyond what looks pretty.It’s also one of the easiest ways […]
Read More
The Galentine’s Formula: Decor, Tables, and Activities That Just Work
Are you all about style, decor and organization? Download a copy of our Decluttering Workbook. ***Galentine’s Day has become one of those rare gatherings that people genuinely enjoy planning for […]
Read More
7 Window Christmas Decor Ideas That Look Luxe With Almost No Effort
Are you all about style, decor and organization? Download a copy of our Decluttering Workbook. **** Bare windows can make a whole room feel unfinished, even if your tree looks […]
Read More