


Talk to a coach about Organizational coaching

Crystal Faulk
ACC
I help overwhelmed women in transition gain clarity, confidence, and...

Terrie Hein
Certified Life Coach, Certified Insight Coach Practitioner
Coaching to declutter your life, organize your goals, and cook...

Dr Charlene Ashley
Doctorate - Behaviours
I coach individuals to design fulfilling lives through structure, clarity,...

Paloma Chiara

Lana's Gymnastics Club
"Where the best in gymnastics meets fun. Where every child is a star"
lgclubny.com

Anna Sosnina
ICF (ACC)
ICF ACC certified coach, founder of EssorVie Coaching, passionate about...

Tyler Fink
B.A. in Religion, Anthropology, and Philosophy. Master of Divinity (M.Div.) in Missiology
Pastor, husband, and father helping Christian men pursue faithful growth...

Travis Brown
Professional Life coach
With experience in guiding clients to achieve goals, build confidence,...



Tissue Box Caddy for Mail, Notepads, and Loose Papers
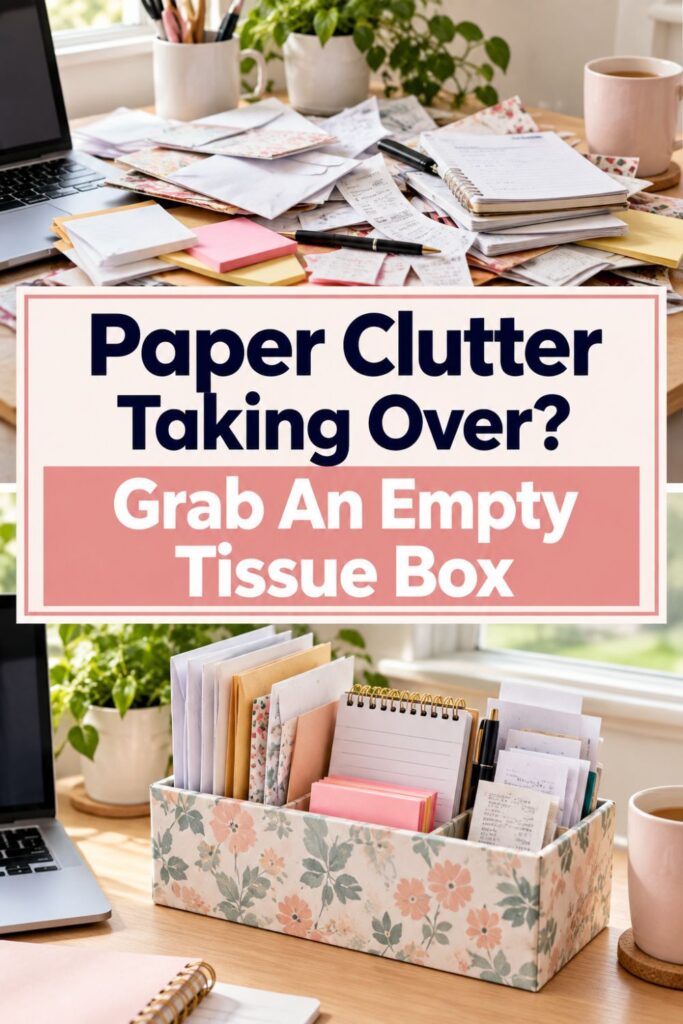
Paper clutter rarely starts as a dramatic mess. It usually begins with one envelope beside the keyboard, a notepad left open after a phone call, two receipts you need to deal with later, and a reminder you are afraid you will forget if you put it away.
A few days later, those little pieces of paper have spread across your desk.
The problem is not always that you own too much paperwork. Often, the problem is that the things you are actively using do not have an obvious temporary home.
That is where an empty tissue box can be surprisingly useful.
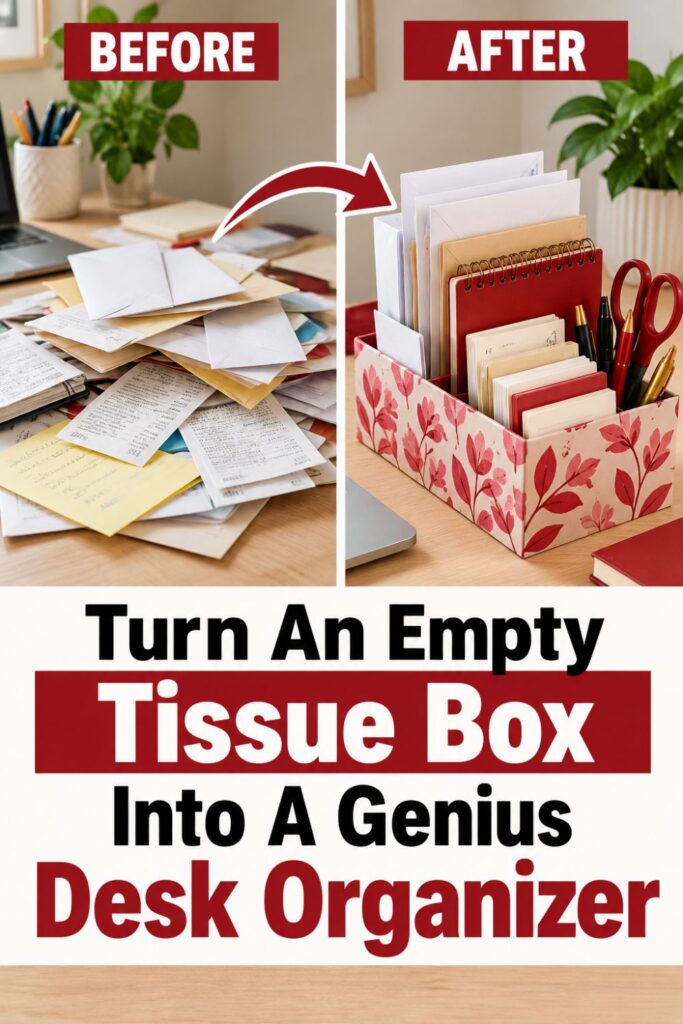
Instead of throwing the box away, you can use it as a lightweight desk caddy for mail, notepads, loose papers, index cards, sticky notes, and other small items that tend to wander around your workspace. There is no complicated build, no special organizer to buy, and no need to turn this into a craft project.
The goal is simply to give everyday paper clutter a boundary.
Start with the clutter this solves: Look for the lightweight items currently sitting loose on your desk. Think envelopes, small forms, receipts, reminders, project notes, index cards, and the notepad you keep reaching for.
Keep the purpose temporary: Use the tissue box for papers you are actively handling, not documents that need to be archived for months or years.
If you want to get more from your life, and are looking for concrete action steps to get you there, check out our Request a Coach page. It’s a “cut the fence-sitting and take action” way to tackle your issues and actually find success. To get off the fence and start to take action, click or tap here.
Let the container create a limit: When the box becomes difficult to use, that is your signal to process what is inside instead of creating another pile beside it.
This small distinction matters.
A filing cabinet stores records. A tissue box caddy manages the papers moving through your day.
When you give those papers one predictable place to land, your desk becomes easier to reset and the things you actually need become much easier to find.
Choose the Right Empty Tissue Box for Your Desk
Not every empty tissue box will work equally well as a desk caddy. The best choice depends on what usually collects around your workspace and how much room you have available.
Start by looking at the paper clutter you already have instead of choosing a box based only on how it looks.
A cube-shaped tissue box can work well when your clutter is mostly small. It is a good fit for sticky-note pads, envelopes, index cards, small notebooks, receipts, and a few frequently used desk supplies.
A longer rectangular box gives you more horizontal space and may feel more stable if you regularly deal with wider envelopes, folded documents, or larger notepads.
If you want to get more from your life, and are looking for concrete action steps to get you there, check out our Request a Coach page. It’s a “cut the fence-sitting and take action” way to tackle your issues and actually find success. To get off the fence and start to take action, click or tap here.
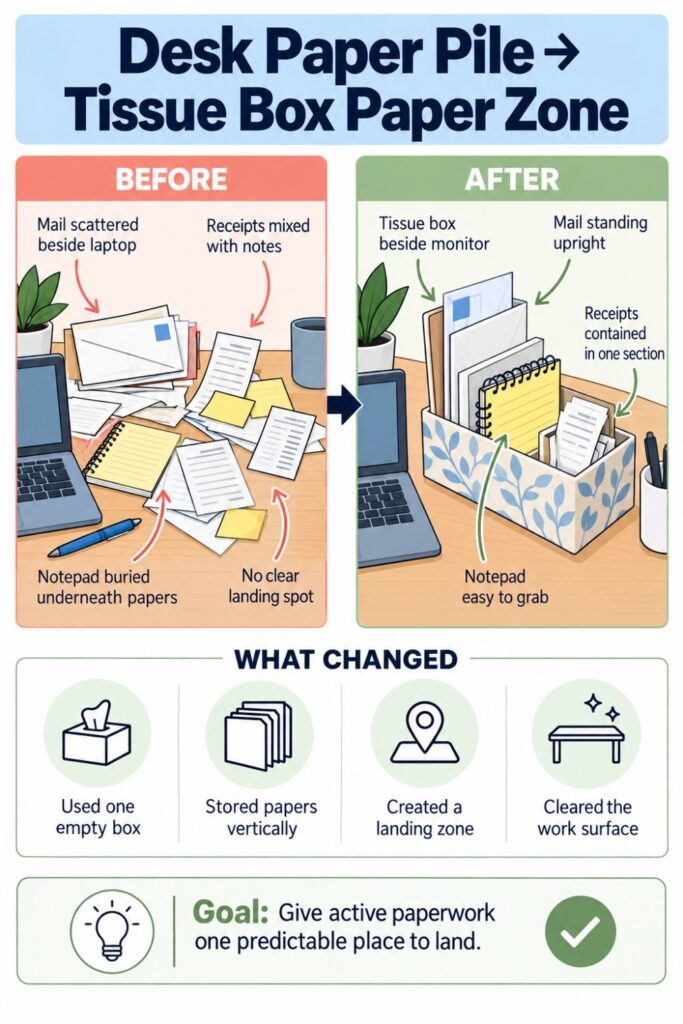
Match the box to your real clutter: Gather a few of the items you expect to store and place them beside the box. If most of them are dramatically taller or wider than the container, choose another box instead of forcing the setup.
Check the existing opening: Slide a few papers through the tissue opening to see whether they move in and out easily. If the plastic film catches constantly, fold it inward if possible or simply choose another empty box.
Test the sturdiness: Lightly press the sides and base. A box that has already been crushed may collapse once you begin pulling items in and out throughout the day.
Choose stability over appearance: A pretty box is useful only if it stays upright when you grab your notepad. Wider bases and intact corners generally make the caddy easier to use.
Avoid turning this into a complicated DIY project.
You do not need to cut several new compartments into the cardboard, reinforce the sides with elaborate materials, or spend an afternoon decorating it before it becomes useful.
The whole advantage of this idea is that the basic container already exists.
Empty it, check that it is sturdy, decide what it will hold, and put it to work.
If you want to get more from your life, and are looking for concrete action steps to get you there, check out our Request a Coach page. It’s a “cut the fence-sitting and take action” way to tackle your issues and actually find success. To get off the fence and start to take action, click or tap here.
Decide What Actually Belongs in the Caddy
The fastest way to ruin a useful container is to make it responsible for everything.
If your tissue box becomes the new home for batteries, charging cables, coupons, makeup, receipts, pens, mail, medication, keys, scissors, old notes, and mystery objects, you have not really organized the clutter. You have simply moved it into a cardboard box.
Give the caddy a narrow job.
For this setup, that job is managing lightweight paper and a small number of desk items that support the same tasks.
Start with frequently handled paper: Good candidates include mail waiting for action, receipts you need this week, reminder cards, small forms, notepads, index cards, current project notes, and envelopes you still need to respond to.
Add only a few supporting supplies: A pen, highlighter, sticky-note pad, small ruler, or similar item can live here if you use it alongside those papers regularly.
Move long-term records elsewhere: Paid bills, tax documents, contracts, medical paperwork, old statements, and completed forms belong in a proper filing system rather than your everyday caddy.
Remove trash immediately: Empty envelopes, expired coupons, outdated reminders, duplicate papers, and random scraps should not earn storage space simply because a container is available.
If you want to get more from your life, and are looking for concrete action steps to get you there, check out our Request a Coach page. It’s a “cut the fence-sitting and take action” way to tackle your issues and actually find success. To get off the fence and start to take action, click or tap here.
A useful test is to ask, “Will I probably need this at my desk within the next few days?”
If the answer is yes, the caddy may be appropriate.
If the answer is “maybe someday,” the item probably belongs somewhere else.
You can also create a simple physical rule. Everything stored in the tissue box should be removable without having to dig through multiple layers.
That keeps the system aligned with its real purpose: fast access.
The caddy should make your desk easier to use, not become another miniature junk drawer you avoid opening because you are not sure what is inside.
Give the Box Two or Three Simple Paper Zones
Putting everything into one container is helpful, but dumping everything together can create a new problem.
Instead of a desk pile, you end up with a tissue box pile.
If you want to get more from your life, and are looking for concrete action steps to get you there, check out our Request a Coach page. It’s a “cut the fence-sitting and take action” way to tackle your issues and actually find success. To get off the fence and start to take action, click or tap here.
The fix is to give the inside of the box two or three simple zones based on what you need to do with the papers.
Do not create seven tiny categories. The goal is to reduce decisions, not create an office filing system inside a tissue box.
One easy setup is:
- Incoming: Mail, receipts, forms, and papers you have not processed yet.
- Working Notes: Notepads, index cards, project notes, and references you are currently using.
- Action: Anything you need to sign, answer, pay, return, schedule, or follow up on.
You can change the categories to match your own routine.
If you rarely receive physical mail, for example, you might use “Today,” “This Week,” and “Notes.” If you use the box mainly while running a home business, your zones might be “Orders,” “Receipts,” and “Follow-Up.”
Choose categories based on action: Ask what needs to happen next to the paper rather than what the paper technically is.
Keep the number of zones small: Two clear categories that you use consistently are better than five categories you cannot remember.
Use what you already have as separators: An old envelope, postcard, folded piece of cardstock, or paper sleeve can create a simple visual divider.
If you want to get more from your life, and are looking for concrete action steps to get you there, check out our Request a Coach page. It’s a “cut the fence-sitting and take action” way to tackle your issues and actually find success. To get off the fence and start to take action, click or tap here.
Make the sections obvious at a glance: Arrange papers in small lanes rather than mixing everything flat across the bottom.
You do not necessarily need labels.
If the position is easy to remember, such as incoming on the left and action on the right, the layout itself can become the label.
The goal is to make putting something away almost automatic.
When a new receipt appears, you should know where it goes without stopping to rethink your entire organizing system.
Load the Caddy So You Can See What Is Inside
Even a good container becomes frustrating if you have to empty it every time you need one piece of paper.
How you arrange the contents matters.
Think of the tissue box more like a small vertical file than a traditional storage box. You want enough of each item visible that you can recognize and grab it quickly.
If you want to get more from your life, and are looking for concrete action steps to get you there, check out our Request a Coach page. It’s a “cut the fence-sitting and take action” way to tackle your issues and actually find success. To get off the fence and start to take action, click or tap here.
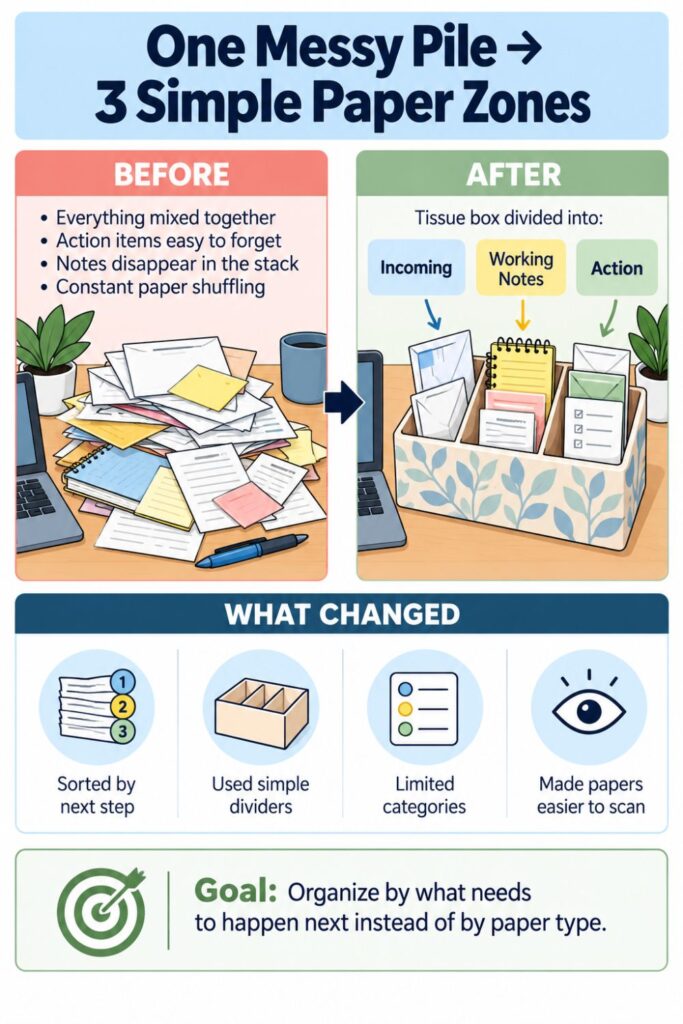
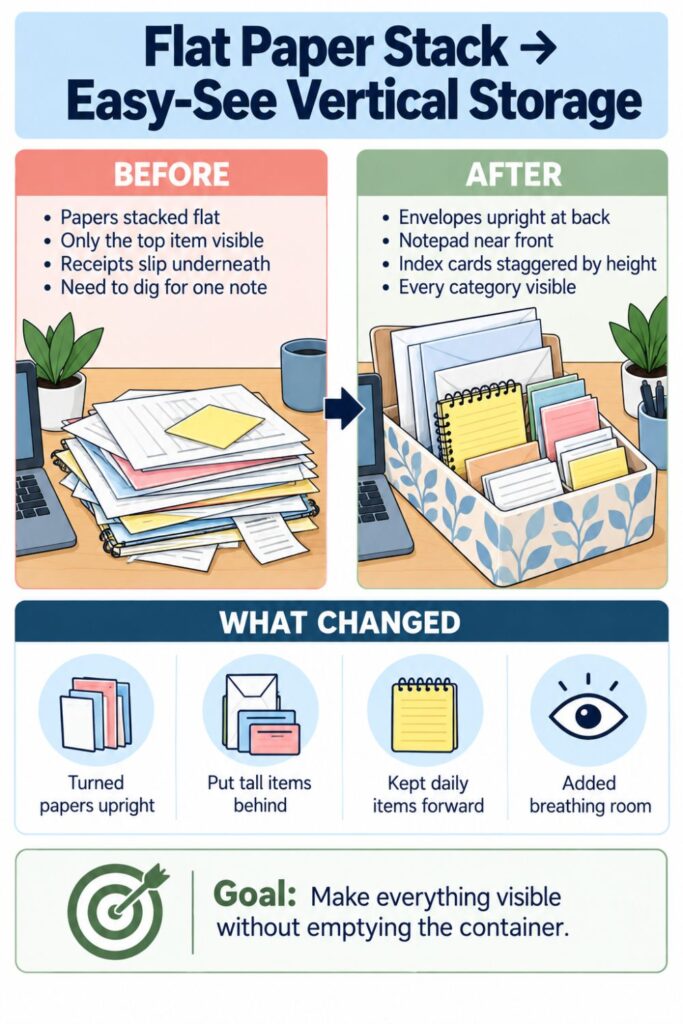
Put taller papers toward the back: Envelopes, folded forms, and larger notes can rise slightly above shorter pieces. This keeps them visible rather than buried underneath the notepad.
Place frequently used items toward the front: Keep your daily notepad, sticky notes, or current action paper closest to your hand.
Store papers vertically when possible: Papers that stand upright are easier to scan than a flat stack where only the top item is visible.
Leave breathing room: If you have to push hard to fit one more receipt into the box, the container is already too full.
This is especially important with lightweight cardboard.
A tissue box works best when the contents are loose enough to move easily. Overpacking the box can make the sides bow outward, cause papers to bend, or turn every retrieval into a two-handed operation.
Try to keep each category visually distinct.
For example, your incoming mail might stand along the left side, your current notepad in the center, and your action papers on the right. A simple divider can help if the papers keep sliding together.
If you want to get more from your life, and are looking for concrete action steps to get you there, check out our Request a Coach page. It’s a “cut the fence-sitting and take action” way to tackle your issues and actually find success. To get off the fence and start to take action, click or tap here.
You can also stagger the heights slightly.
A short index card in front of a taller envelope is easier to spot than five objects lined up at exactly the same level.
The test is simple.
Sit at your desk and look at the caddy.
Can you tell what is inside without pulling everything out?
If the answer is yes, your arrangement is doing its job.
Put the Caddy Where Paper Naturally Lands
A perfectly organized container can still fail if you put it in the wrong place.
Good organization should work with your natural habits instead of requiring you to remember an extra step every time you touch something.
If you want to get more from your life, and are looking for concrete action steps to get you there, check out our Request a Coach page. It’s a “cut the fence-sitting and take action” way to tackle your issues and actually find success. To get off the fence and start to take action, click or tap here.
Before choosing a spot for your tissue box caddy, watch what happens when you bring paper to your desk.
Where does the mail normally land?
Where do you drop receipts after emptying your bag?
Where do you place your notepad when a phone call ends?
That natural landing spot gives you valuable information.
Place the caddy close to the existing drop zone: If mail always lands on the right side of your desk, placing the box across the room creates unnecessary friction.
Keep it within easy reach: You should be able to place a note inside without standing up or moving several other objects.
Protect your main work surface: Avoid positioning the box directly in front of your keyboard, mouse, or writing area.
If you want to get more from your life, and are looking for concrete action steps to get you there, check out our Request a Coach page. It’s a “cut the fence-sitting and take action” way to tackle your issues and actually find success. To get off the fence and start to take action, click or tap here.
Use edges and corners strategically: The back corner of the desk, a side section, a nearby shelf, or the edge beside your monitor can provide easy access without stealing prime work space.
Visibility matters too.
If you hide the tissue box inside a closed cabinet, you may go right back to leaving papers on the desk because the container is no longer convenient.
This is temporary working storage, so seeing it can actually be helpful.
Of course, visible does not have to mean intrusive.
You can place the box where it is easy to reach but not directly in your visual field while you work.
The best location makes using the caddy feel easier than creating a pile.
When a receipt appears, the correct action should require almost no thought.
If you want to get more from your life, and are looking for concrete action steps to get you there, check out our Request a Coach page. It’s a “cut the fence-sitting and take action” way to tackle your issues and actually find success. To get off the fence and start to take action, click or tap here.
Drop it into the appropriate section and continue with your day.
That is when an organizing system starts to feel natural instead of like another chore.
Use a Simple Sort-It-When-It-Lands Rule
A tissue box can contain paper clutter, but the habit you build around it determines whether the system lasts.
The easiest rule is to make one small decision whenever paper lands on your desk.
You do not need to complete every task immediately.
You only need to decide where the paper goes next.
Ask what happens next: Does the paper require action, belong with something you are currently working on, need long-term filing, or deserve the recycling bin?
Put active paper directly into its zone: A bill you still need to handle might go into Action. Notes from this week’s project might go into Working Notes.
If you want to get more from your life, and are looking for concrete action steps to get you there, check out our Request a Coach page. It’s a “cut the fence-sitting and take action” way to tackle your issues and actually find success. To get off the fence and start to take action, click or tap here.
File permanent records somewhere else: If the paper has no reason to stay within reach, move it out of the caddy.
Throw away obvious clutter immediately: Do not store paper simply because making a decision feels inconvenient.
This rule works because it separates sorting from doing.
Imagine you receive a form that needs to be signed and returned tomorrow.
You may not have time to complete it while you are opening the mail. Instead of leaving it beside your laptop, place it in the Action section.
The task is not finished, but the paper now has a known location.
The same principle applies to supplies.
If you grab the pen or notepad stored in the tissue box, return it after using it. Otherwise, the tools that were supposed to stay contained gradually migrate back across the desk.
If you want to get more from your life, and are looking for concrete action steps to get you there, check out our Request a Coach page. It’s a “cut the fence-sitting and take action” way to tackle your issues and actually find success. To get off the fence and start to take action, click or tap here.
Keep the process simple enough that you can follow it on busy days.
If maintaining your system requires opening three drawers, checking a complicated category list, and deciding among ten filing options, you are much more likely to drop the paper wherever you are standing.
One quick decision is enough.
Contain first. Process when appropriate.
That keeps the desktop clear without requiring you to stop working every time a piece of paper appears.
Use the Tissue Box as a Built-In Clutter Limit
One of the most useful things about a small container is something that initially seems like a disadvantage.
It cannot hold very much.
A huge basket can absorb clutter for months before you are forced to deal with it. A tissue box reaches capacity much faster, which gives you an obvious signal that your temporary paper system needs attention.
If you want to get more from your life, and are looking for concrete action steps to get you there, check out our Request a Coach page. It’s a “cut the fence-sitting and take action” way to tackle your issues and actually find success. To get off the fence and start to take action, click or tap here.
Instead of fighting that limitation, use it.
Treat fullness as a reset signal: When you cannot slide papers in and out comfortably, stop adding more and process what is already there.
Remove completed action items first: Signed forms, paid bills, handled receipts, and finished notes no longer need premium desk space.
Move records to permanent storage: Papers you need to keep should graduate from the tissue box to your filing system.
Recycle what has expired: Old reminders, unnecessary envelopes, and notes that have already served their purpose can leave.
Be careful about solving overflow by simply finding a bigger box.
If the tissue caddy worked for several weeks and suddenly feels too small, the problem may not be the container.
You may be keeping temporary papers longer than necessary.
If you want to get more from your life, and are looking for concrete action steps to get you there, check out our Request a Coach page. It’s a “cut the fence-sitting and take action” way to tackle your issues and actually find success. To get off the fence and start to take action, click or tap here.
Look especially closely at items that survive several resets.
If the same brochure, reminder, or envelope has been sitting in the box for six weeks, ask why.
Maybe you still need it and it belongs in permanent storage.
Maybe it represents a task you keep postponing.
Or maybe you no longer need it at all.
A small container forces those decisions sooner.
That is valuable because paper clutter expands easily when there is no physical boundary.
Your desk does not need unlimited holding space for unfinished decisions.
If you want to get more from your life, and are looking for concrete action steps to get you there, check out our Request a Coach page. It’s a “cut the fence-sitting and take action” way to tackle your issues and actually find success. To get off the fence and start to take action, click or tap here.
It needs a small, useful home for the items moving through your current routine.
Once the tissue box reaches its comfortable limit, let that boundary do its job.
Process the contents rather than allowing the clutter to spread outward again.
Build a 60-Second Desk Reset Around the Caddy
A small daily reset can keep your tissue box caddy useful without turning desk organization into a major weekend project.
You do not need to empty every paper, wipe every surface, or reorganize your entire office each evening.
The goal is simply to return the active pieces of your workspace to their homes.
Try doing this when you finish work, close your laptop, or complete your final task of the day.
Gather loose papers first: Pick up any receipts, notes, mail, or reminder cards that escaped onto the desktop.
If you want to get more from your life, and are looking for concrete action steps to get you there, check out our Request a Coach page. It’s a “cut the fence-sitting and take action” way to tackle your issues and actually find success. To get off the fence and start to take action, click or tap here.
Return active items to their zones: Put unfinished action papers back in Action and current notes back with Working Notes.
Remove completed items: If you finished signing, paying, answering, or reviewing something, move that paper to filing, recycling, shredding, or wherever it belongs next.
Return your small supplies: Put the pen, sticky notes, index cards, or notepad back into the caddy.
Then look at the main desk surface.
You are not aiming for an empty showroom.
You are simply clearing enough space that tomorrow’s work does not have to begin on top of yesterday’s leftovers.
This short reset also helps you notice when the tissue box is becoming overloaded.
If papers are leaning outward, catching on the opening, or becoming hard to identify, take another minute to remove a few finished items.
If you want to get more from your life, and are looking for concrete action steps to get you there, check out our Request a Coach page. It’s a “cut the fence-sitting and take action” way to tackle your issues and actually find success. To get off the fence and start to take action, click or tap here.
Linking the reset to something you already do can make it much easier to remember.
For example, reset the caddy immediately after plugging in your laptop for the night. You could also do it after writing tomorrow’s to-do list or before leaving your home office.
The exact trigger matters less than consistency.
A lightweight organizing system stays lightweight only when small maintenance replaces occasional rescue missions.
One minute today is much easier than sorting through a month’s worth of mysterious paper later.
How an Organizing Coach Might Simplify the System Further
Sometimes the container is not really the problem.
If your tissue box keeps overflowing immediately, papers continue spreading across the desk, or you consistently ignore the categories you created, the system may not match the way you actually work.
This is where an organizing coach can offer a useful perspective.
If you want to get more from your life, and are looking for concrete action steps to get you there, check out our Request a Coach page. It’s a “cut the fence-sitting and take action” way to tackle your issues and actually find success. To get off the fence and start to take action, click or tap here.
Rather than simply telling you to buy another organizer, a coach might look at the point where the clutter begins.
Identify the friction point: Are papers piling up because they have no home, because you postpone decisions, or because your filing system is inconvenient?
Reduce unnecessary categories: If Incoming, Working Notes, Action, Reference, Follow-Up, Filing, Receipts, and Pending feels like too much, simplify.
Match the setup to your habits: If you always open mail near the kitchen and carry only action items to the desk, the caddy should reflect that behavior instead of trying to store everything.
Create one reset trigger: A coach might help connect the system to an existing routine such as shutting down work on Friday or planning your next day.
For many people, the most useful change would simply be shrinking the system.
Instead of three categories, you might need only two:
- Using Now
- Needs Action
That may feel almost too simple, but simple systems are often easier to maintain consistently.
If you want to get more from your life, and are looking for concrete action steps to get you there, check out our Request a Coach page. It’s a “cut the fence-sitting and take action” way to tackle your issues and actually find success. To get off the fence and start to take action, click or tap here.
A coach might also help you notice where the same paper keeps getting stuck.
For example, if receipts accumulate because you need them for bookkeeping, the tissue box may be doing its job perfectly. The real missing step is a regular time to enter or file those receipts.
That distinction prevents you from repeatedly redesigning the container when the real issue happens later in the workflow.
You do not need professional help to use a tissue box caddy.
But thinking like an organizing coach can help.
Instead of asking, “Why can’t I stay organized?” ask, “Which step in this system is harder than it needs to be?”
Then simplify that step.
One Small Container, One Clearer Desk
An empty tissue box is not going to replace your filing cabinet, organize every document you own, or magically eliminate paperwork from your life.
If you want to get more from your life, and are looking for concrete action steps to get you there, check out our Request a Coach page. It’s a “cut the fence-sitting and take action” way to tackle your issues and actually find success. To get off the fence and start to take action, click or tap here.
That is precisely why this idea can work.
Its job is small.
It gives the lightweight papers and grab-and-go desk items you are currently using one contained place to live.
When mail arrives, it has somewhere to go.
When you finish taking notes, your notepad has somewhere to return.
When a form still needs action, you know where to look for it tomorrow.
Keep the purpose narrow: Use the caddy for current mail, active notes, loose papers, and a few supplies connected to those tasks.
Keep categories simple: Two or three obvious zones are usually enough.
If you want to get more from your life, and are looking for concrete action steps to get you there, check out our Request a Coach page. It’s a “cut the fence-sitting and take action” way to tackle your issues and actually find success. To get off the fence and start to take action, click or tap here.
Keep the container easy to access: Place it where papers naturally appear instead of forcing yourself to use an inconvenient location.
Keep the boundary intact: When the tissue box becomes full, process the contents instead of allowing clutter to spread beside it.
Most importantly, judge the system by whether it makes everyday work easier.
You should spend less time searching for the receipt you saw yesterday. Your notepad should stop disappearing underneath other papers. You should have enough open desk space to actually use your desk.
That is a meaningful improvement, even if the organizer responsible happens to be an empty tissue box.
Organization does not always require a new product or an elaborate setup.
Sometimes the most practical system is simply giving a familiar object a very specific job.
Before recycling your next empty tissue box, place it on your desk for a week.
If you want to get more from your life, and are looking for concrete action steps to get you there, check out our Request a Coach page. It’s a “cut the fence-sitting and take action” way to tackle your issues and actually find success. To get off the fence and start to take action, click or tap here.
Give your loose papers somewhere to land, keep the categories simple, and see how much easier it becomes to stop a small pile from turning into a much bigger one.
If you want to get more from your life, and are looking for concrete action steps to get you there, check out our Request a Coach page. It’s a “cut the fence-sitting and take action” way to tackle your issues and actually find success. To get off the fence and start to take action, click or tap here.
Read this next

10 Crazy Simple DIY Christmas Décor Ideas That Look Luxe
Creating a beautiful Christmas home doesn’t have to be expensive, overwhelming, or time-consuming. With a few clever techniques and simple materials, you can achieve a high-end, designer look without spending […]
Read More
7 Super Easy DIY Rustic Outdoor Christmas Porch Decor Ideas
Are you all about style, decor and organization? Download a copy of our Decluttering Workbook.**** Rustic Christmas porch decor has a charm that feels welcoming, warm, and handmade in all […]
Read More
Sidecar Cart System for Desks With No Drawer Space
No desk drawers? This sidecar cart setup keeps supplies close, clears the desktop, and makes tiny workspaces feel instantly easier.
Read More