


Talk to a coach about Organizational coaching

Crystal Faulk
ACC
I help overwhelmed women in transition gain clarity, confidence, and...

Terrie Hein
Certified Life Coach, Certified Insight Coach Practitioner
Coaching to declutter your life, organize your goals, and cook...

Dr Charlene Ashley
Doctorate - Behaviours
I coach individuals to design fulfilling lives through structure, clarity,...

Paloma Chiara

Lana's Gymnastics Club
"Where the best in gymnastics meets fun. Where every child is a star"
lgclubny.com

Anna Sosnina
ICF (ACC)
ICF ACC certified coach, founder of EssorVie Coaching, passionate about...

Tyler Fink
B.A. in Religion, Anthropology, and Philosophy. Master of Divinity (M.Div.) in Missiology
Pastor, husband, and father helping Christian men pursue faithful growth...

Travis Brown
Professional Life coach
With experience in guiding clients to achieve goals, build confidence,...





Overhead Seasonal Storage Row for Out-of-Rotation Clothes

Are you all about style, decor and organization? Download a copy of our Clutter Reset Guide.
*****
When Your Closet Is Full of Clothes You Can’t Wear Right Now
You open your closet to find a shirt for today, but first you have to push aside winter coats, move a stack of sweaters, and untangle hangers holding clothes you won’t wear for months. The closet feels full, even though only part of what’s inside belongs to the current season.
That is often a storage problem, not a shopping problem. When warm-weather dresses, cold-weather layers, and special-occasion pieces compete for the same easy-to-reach spots, getting dressed becomes more complicated than it needs to be. Adding another basket to the floor rarely fixes that problem.
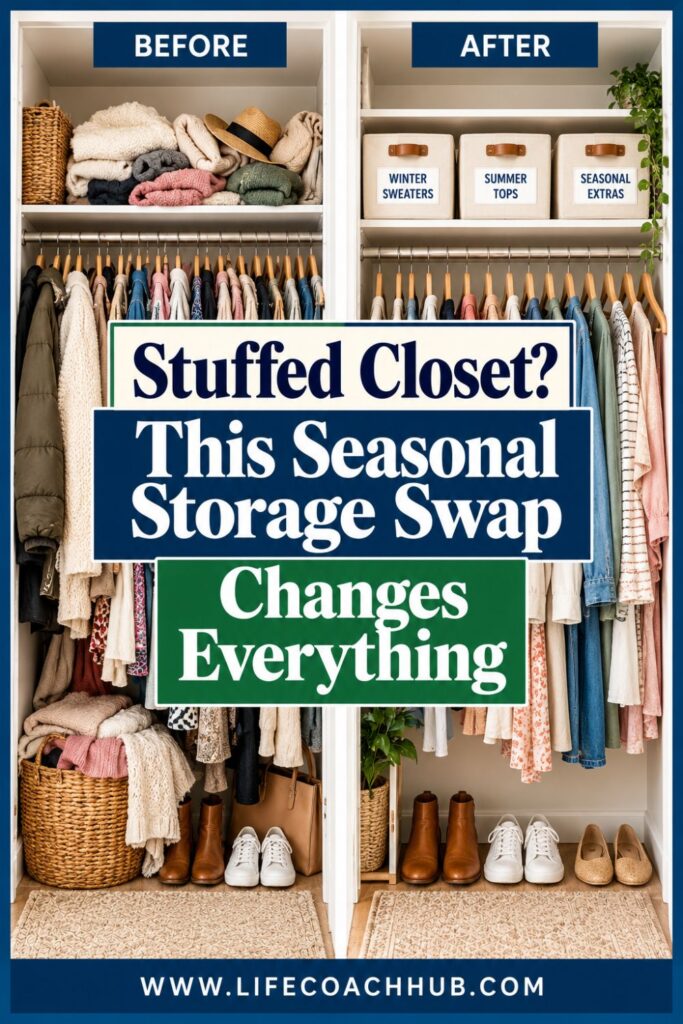
An overhead seasonal storage row offers a more useful division. Off-season clothes live in labeled containers on a sturdy upper closet shelf, while the main rod and lower shelves hold pieces you actually wear now. You don’t have to get rid of your favorite sweaters to find room for your summer tops.
Before you begin, look at your closet with three questions in mind:
- What’s taking up prime space? Notice bulky or rarely needed clothing sitting where your daily essentials should be.
- What upper space is already available? Look for an existing, securely supported top shelf with enough clearance for containers and safe access.
- What would make mornings easier? Picture a closet where the clothes suitable for today’s weather are visible without moving other seasons aside.
The key is to treat the upper row as a defined storage zone, not a place to hide everything that lacks a home. It needs limits, clear labels, and containers you can safely retrieve. Otherwise, the overhead shelf becomes one more cluttered area.
The setup takes some sorting, measuring, and careful arranging, but most of that work happens once. Afterward, you can swap seasonal clothing in and out of the same containers. The result is a closet organized around the life and weather you’re experiencing right now.
If you want to get more from your life, and are looking for concrete action steps to get you there, check out our Request a Coach page. It’s a “cut the fence-sitting and take action” way to tackle your issues and actually find success. To get off the fence and start to take action, click or tap here.
Need some in depth help with organization and productivity ? Drop on by our directories choc full of productivity coaches, minimalist coaches, and work/life balance coaches to get your life organized! Or click here to have us match you to the best.
Step 1: Separate Your Current Wardrobe From Everything That’s Out of Rotation
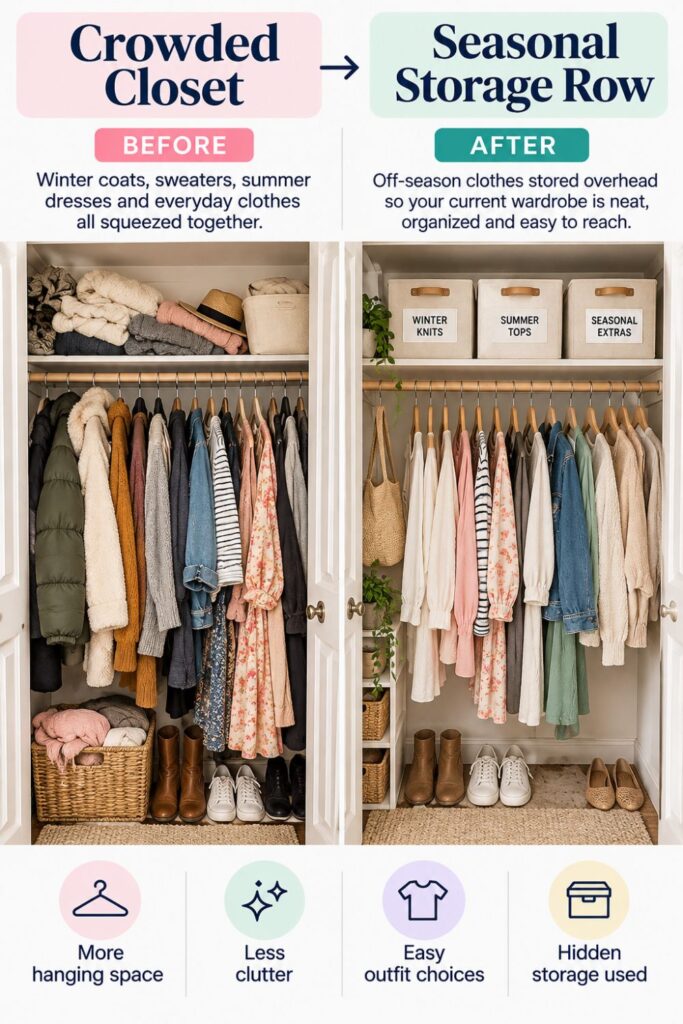
The biggest mistake is buying storage bins before deciding what belongs in them. Start by taking stock of your clothes, because the goal isn’t to move random piles upward. It’s to reserve your most accessible closet space for the wardrobe you’re using this season.
Work one section at a time if your closet is crowded. You might begin with the hanging rod, then tackle folded sweaters, scarves, or clothing tucked into side shelves. Place items on a clean bed or another surface where you can see them clearly.
- Make a wear-now group: Collect clothes you reach for regularly in the current weather, including work outfits, casual favorites, and practical layers. These will return to the main closet.
- Make an off-season group: Set aside pieces that won’t be needed for several months, such as heavy knits during hot weather or lightweight summer dresses during winter.
- Make an occasional-use group: Keep job-interview outfits, formal clothing, or useful layers separate until you decide how quickly you might need to reach them.
- Edit before you store: Check fit, condition, and whether you still want each piece. Repair, donate, or responsibly discard what you won’t realistically wear again.
Don’t automatically pack everything labeled “winter” or “summer.” A cardigan might be useful in an air-conditioned office all year, and a rain jacket may need to stay handy even during a dry season. Your actual routine matters more than the category on the tag.
Once you’ve sorted, arrange the off-season group in loose stacks to estimate how many containers you need. Separate bulky items from delicate pieces and note anything requiring special care. This preview is more reliable than guessing at bin sizes while shopping.
By the end of this step, the distinction should feel simple: everyday clothes stay within easy reach, while genuinely out-of-rotation items earn a place in the upper row. That decision is the foundation of the entire system.
Step 2: Find the Safest Overhead Space Without Crowding Your Closet
An empty-looking area above your clothes isn’t automatically usable storage. Before placing anything overhead, check what actually supports the space. A properly installed top shelf may work well, but an unsupported gap above a hanging rod is not a shelf.
Start with a tape measure and a clear view of the closet. Measure the usable shelf width and depth, along with the distance between the shelf and the ceiling. Note sloped ceilings, door tracks, light fixtures, and anything that could make removing a container awkward.
If you want to get more from your life, and are looking for concrete action steps to get you there, check out our Request a Coach page. It’s a “cut the fence-sitting and take action” way to tackle your issues and actually find success. To get off the fence and start to take action, click or tap here.
- Measure the full storage footprint: Write down width, depth, and height rather than relying on one dimension. Allow a little extra space so bins can slide out without scraping walls.
- Inspect the existing shelf: Look for loose brackets, bowing boards, damaged anchors, or unclear load limits. Follow the manufacturer’s guidance, and have an appropriate professional assess repairs or new installations if needed.
- Preserve hanging clearance: Check that the shelf and containers won’t interfere with closet doors or crowd long garments hanging below. Clothing should hang freely, without being pushed into the shelf.
- Plan how you’ll reach it: Use a stable step stool on level flooring and make sure you can remove each container without leaning, stretching excessively, or lifting a heavy load overhead.
Avoid turning a very high closet into a towering stack of bins. Even if containers technically fit, stacking can make the lower one difficult to retrieve and encourage unsafe reaching. A single accessible row is usually easier to use.
Weight matters as much as measurements. Overhead storage is better suited to lightweight clothing than shoes, books, or dense household supplies. If you don’t know a shelf’s safe load rating, don’t guess based on how solid it looks.
This measurement stage may seem less exciting than organizing colorful containers, but it prevents the most frustrating outcome: buying bins that don’t fit or creating storage that’s too inconvenient to use. A workable row starts with a safe, realistic space.
Step 3: Choose Storage Containers That Fit the Space and Protect Your Clothes
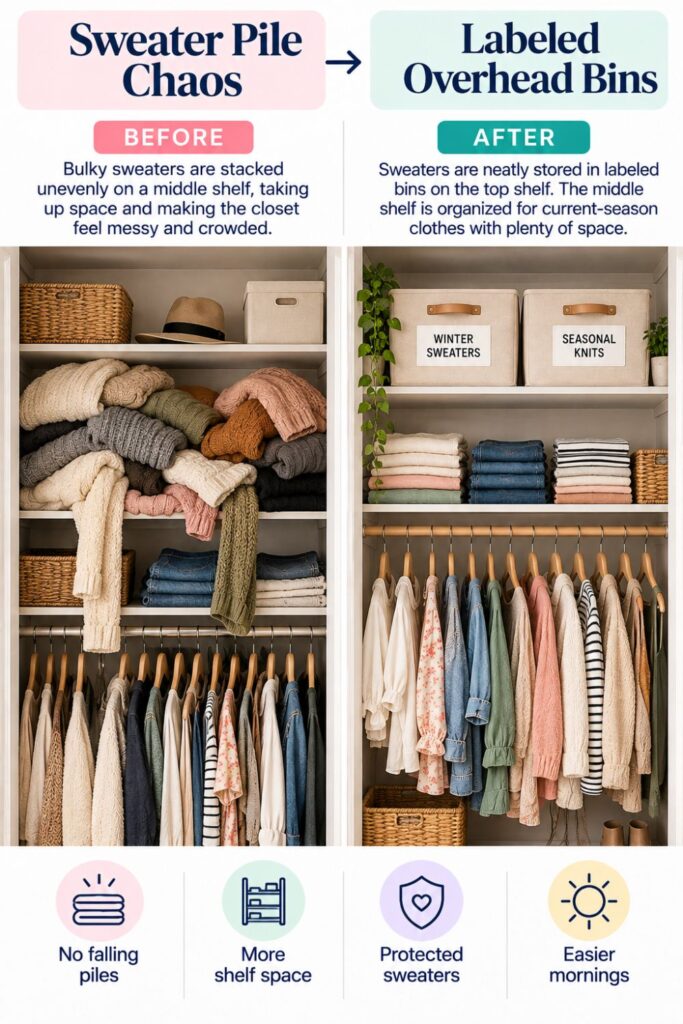
Once you know the shelf dimensions, select containers for that particular location. A matching set may look tidy, but appearance should come after fit, weight, and ease of handling. The best container is one you can lift down safely and open without wrestling with it.
For shallow upper shelves, low-profile bins may make more sense than tall tubs. Lightweight fabric organizers can be useful for some clothing, while structured containers offer firmer sides and clearer boundaries. Think about your home’s moisture, dust, and pest conditions before choosing a material.
- Choose the right dimensions: Compare each bin’s external measurements with the shelf’s usable width, depth, and vertical clearance. Include lids, handles, and any extra room needed for lifting.
- Consider fabric care: Store clothing clean and completely dry. Choose a suitable breathable or protective container based on the garment type and environment, and avoid trapping moisture inside sealed bins.
- Keep loads manageable: Use multiple smaller containers instead of one huge tub full of sweaters. A lighter bin is less intimidating to retrieve and makes seasonal swapping easier.
- Make identification effortless: Look for a clear label area, a secure but easy-to-open closure, and a front edge you can grip without pulling on an unstable stack.
You don’t need to purchase expensive organizers to make this work. If you already own clean, sturdy containers that fit safely, use them. Consistent labels can make mixed containers feel organized without replacing perfectly functional storage.
Test one empty container on the shelf before committing to a full row. Check that it sits completely on the surface, doesn’t hit the ceiling when tilted for removal, and can be lifted down comfortably. Then calculate how many actually fit side by side.
Leave a small amount of breathing room rather than filling every inch. The row should look intentional, but more importantly, each container should remain independently accessible. The goal is dependable seasonal storage, not a perfectly packed shelf that becomes difficult to use.
If you want to get more from your life, and are looking for concrete action steps to get you there, check out our Request a Coach page. It’s a “cut the fence-sitting and take action” way to tackle your issues and actually find success. To get off the fence and start to take action, click or tap here.
Step 4: Pack Off-Season Clothes So They Come Back Ready to Wear
An overhead storage row works only if the clothes inside are worth wearing when the next season arrives. Stuffing unwashed sweaters into a bin can mean opening it months later to discover odors, stains, or damaged fabrics. Take a little extra time now to protect what you’re keeping.
Begin with garment care labels. Different fabrics need different cleaning and storage methods, so avoid treating delicate pieces exactly like ordinary cotton T-shirts. Once clothes are cleaned, wait until they’re fully dry before packing them away.
- Clean before packing: Wash or dry-clean garments as directed, and address visible stains first. Stains left for months can become harder to remove and may attract pests.
- Fold with the fabric in mind: Fold knits and sweaters to help prevent stretching. Use gentle folds for delicate clothing and avoid compressing structured garments that need to keep their shape.
- Group clothes by likely retrieval: Put winter knits together, summer basics together, and seasonal accessories in a separate smaller container when practical. This lets you find one needed item without opening every bin.
- Stop before bins become overstuffed: Leave closures easy to fasten and contents loose enough to avoid unnecessary creasing. Split a full container into two if it becomes difficult to handle safely.
If you use protective bags or liners, make sure they’re appropriate for the garments and the storage environment. Never seal damp clothing in plastic, and be especially careful with materials that need ventilation. For valuable or delicate items, follow fabric-specific care advice rather than relying on a universal packing trick.
As you fill each container, jot down a brief contents list. “Cold-Weather Sweaters, Scarves” is more helpful than “Seasonal.” You can add the list to the front label or keep a simple note on your phone.
Before lifting a bin overhead, check its weight and closure. The contents shouldn’t shift dramatically or spill if the bin tilts slightly during retrieval. Well-packed clothing makes the next seasonal change feel like a quick swap instead of another messy discovery project.
Step 5: Build an Overhead Storage Row That Stays Organized
Now it’s time to turn your prepared containers into a working storage system. The temptation is to squeeze every available bin above the rod, but the strongest layout is usually the one you can understand at a glance and access without moving several other things.
Clear the existing upper shelf and wipe away dust before placing anything back. If the shelf shares space with household supplies, decide which items truly belong there and relocate anything heavy or unrelated. The row should have one clear purpose: holding clothes that are temporarily out of rotation.
- Create one visible row: Place containers side by side, fully supported by the shelf, with their fronts facing outward. Avoid precarious stacks or bins overhanging the front edge.
- Put retrieval first: Keep the lightest, easiest-to-handle containers overhead. If a bin is awkward to lift, reduce its contents or find a lower storage location.
- Label the front of every bin: Use large, readable labels such as “Winter Sweaters” or “Summer Tops.” Add a short contents note if multiple bins belong to the same season.
- Check clearance after loading: Open and close closet doors, confirm hanging garments remain free, and make sure each bin can be removed individually with a stable step stool.
You can arrange the row by season, garment type, or how often you expect to access each container. For example, a transition-weather bin might sit near the most convenient end, while clothing for a distant season can occupy a less prominent spot. The exact order matters less than consistency.
If you want to get more from your life, and are looking for concrete action steps to get you there, check out our Request a Coach page. It’s a “cut the fence-sitting and take action” way to tackle your issues and actually find success. To get off the fence and start to take action, click or tap here.
Stand back and see whether the labels make sense without opening anything. Then test removing a single container, setting it down, and putting it back. If the process feels risky or cumbersome, revise the layout now instead of accepting a difficult routine.
A finished storage row should feel almost boring in the best way. Everything has a named place, nothing needs to balance on another bin, and every container is easy to identify. That’s what keeps the top shelf from becoming a mystery pile again.
Step 6: Reorganize the Main Closet Around What You Actually Wear Now
Moving off-season clothing overhead creates an opportunity, but an empty gap alone doesn’t guarantee an easier morning. The next job is giving the remaining closet space a job. Instead of returning every garment wherever it fits, arrange the main closet around how you get dressed.
Bring back the wear-now group you sorted earlier. Start with the clothes you reach for most often, then place less frequently used current-season items around them. You should be able to find daily basics without moving special-occasion outfits out of the way.
- Claim prime hanging space: Give work outfits, everyday tops, and frequently worn layers the most reachable section of the rod. Keep rarely used pieces at the ends or in another suitable location.
- Build a few useful zones: Group clothes by the way you use them, such as work, casual, activewear, or getting-ready essentials. Avoid creating so many categories that the system becomes hard to remember.
- Rescue the lower shelves and floor: Use the space you’ve freed for shoes or accessories you need now, while keeping walking space and door movement clear. Don’t immediately refill it with miscellaneous storage.
- Test one complete outfit routine: Pretend you’re getting ready for a normal day. Locate clothing, shoes, and any accessories, then adjust zones wherever you still have to search or shift piles.
Some closets work best with clothing type groupings, such as shirts and pants. Others are easier when entire work or weekend outfits stay together. Choose the arrangement that reflects your actual habits, not a showroom photograph.
Notice how much room appears once hangers aren’t squeezed between out-of-season pieces. Clothes may hang more naturally, and you’ll see what you own instead of rediscovering the same shirt every few weeks. Resist the urge to fill every opening simply because it’s available.
Give yourself several mornings to evaluate the new layout. If something you wear every day remains inconvenient, move it closer. The overhead row succeeds when the closet below it works harder for the present season, not merely when the top shelf looks neat.
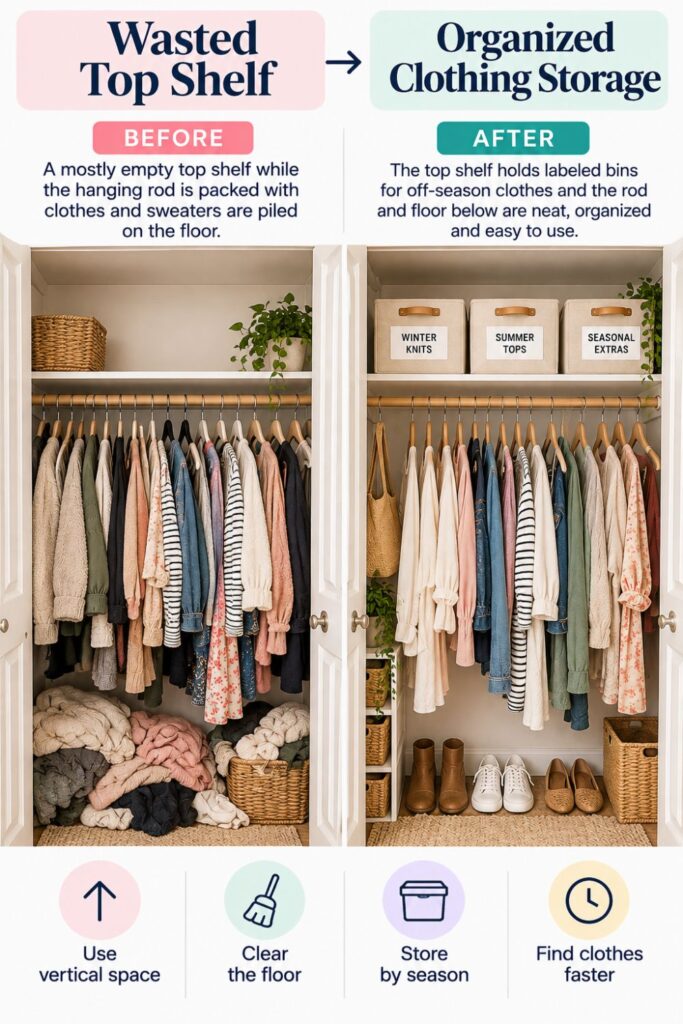
Step 7: Avoid the Overhead Storage Mistakes That Make Closets Messy Again
The first day after organizing often looks fantastic. The real test comes later, when a shopping bag needs a temporary home or a pile of clean laundry seems easier to put on the top shelf. Without clear boundaries, an overhead seasonal row can quickly turn into another catchall.
If you want to get more from your life, and are looking for concrete action steps to get you there, check out our Request a Coach page. It’s a “cut the fence-sitting and take action” way to tackle your issues and actually find success. To get off the fence and start to take action, click or tap here.
Prevent that drift by defining what is allowed in the space. Your labels, container limits, and access rules should do most of the work. You shouldn’t have to make a complicated decision every time something needs to be put away.
- Protect the seasonal-only rule: Keep the row for out-of-rotation clothing, not spare linens, random paperwork, or purchases you haven’t put away. Give unrelated items a different home.
- Avoid the mystery-bin habit: Update labels whenever contents change. If you can’t identify what a container holds without opening it, the labeling system needs attention.
- Watch for container overflow: Treat a full bin as a signal to review its contents, not permission to build a second unsafe stack. Move bulky items to appropriate lower storage if needed.
- Recheck access and stability: Notice damaged containers, loose shelf supports, or bins that have become heavier over time. Correct problems before the next seasonal swap.
A common mistake is storing clothing overhead simply because you don’t know whether to keep it. That turns a seasonal system into long-term decision avoidance. Use a separate, time-limited review box for uncertain items instead of mixing them with clothes you know you’ll wear again.
Another mistake is making the row too decorative to use. Uniform containers are lovely, but a lid that’s hard to open or a box that’s difficult to grip can make the system frustrating. Ease of retrieval should win every time.
Finally, remember that seasonal storage doesn’t create unlimited closet capacity. It creates a clearer division between what you need now and what you need later. Protect that distinction, and the closet stays more functional even as your wardrobe changes.
Create a Seasonal Clothing Swap Routine That Takes Less Effort Each Year
The real benefit of an overhead row becomes clear when the weather changes again. Rather than starting from scratch, you already know where the stored clothing lives and where the current wardrobe should go. A short, repeatable swap keeps the system useful throughout the year.
Choose review points that make sense for your climate. In places with distinct warm and cold seasons, spring and fall may be enough. Where weather changes more gradually, a transition-season check may be more practical than a rigid twice-yearly schedule.
- Put a review on your calendar: Choose a realistic weekend or afternoon before you usually change what you wear. Treat the date as a reminder to assess the weather and your routine, not as an absolute deadline.
- Retrieve one container at a time: Set the bin on a stable surface, unpack its contents, and check for fit, condition, and whether each item still suits your life.
- Refill with the departing season: Launder and fully dry the clothes you’re putting away, then pack them by category using the same guidelines as the first setup.
- Refresh labels and the inventory: Update descriptions when categories move or your wardrobe changes. Return only manageable, properly closed containers to the upper row.
During the swap, look for items you never wore. Some may deserve another season, especially clothing kept for occasional situations. Others may no longer fit your preferences or needs. A quick decision now prevents forgotten pieces from circulating between closet and storage forever.
Keep a simple checklist somewhere accessible: retrieve, review, clean, fold, label, replace. If the process feels too long, reduce the number of bins or simplify your categories. A maintenance routine should be easier than the original setup.
If you want to get more from your life, and are looking for concrete action steps to get you there, check out our Request a Coach page. It’s a “cut the fence-sitting and take action” way to tackle your issues and actually find success. To get off the fence and start to take action, click or tap here.
You don’t need a perfect calendar or a complete closet makeover each year. You need a repeatable moment to bring the next season forward and move the previous one out of the way. That’s how a one-time organizing project turns into a lasting habit.
How an Organizing Coach Can Help You Make Better Wardrobe Decisions
Sometimes the hardest part of closet organization isn’t measuring a shelf or folding sweaters. It’s deciding what belongs in daily reach, what deserves storage, and what you no longer need. If every item feels equally important, even a beautifully arranged storage row can become overcrowded.
An organizing coach or professional organizer can provide structure for those decisions. The support might be hands-on help setting up a space, guided questions about daily habits, or accountability for finishing a project that has been postponed. Different professionals offer different services, so choose someone whose approach matches your needs.
- Identify what keeps the closet crowded: Review your routine and pinpoint why clothing from several seasons stays mixed together. Maybe you’re worried about needing an item unexpectedly, or maybe you haven’t defined a useful storage boundary.
- Clarify your current wardrobe needs: Talk through work, family life, climate, and the activities you actually dress for. Use that information to decide which garments need easy access.
- Break the project into doable tasks: Set a goal such as sorting one category today, measuring the top shelf tomorrow, and packing the first bin on the weekend. Small milestones make a medium-effort project less overwhelming.
- Build a realistic maintenance plan: Agree on a seasonal review date, simple labeling rules, and a way to check whether the closet is easier to use after the change.
A coach shouldn’t decide which sentimental or expensive items you’re allowed to keep. The goal is to help you make choices that reflect your priorities, not someone else’s idea of the perfect wardrobe. A professional organizer can also advise on practical layouts, while shelving repairs or structural questions belong with qualified installers.
You can borrow the same process even without hiring anyone. Ask yourself, “What do I need accessible this month?” and “What can wait safely until the weather changes?” Then choose one concrete step instead of attempting the entire closet at once.
When your decisions become clearer, the storage system becomes simpler. The top row no longer holds unresolved questions. It holds clothing you’ve intentionally chosen to use again later.
Make Your Closet Work for the Season You’re Living In
A useful closet doesn’t need to display every item you own all year. It needs to help you find what fits today’s weather, your schedule, and the activities you’re preparing for. When off-season pieces occupy the same prime space as daily essentials, even a large closet can feel unnecessarily crowded.
An overhead seasonal storage row creates a clear boundary. Clothes you’re not currently wearing move into properly labeled containers on a suitable, safely supported upper shelf. The main closet becomes a more focused home for clothing that belongs to your present routine.
If you want to get more from your life, and are looking for concrete action steps to get you there, check out our Request a Coach page. It’s a “cut the fence-sitting and take action” way to tackle your issues and actually find success. To get off the fence and start to take action, click or tap here.
You don’t need to tackle the entire project in one afternoon. Begin with the smallest meaningful change, then build on it:
- Choose one seasonal category: Start with sweaters, summer tops, or another group that’s clearly out of rotation. Sorting a single category shows you how much space you might reclaim.
- Measure before moving anything overhead: Confirm that your existing upper shelf can safely hold appropriately sized, lightweight containers. If the shelf isn’t suitable, choose a safer storage location rather than forcing the plan.
- Set up one clearly labeled container: Clean and fold its contents, test how easily you can retrieve it, and place it where it belongs. Expand only when the first bin works well.
- Give the cleared space a specific purpose: Use it for current-season outfits, everyday layers, or accessories you regularly reach for, instead of letting another pile take its place.
Remember that the goal isn’t maximum storage density. It’s reducing the number of decisions and obstacles between you and getting dressed. A little visible space between hangers can be more useful than one extra overfilled bin.
As seasons change, the system can change with them. Bring the next set of clothes down, review what still works, and return clean off-season pieces to the same labeled row. There’s no need to redesign the closet every time the temperature shifts.
Start with the clothes you know you won’t wear for a while. Give them a safe, defined home overhead, and let the rest of your closet serve the season you’re actually living in.
*****
Are you all about style, decor and organization? Download a copy of our Clutter Reset Guide.
Need some in depth help with organization and productivity ? Drop on by our directories choc full of productivity coaches, minimalist coaches, and work/life balance coaches to get your life organized! Or click here to have us match you to the best.
If you want to get more from your life, and are looking for concrete action steps to get you there, check out our Request a Coach page. It’s a “cut the fence-sitting and take action” way to tackle your issues and actually find success. To get off the fence and start to take action, click or tap here.
Read this next

8 Small Closet Fixes That Instantly Create More Space
Tiny closet? These simple layout fixes help you find extra room, clear clutter, and make your closet feel bigger fast.
Read More
How to Decorate for Christmas Based on Your Aesthetic: The Luxury Lover, Modern Minimalist, Vintage Soul & Boho Dreamer
Are you all about style, decor and organization? Download a copy of our Decluttering Workbook. **** Your Christmas decor says more about you than any trend ever could. It’s not […]
Read More
Why Your Vision Board Aesthetic Matters More Than You Think
A vision board that looks good but fades fast needs this simple aesthetic fix. See why calm design keeps your goals impossible to ignore.
Read More