


Talk to a coach about Organizational coaching

Crystal Faulk
ACC
I help overwhelmed women in transition gain clarity, confidence, and...

Terrie Hein
Certified Life Coach, Certified Insight Coach Practitioner
Coaching to declutter your life, organize your goals, and cook...

Dr Charlene Ashley
Doctorate - Behaviours
I coach individuals to design fulfilling lives through structure, clarity,...

Paloma Chiara

Lana's Gymnastics Club
"Where the best in gymnastics meets fun. Where every child is a star"
lgclubny.com

Anna Sosnina
ICF (ACC)
ICF ACC certified coach, founder of EssorVie Coaching, passionate about...

Tyler Fink
B.A. in Religion, Anthropology, and Philosophy. Master of Divinity (M.Div.) in Missiology
Pastor, husband, and father helping Christian men pursue faithful growth...

Travis Brown
Professional Life coach
With experience in guiding clients to achieve goals, build confidence,...
Label-Ready Linen Bin System for Top Closet Shelves
Are you all about style, decor and organization? Download a copy of our Clutter Reset Guide.
*****
Why Matching Bins Can Still Turn Into a Closet Black Hole
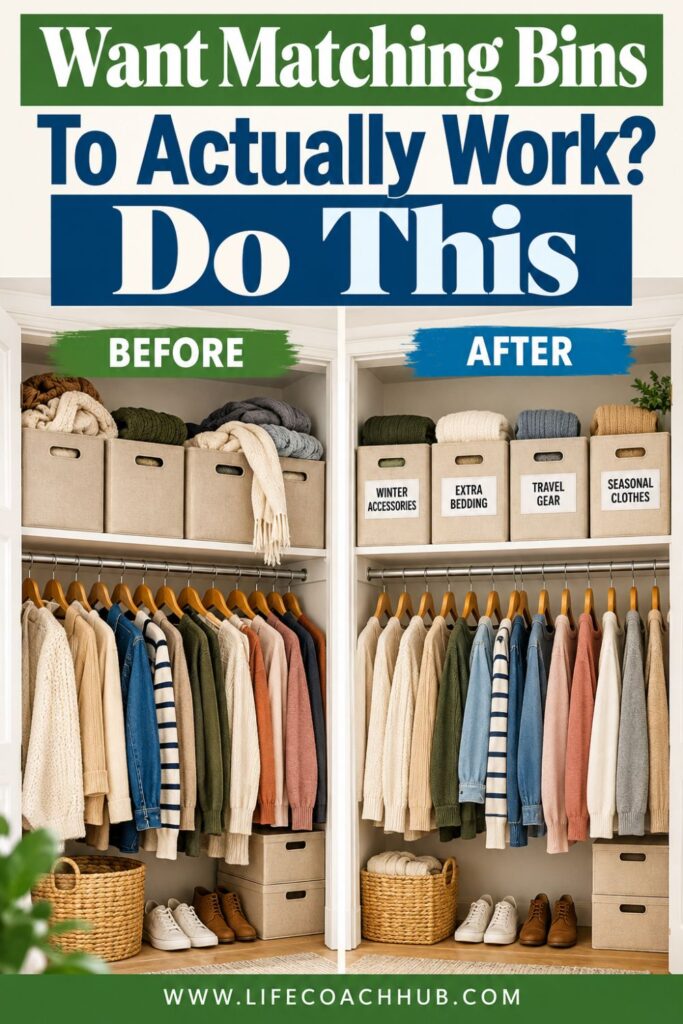
Matching linen bins can make the top shelf of a closet look instantly calmer. Instead of seeing stacks of sweaters, loose handbags, spare bedding, and seasonal accessories, you see one neat row of coordinated containers.
The problem starts when you actually need something.
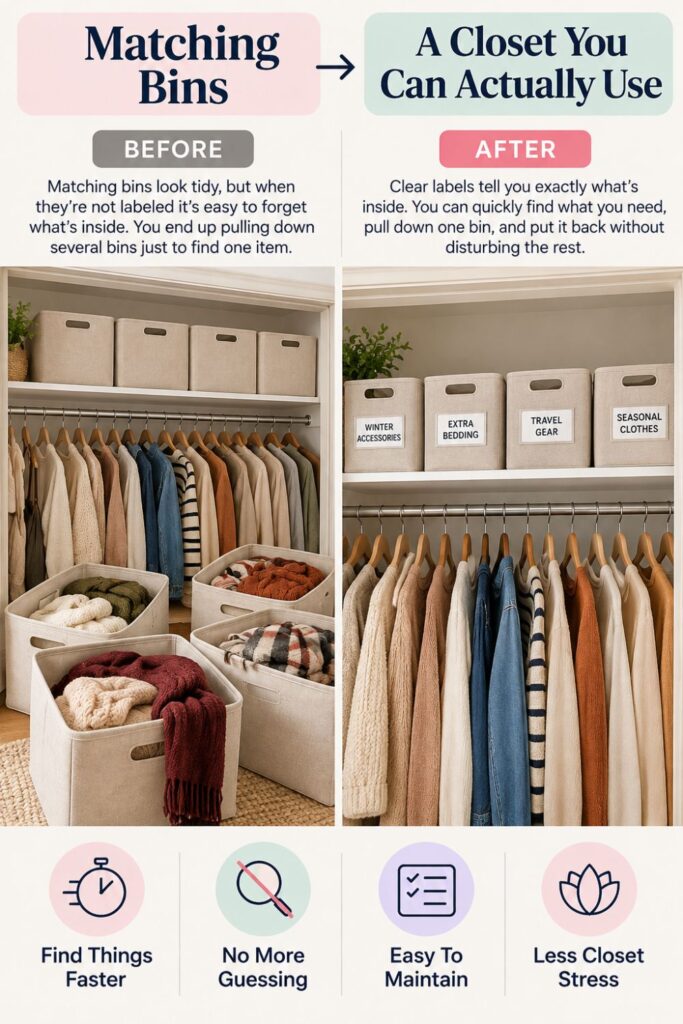
When every bin looks exactly the same, it is easy to forget whether your winter scarves are in the second bin or the fourth. Before long, you are pulling down several containers just to find one item.
A good top-shelf storage system has to do more than hide clutter. It needs to tell you where things are, make them easy to retrieve, and make putting them away just as simple.
That means the real system has four parts:
- Matching containers that fit the shelf properly
- Clear categories that make sense
- Labels you can read without guessing
- A permanent location for each bin
Think of the shelf as a system: Instead of asking how many pretty bins you can fit across the top, decide what needs to live there and how you will find it again later.
If you want to get more from your life, and are looking for concrete action steps to get you there, check out our Request a Coach page. It’s a “cut the fence-sitting and take action” way to tackle your issues and actually find success. To get off the fence and start to take action, click or tap here.
Make identification part of the setup: Matching bins remove visual clutter, but they also remove visual clues. Labels restore those clues without making the closet look busy.
Create rules once: Decide where categories live, what belongs inside each bin, and how full a bin is allowed to become. Those decisions should not have to be made every time you put something away.
The goal is not to create a closet that photographs beautifully for one afternoon. It is to create a top shelf that keeps working when you are rushing to get dressed, changing seasons, or putting laundry away.
Once the system is properly set up, the shelf should almost manage itself. You should be able to look up, identify the right bin, pull it down, find what you need, and put it back without disturbing everything around it.
That is what turns matching linen bins from simple storage into a genuinely useful closet system.
Need some in depth help with organization and productivity ? Drop on by our directories choc full of productivity coaches, minimalist coaches, and work/life balance coaches to get your life organized! Or click here to have us match you to the best.
1. Measure the Top Shelf Before You Buy a Single Bin
One of the easiest ways to waste closet space is to buy storage containers first and measure afterward.
A linen bin might look compact online or on a store shelf, but even a difference of two or three inches can determine whether you fit three bins or five. The dimensions also affect whether you can comfortably pull the containers down.
If you want to get more from your life, and are looking for concrete action steps to get you there, check out our Request a Coach page. It’s a “cut the fence-sitting and take action” way to tackle your issues and actually find success. To get off the fence and start to take action, click or tap here.
Start by measuring the actual usable storage area rather than the shelf board alone.
Measure the usable width: Record the distance from one side of the available shelf space to the other. Account for vertical dividers, closet walls, door frames, or anything else that interrupts the shelf.
Measure the usable depth: A bin should sit fully supported on the shelf. Avoid choosing containers that hang noticeably over the front edge.
Measure the usable height: Check the distance from the shelf to the ceiling or shelf above it. Remember that you need enough clearance to lift the front of the bin slightly when removing it.
Write down all three measurements before shopping.
Then decide how many bins you realistically want across the shelf.
For example, if your shelf is 60 inches wide, five 12-inch bins technically fill the space perfectly. In practice, that arrangement may be frustrating because the containers will be pressed tightly against one another.
Leaving a little breathing room makes the system easier to use.
If you want to get more from your life, and are looking for concrete action steps to get you there, check out our Request a Coach page. It’s a “cut the fence-sitting and take action” way to tackle your issues and actually find success. To get off the fence and start to take action, click or tap here.
Consider:
- Space for your fingers beside each bin
- Clearance around handles
- Room to slide a bin forward
- Any trim or hardware near the shelf
- Whether closet doors partially block the edges
Test your reach: Stand where you normally access the closet and imagine pulling down a fully loaded bin. A container that is too deep, tall, or heavy can turn a clever storage idea into an annoying one.
Do not automatically choose the largest container that fits. A slightly smaller bin that is easy to handle will usually work better over time.
Your measurements create the boundaries for the whole system. Once you know exactly what fits, every other decision becomes easier.
2. Decide What Actually Belongs on the Upper Shelf
The highest shelf in a closet is valuable storage space, but it is not the best location for everything.
Upper shelves work best for items that are bulky enough to take up useful space elsewhere but not so heavy that retrieving them becomes difficult. They are also better suited to things you do not need every single day.
Start by looking at what currently occupies your closet.
Choose good top-shelf categories: Think about soft, lightweight, or occasional-use items that can be grouped easily.
If you want to get more from your life, and are looking for concrete action steps to get you there, check out our Request a Coach page. It’s a “cut the fence-sitting and take action” way to tackle your issues and actually find success. To get off the fence and start to take action, click or tap here.
Good possibilities include:
- Off-season sweaters
- Scarves and winter accessories
- Swimsuits or summer accessories
- Spare bedding
- Handbags used occasionally
- Special occasion accessories
- Travel items
- Seasonal clothing
Move frequently used items lower: If you reach for something several times a week, storing it above your head may create unnecessary friction. Everyday jeans, work clothes, frequently worn bags, and daily accessories usually deserve easier access.
Avoid heavy containers: A large bin of shoes, books, or dense household supplies may technically fit on the shelf, but lifting it down repeatedly can be awkward.
Top-shelf storage should feel manageable.
This is also a good time to notice whether you are using bins to avoid making decisions.
A matching container can make unwanted belongings disappear visually without solving the underlying clutter problem. If you have not worn or used something in years, giving it a beautiful linen bin does not automatically make it worth storing.
Edit before assigning categories: Pull out obvious donations, damaged items, duplicates, and things that no longer fit your life before designing the system around them.
That step matters because your categories should reflect what you genuinely want to store, not everything that happened to accumulate.
If you want to get more from your life, and are looking for concrete action steps to get you there, check out our Request a Coach page. It’s a “cut the fence-sitting and take action” way to tackle your issues and actually find success. To get off the fence and start to take action, click or tap here.
Once you know what belongs up high, you can start grouping those belongings into sensible categories.
The goal is simple: every item placed on the top shelf should have a reason for being there and a clear container waiting for it.
3. Choose Linen Bins That Are Truly Label-Ready
Not every linen bin works equally well on a high closet shelf.
A beautiful basket can still be frustrating if it collapses when half empty, has no handle, or gives you nowhere to attach a readable label.
Look beyond color and fabric when choosing your containers.
Choose a consistent shape: Bins with similar height, width, and depth create a cleaner visual line across the shelf. They also make it easier to plan your layout.
Look for structured sides: Soft fabric cubes sometimes bow outward or collapse inward. For a top-shelf system, slightly reinforced sides usually work better because the front stays upright and the label remains visible.
Prioritize front handles: A sturdy handle gives you something predictable to grab when the bin is above eye level. You should not have to squeeze both sides of a container just to pull it forward.
If you want to get more from your life, and are looking for concrete action steps to get you there, check out our Request a Coach page. It’s a “cut the fence-sitting and take action” way to tackle your issues and actually find success. To get off the fence and start to take action, click or tap here.
Check the bottom: A reinforced base helps prevent the bin from sagging when filled with folded clothing, accessories, or bedding.
Then think about whether you want open or closed storage.
Open bins make sense when you rotate items regularly and want quick access. Lidded bins may be useful for seasonal items or belongings that sit untouched for several months.
Whatever you choose, keep the overall system visually consistent.
The most important feature is a clear place for the label.
Good options include:
- Built-in label windows
- Clip-on label holders
- Small hanging tags
- Removable adhesive labels
- Card inserts attached near the handle
Plan the label before purchasing: Look at the bin from the angle you will see it in your closet. Ask whether a label attached to the front will actually be visible from below.
A tiny tag hanging near the top edge may look charming at eye level but become unreadable once the container is seven feet off the floor.
If you want to get more from your life, and are looking for concrete action steps to get you there, check out our Request a Coach page. It’s a “cut the fence-sitting and take action” way to tackle your issues and actually find success. To get off the fence and start to take action, click or tap here.
Your storage bins do not have to be expensive. They simply need to fit the shelf, hold their shape, be comfortable to retrieve, and make labeling easy.
Those practical details are what allow the matching look to stay useful.
4. Build Categories That Are Specific Enough to Be Useful
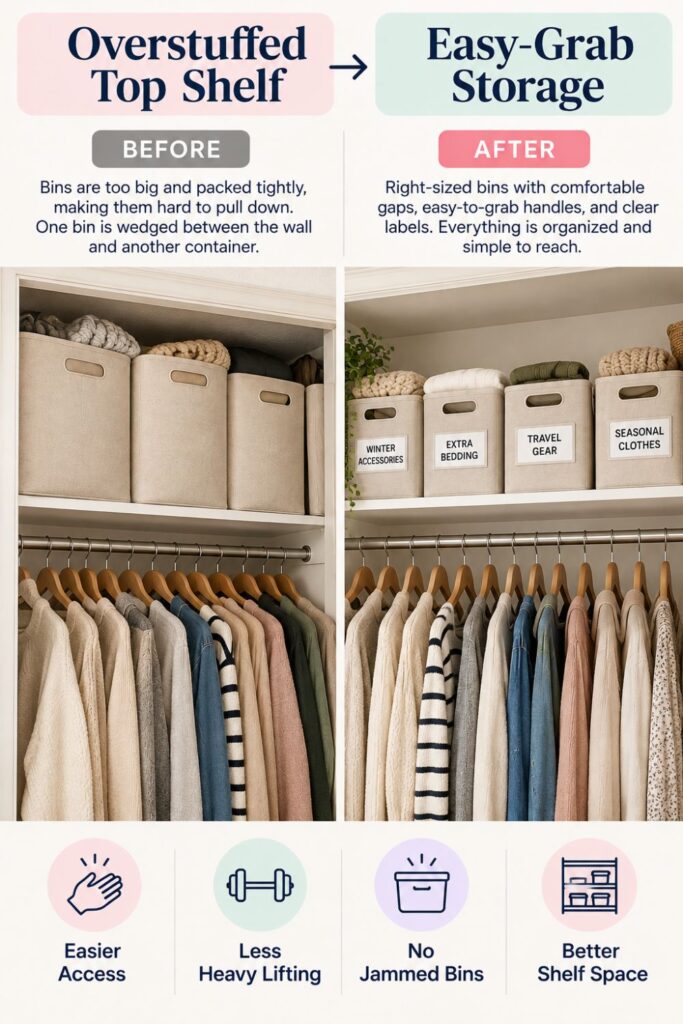
Once your bins are chosen, resist the temptation to start filling them immediately.
The categories you create will determine whether the system remains easy to use six months from now.
A label such as “Miscellaneous” may feel convenient during setup, but it tells you almost nothing when you are trying to find a particular item later.
Give each bin one clear purpose: Choose categories that instantly tell you what should go inside.
Instead of vague labels, use names such as:
- Winter Accessories
- Guest Bedding
- Special Occasion Bags
- Summer Accessories
- Travel Gear
- Off-Season Sweaters
- Formal Accessories
The right category should answer two questions immediately: “Where should I look for this?” and “Where should I put this back?”
If you want to get more from your life, and are looking for concrete action steps to get you there, check out our Request a Coach page. It’s a “cut the fence-sitting and take action” way to tackle your issues and actually find success. To get off the fence and start to take action, click or tap here.
Match the category to the available space: If one category clearly contains too much for a single bin, do not force it.
For example, instead of creating one overflowing “Sweaters” bin, divide the category into something more useful:
- Heavy Sweaters
- Lightweight Sweaters
The same rule applies to handbags, bedding, travel supplies, and seasonal accessories.
Avoid mixing unrelated categories: An empty corner inside a bin can make it tempting to add random items. That is how systems slowly fall apart.
If a bin is labeled “Guest Bedding,” keep it for guest bedding even when there is space left inside.
Empty space is not a problem. Confusing categories are.
Create an overflow rule: Decide what happens when a category no longer fits.
You might:
If you want to get more from your life, and are looking for concrete action steps to get you there, check out our Request a Coach page. It’s a “cut the fence-sitting and take action” way to tackle your issues and actually find success. To get off the fence and start to take action, click or tap here.
- Edit the category and remove unused items
- Create a second clearly labeled bin
- Move rarely used items elsewhere
- Reassign the category to a larger container
Making that decision now prevents the default solution of stuffing items wherever there is room.
A strong category system creates invisible boundaries inside the closet. Those boundaries make both finding and returning belongings easier.
Once the category names feel obvious, you are ready to make those decisions visible through labels.
5. Create Labels You Can Understand in One Glance
Labels are what make identical bins practical.
Without them, matching storage can quickly turn into a memory test. With them, you should be able to look at the shelf and know exactly which container to pull down.
The best labels are simple.
Use plain language: Label bins according to what you naturally call the items inside them.
If you always think “winter scarves,” use that phrase rather than something more decorative such as “Cold Weather Essentials.”
If you want to get more from your life, and are looking for concrete action steps to get you there, check out our Request a Coach page. It’s a “cut the fence-sitting and take action” way to tackle your issues and actually find success. To get off the fence and start to take action, click or tap here.
Your labels are instructions, not decor.
Keep the wording short: Long descriptions become harder to read from a distance. One to three words will usually be enough.
For example:
- Winter Accessories
- Guest Bedding
- Summer Bags
- Travel Gear
- Extra Sweaters
Use consistent wording: If one label describes an item type, the others should generally follow the same style.
A shelf labeled “Winter,” “Bags I Rarely Use,” “Extra Stuff,” and “Bedding” feels less intuitive than a shelf where every category follows a predictable naming pattern.
Make the text readable from below: The label should be large enough to read while you are standing in front of the closet.
Choose high contrast between the lettering and the label background. Decorative script may look attractive up close, but simple lettering is usually easier to read from several feet away.
Use removable labels when possible: Closet needs change.
If you want to get more from your life, and are looking for concrete action steps to get you there, check out our Request a Coach page. It’s a “cut the fence-sitting and take action” way to tackle your issues and actually find success. To get off the fence and start to take action, click or tap here.
A bin that holds winter scarves today might eventually become storage for travel accessories or handbags. Replaceable cards, clips, and removable labels let the system evolve without requiring new containers.
Place every label in approximately the same position.
That visual consistency makes the whole shelf easier to scan because your eyes know exactly where to look.
Most importantly, label the front rather than relying on a label attached to the lid.
If you can identify every bin without touching it, the labeling system is doing its job.
6. Pack Each Bin So It Stays Easy to Retrieve
A clear label solves only half the problem.
You can pull down the correct container in seconds and still spend several minutes digging through it if everything inside has been packed randomly.
Treat the inside of each bin as a small storage zone.
If you want to get more from your life, and are looking for concrete action steps to get you there, check out our Request a Coach page. It’s a “cut the fence-sitting and take action” way to tackle your issues and actually find success. To get off the fence and start to take action, click or tap here.
Group similar items together: If a bin contains winter accessories, keep scarves together, gloves together, and hats together rather than mixing everything into one pile.
You do not necessarily need smaller containers inside every linen bin. Simple folding, stacking, or grouping may be enough.
Put frequently used items near the top: If there are pieces within a category that you use more often, keep them easiest to reach.
For example, your favorite travel pouch should not sit underneath six rarely used bags just because it happened to be packed first.
Avoid filling the container completely: A bin that looks perfectly packed on setup day can become difficult to maintain.
Leave enough space to remove one item and return it later without having to repack everything around it.
Think of the empty space as working room.
Watch the weight: Linen bins can hold more than you may want to lift above shoulder height.
If you want to get more from your life, and are looking for concrete action steps to get you there, check out our Request a Coach page. It’s a “cut the fence-sitting and take action” way to tackle your issues and actually find success. To get off the fence and start to take action, click or tap here.
Stop adding items before the container becomes awkward. If the category is too heavy, split it or move part of it lower in the closet.
A quick test can help.
Pull the packed bin down using only the handle and the movement you would normally use. Then put it back.
Ask yourself:
- Does the bin bend or sag?
- Can I control the weight comfortably?
- Can I find one item without emptying the container?
- Can I return that item easily?
- Does the bin still hold its shape?
If not, adjust the contents before placing the system into regular use.
The goal is not maximum compression. It is usable storage.
A slightly less full bin that you can manage easily will serve you better than an overstuffed one that you avoid opening.
7. Give Every Bin a Permanent Place on the Shelf
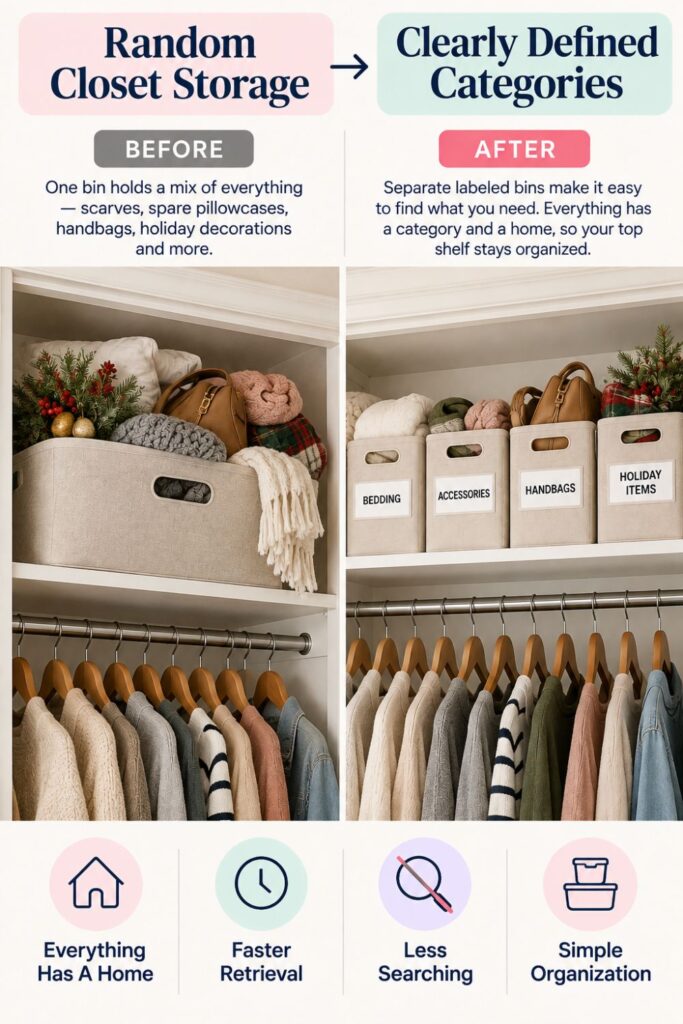
Once every bin has a category and label, decide exactly where it belongs.
If you want to get more from your life, and are looking for concrete action steps to get you there, check out our Request a Coach page. It’s a “cut the fence-sitting and take action” way to tackle your issues and actually find success. To get off the fence and start to take action, click or tap here.
This step may seem unnecessary because the labels already tell you what is inside. However, permanent locations make the system even faster because you begin to remember where categories live without needing to read every label.
Think of it as a simple shelf map.
Choose a left-to-right order: Arrange your categories according to a rule that makes sense to you.
You might organize by:
- Frequency of use
- Season
- Clothing type
- Personal preference
- Who uses the items
- How easy each area is to reach
For example, if the center of the shelf is easiest to access, place frequently retrieved bins there. Less-used seasonal storage can occupy the far left and right sides.
Keep each bin in the same position: If “Travel Gear” belongs third from the left, return it there every time.
Eventually, you may reach for the correct container almost automatically.
Consider accessibility: Closet doors, walls, and hanging clothes can make some positions harder to reach than others.
If you want to get more from your life, and are looking for concrete action steps to get you there, check out our Request a Coach page. It’s a “cut the fence-sitting and take action” way to tackle your issues and actually find success. To get off the fence and start to take action, click or tap here.
Do not put your most frequently used category in a corner that requires shifting clothing every time.
Leave a little breathing room: A top shelf does not need to be packed wall to wall.
Even one or two inches between groups of containers can make them easier to grasp and prevent the entire shelf from looking overcrowded.
If you have extra space, resist filling it simply because it exists.
You might deliberately leave one small open area for temporary storage during a seasonal swap or laundry reset.
The shelf map should feel obvious enough that another person could understand it.
Matching bins provide the visual calm. Labels provide information. Permanent positions add another layer of predictability.
Together, those three elements reduce the amount of thinking required every time you use the closet.
If you want to get more from your life, and are looking for concrete action steps to get you there, check out our Request a Coach page. It’s a “cut the fence-sitting and take action” way to tackle your issues and actually find success. To get off the fence and start to take action, click or tap here.
8. Run the 10-Second Retrieval Test
A closet system is not finished when it looks neat.
It is finished when you can use it quickly.
The easiest way to test your new top-shelf setup is to pretend you are looking for something on a busy morning.
Choose an item stored inside one of the bins and start a simple mental countdown.
Identify the correct bin: You should be able to scan the labels and know where to look almost immediately.
If you have to stop and wonder whether something belongs in “Seasonal” or “Accessories,” the categories may still be too vague.
Pull down one container: The correct bin should come down without removing the containers beside it.
If you constantly need to move another bin first, the layout needs more space or a different arrangement.
If you want to get more from your life, and are looking for concrete action steps to get you there, check out our Request a Coach page. It’s a “cut the fence-sitting and take action” way to tackle your issues and actually find success. To get off the fence and start to take action, click or tap here.
Find the item quickly: Once the bin is open, you should not have to dig through unrelated things.
If finding one scarf means removing handbags, extra bedding, and travel pouches, the category has become too broad.
Put everything back: This is the most important part of the test.
A system that makes retrieval easy but returning difficult will gradually fall apart.
Ask yourself whether you can put the item back in its category, return the bin to its permanent spot, and walk away without rearranging anything else.
Look for friction points such as:
- Labels that are difficult to read
- Categories that overlap
- Containers that are too heavy
- Overfilled bins
- Awkward shelf positions
- Items that do not have an obvious home
Fix those problems while the system is still new.
It is much easier to rename one label or switch two bins now than to live with an annoying setup for months.
If you want to get more from your life, and are looking for concrete action steps to get you there, check out our Request a Coach page. It’s a “cut the fence-sitting and take action” way to tackle your issues and actually find success. To get off the fence and start to take action, click or tap here.
The 10-second idea is not about racing yourself. It is simply a useful standard.
Your closet should give you answers quickly.
When you can identify, retrieve, and return an item without disturbing the rest of the shelf, the system is doing what it was designed to do.
9. Make Seasonal Swaps Without Starting Over
Seasonal closet changes often lead to unnecessary reorganizing.
Summer ends, sweaters come forward, sandals disappear, and suddenly the entire storage system gets rebuilt from scratch.
A label-ready bin system can prevent that.
Instead of changing the physical layout every season, keep your main shelf structure stable and rotate what lives inside designated containers.
Create seasonal categories: Decide which bins are intended to change throughout the year.
If you want to get more from your life, and are looking for concrete action steps to get you there, check out our Request a Coach page. It’s a “cut the fence-sitting and take action” way to tackle your issues and actually find success. To get off the fence and start to take action, click or tap here.
For example, one bin might alternate between:
- Winter Accessories
- Summer Accessories
Another could rotate between:
- Heavy Sweaters
- Summer Cover-Ups
The container stays in the same place. Only its contents and label change.
Use replaceable labels: This is where removable cards or label holders become especially useful.
Swap the wording when the category changes rather than peeling off permanent labels or buying new storage.
Rotate instead of adding: Seasonal transitions should not automatically mean more bins.
If winter accessories are coming into active use, consider moving the warm-weather category out of prime storage rather than squeezing another container onto the shelf.
Use the swap as an editing point: Before packing a seasonal category away, quickly review what is inside.
If you want to get more from your life, and are looking for concrete action steps to get you there, check out our Request a Coach page. It’s a “cut the fence-sitting and take action” way to tackle your issues and actually find success. To get off the fence and start to take action, click or tap here.
Ask:
- Did I use this during the season?
- Does it still fit?
- Is it still in good condition?
- Would I be excited to use it next year?
- Is it taking up space because I forgot about it?
This small review prevents storage bins from becoming long-term holding zones for things you no longer need.
Try to keep the shelf map itself as stable as possible.
The more parts of the system remain unchanged, the easier the closet is to maintain.
A good seasonal swap should feel more like changing the contents of a drawer than redesigning the entire closet.
When the bins, positions, and basic rules stay consistent, the system continues working even as your wardrobe changes throughout the year.
10. How an Organizational Coach Can Help When the System Keeps Breaking
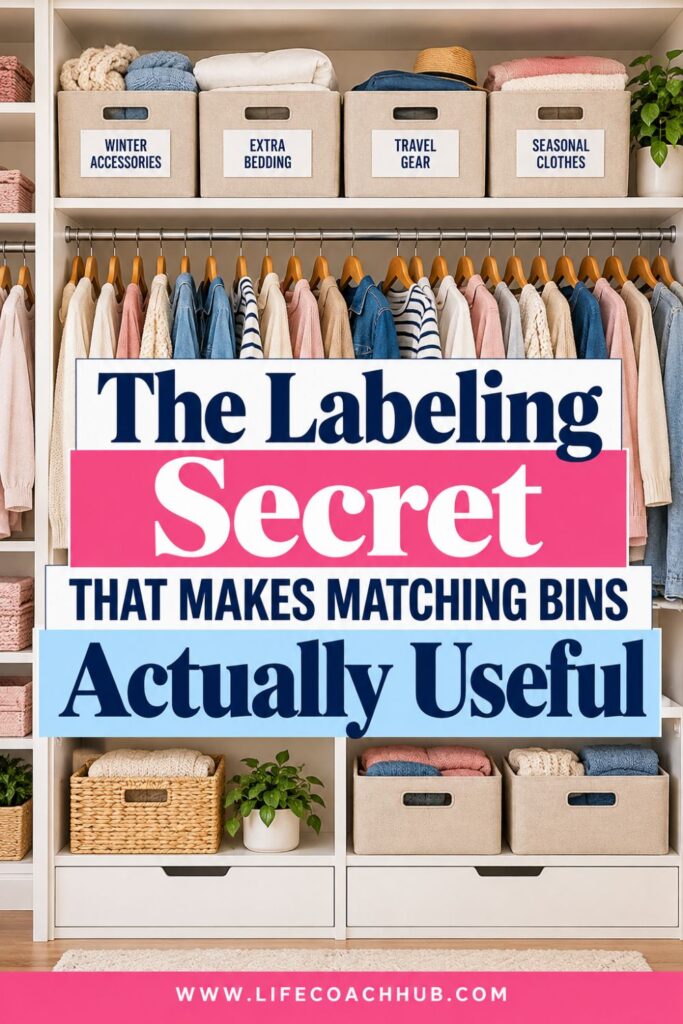
Sometimes the problem is not knowing how to organize a shelf.
You may understand bins, labels, categories, and closet zones perfectly well and still find yourself returning to the same clutter patterns.
If you want to get more from your life, and are looking for concrete action steps to get you there, check out our Request a Coach page. It’s a “cut the fence-sitting and take action” way to tackle your issues and actually find success. To get off the fence and start to take action, click or tap here.
That is where an organizational coach can be useful.
Rather than simply telling you where to put your belongings, a coach can help uncover the decisions and habits that make the system difficult to maintain.
Identify the actual friction: The visible problem might be an overflowing top shelf, but the underlying issue could be something different.
For example:
- You have too many belongings for the available space
- Categories are too complicated
- You postpone putting things away
- You struggle to decide what to keep
- Your current system does not match how you naturally use the closet
Create rules that reduce decisions: A coach can help you turn vague intentions into clear personal rules.
Those might include:
- One bin per category
- No unlabeled storage
- Daily-use items stay below eye level
- Seasonal items live on the upper shelf
- Full bins must be edited before another bin is added
The point is not to create more restrictions. It is to remove repeated decision-making.
Design around real behavior: An organizational system should work with the way you actually live.
If you want to get more from your life, and are looking for concrete action steps to get you there, check out our Request a Coach page. It’s a “cut the fence-sitting and take action” way to tackle your issues and actually find success. To get off the fence and start to take action, click or tap here.
If you consistently leave certain accessories out because the assigned storage is too difficult to access, the answer may not be greater discipline. The storage location itself may need to change.
Choose a reset trigger: A coach can also help you decide when the system gets reviewed.
A seasonal wardrobe change, the first weekend of each quarter, or another predictable event can become the natural moment to check labels, edit categories, and remove overflow.
Coaching is especially useful when you repeatedly create attractive systems that disappear within a few weeks.
Instead of focusing only on what the closet looks like, you can build rules that make staying organized easier.
A Top Shelf That Looks Calm and Works Hard
A beautifully organized top shelf does not need dozens of products or a custom closet renovation.
The biggest improvement usually comes from making a handful of decisions clearly and then sticking with them.
Start with the shelf itself.
If you want to get more from your life, and are looking for concrete action steps to get you there, check out our Request a Coach page. It’s a “cut the fence-sitting and take action” way to tackle your issues and actually find success. To get off the fence and start to take action, click or tap here.
Measure before buying: Know exactly how much usable width, height, and depth you have.
Choose the right categories: Store lightweight, bulky, or less frequently used items up high rather than things you need every day.
Use consistent bins: Matching linen containers reduce visual clutter and make the shelf feel intentional.
Label every container clearly: You should never have to remember which identical bin contains what.
Create permanent positions: Give every category a predictable location so the shelf becomes familiar over time.
Keep bins manageable: Do not overfill them or allow categories to blur together simply because there is extra room.
Most importantly, judge the system by how easily you can use it.
A closet that looks perfect but requires pulling down four containers to find one scarf is not truly organized. It is simply concealed.
If you want to get more from your life, and are looking for concrete action steps to get you there, check out our Request a Coach page. It’s a “cut the fence-sitting and take action” way to tackle your issues and actually find success. To get off the fence and start to take action, click or tap here.
A functional system gives you both.
The row of coordinated linen bins creates a calm, clean appearance. The labels, categories, and shelf map make that appearance practical.
Once everything has a clearly defined home, you no longer have to rely on memory.
You can glance at the shelf, find the right category, pull down one bin, retrieve what you need, and return it to the same place.
That small amount of predictability can make a surprisingly big difference in how easy your closet feels to use.
The goal is not perfection.
It is a shelf that stays understandable even after real life happens, because the system underneath the matching bins is strong enough to keep working.
*****
If you want to get more from your life, and are looking for concrete action steps to get you there, check out our Request a Coach page. It’s a “cut the fence-sitting and take action” way to tackle your issues and actually find success. To get off the fence and start to take action, click or tap here.
Are you all about style, decor and organization? Download a copy of our Clutter Reset Guide.
Need some in depth help with organization and productivity ? Drop on by our directories choc full of productivity coaches, minimalist coaches, and work/life balance coaches to get your life organized! Or click here to have us match you to the best.
If you want to get more from your life, and are looking for concrete action steps to get you there, check out our Request a Coach page. It’s a “cut the fence-sitting and take action” way to tackle your issues and actually find success. To get off the fence and start to take action, click or tap here.
Read this next

Easter Table Decorations That Look High-End but Take Almost No Effort
Create Easter centerpieces that look high-end with simple pieces, smart spacing, and easy formulas you can copy for any spring table.
Read More
Staying Organized Through a Downsize: How I Won The Battle To Unclutter, Part 1
Tips on how to stay organized in a small space to reduce stress, fatigue, and anxiety!
Read More
Organizational Skills Coaching
Don’t let your life spin out of control. Learn to lose the clutter and concentrate on what’s important.
Read More