


Talk to a coach about Organizational coaching

Crystal Faulk
ACC
I help overwhelmed women in transition gain clarity, confidence, and...

Terrie Hein
Certified Life Coach, Certified Insight Coach Practitioner
Coaching to declutter your life, organize your goals, and cook...

Dr Charlene Ashley
Doctorate - Behaviours
I coach individuals to design fulfilling lives through structure, clarity,...

Paloma Chiara

Lana's Gymnastics Club
"Where the best in gymnastics meets fun. Where every child is a star"
lgclubny.com

Anna Sosnina
ICF (ACC)
ICF ACC certified coach, founder of EssorVie Coaching, passionate about...

Tyler Fink
B.A. in Religion, Anthropology, and Philosophy. Master of Divinity (M.Div.) in Missiology
Pastor, husband, and father helping Christian men pursue faithful growth...

Travis Brown
Professional Life coach
With experience in guiding clients to achieve goals, build confidence,...




Bedroom “Desk Reset” Micro-Zones for Students
Want to try this at home? No worries! Download a copy of our Clutter Reset Guide.
*****
A bedroom desk can turn messy fast because it has to do too many jobs at once.
It becomes a study spot, charging station, paper pile, snack table, makeup counter, craft surface, and random drop zone. For students, that means the desk can feel unusable before homework even starts.
The goal of a desk reset system is not to create a perfect-looking setup. It is to make the desk easier to return to every day.
Micro-zones help because they give each type of item a small, obvious place to land. Instead of thinking, “I need to clean my whole desk,” the student only has to reset a few tiny areas.
That might mean:
- One zone for daily study tools
- One zone for papers
- One zone for chargers and tech
- One tray for temporary clutter
- One backpack transfer spot
- One simple end-of-day reset
This works especially well in small bedrooms because it does not require more furniture or a big makeover. It uses the desk, nearby wall space, trays, containers, hooks, folders, and habits more intentionally.
If you want to get more from your life, and are looking for concrete action steps to get you there, check out our Request a Coach page. It’s a “cut the fence-sitting and take action” way to tackle your issues and actually find success. To get off the fence and start to take action, click or tap here.
It can also be helpful for students who get distracted easily or struggle to start tasks. When the desk is already clear enough to use, studying feels less like a whole event.
The point is to make the first step easier. Sit down. Open the notebook. Plug in the laptop. Start.
Here is how to create a bedroom desk reset system that keeps school supplies contained, visible, and ready without turning the whole room into a cleanup project.
Need some in depth help with organization and productivity ? Drop on by our directories choc full of productivity coaches, minimalist coaches, and work/life balance coaches to get your life organized! Or click here to have us match you to the best.
Create A Daily Study Zone For What You Use Every Time
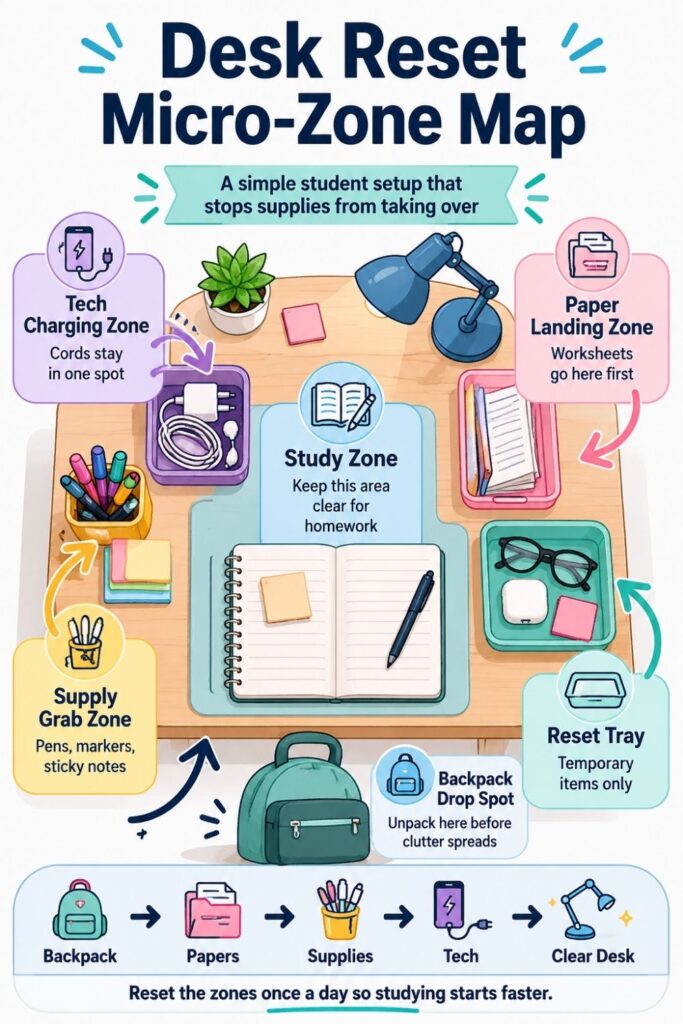
The daily study zone is the most important part of the desk because it protects the actual work surface. This is the area where homework, reading, writing, and laptop work happen.
A common mistake is letting every school-related item live in this zone. Extra pens, old notebooks, graded papers, art supplies, chargers, snacks, and random personal items slowly crowd the surface until there is no clear place to work.
The daily study zone should only hold what the student uses almost every time they sit down.
Choose your core study tools: Pick the few items that are needed for most study sessions, such as a laptop, notebook, planner, favorite pens, calculator, headphones, and water bottle. Keep this list short so the desk still feels open.
If you want to get more from your life, and are looking for concrete action steps to get you there, check out our Request a Coach page. It’s a “cut the fence-sitting and take action” way to tackle your issues and actually find success. To get off the fence and start to take action, click or tap here.
Keep the center of the desk clear: Leave the middle area available for active work. Supplies can sit along the back edge, side edge, or in a small caddy, but the main surface should stay open enough for a notebook and laptop.
Remove “maybe I’ll need it” items: Move backup notebooks, old folders, extra pencils, art supplies, and random books out of the daily zone. These items may still be useful, but they do not need to sit in the prime work area.
A good test is to ask: “Could I start studying here in less than one minute?”
If the answer is no, the daily zone probably has too many items.
For small desks, a clear daily zone may only be a rectangle of open space. That is enough. The goal is not a magazine-worthy desk. The goal is a surface that makes starting easier.
Build A Supply Grab Zone For Pens, Highlighters, Sticky Notes, And Small Tools
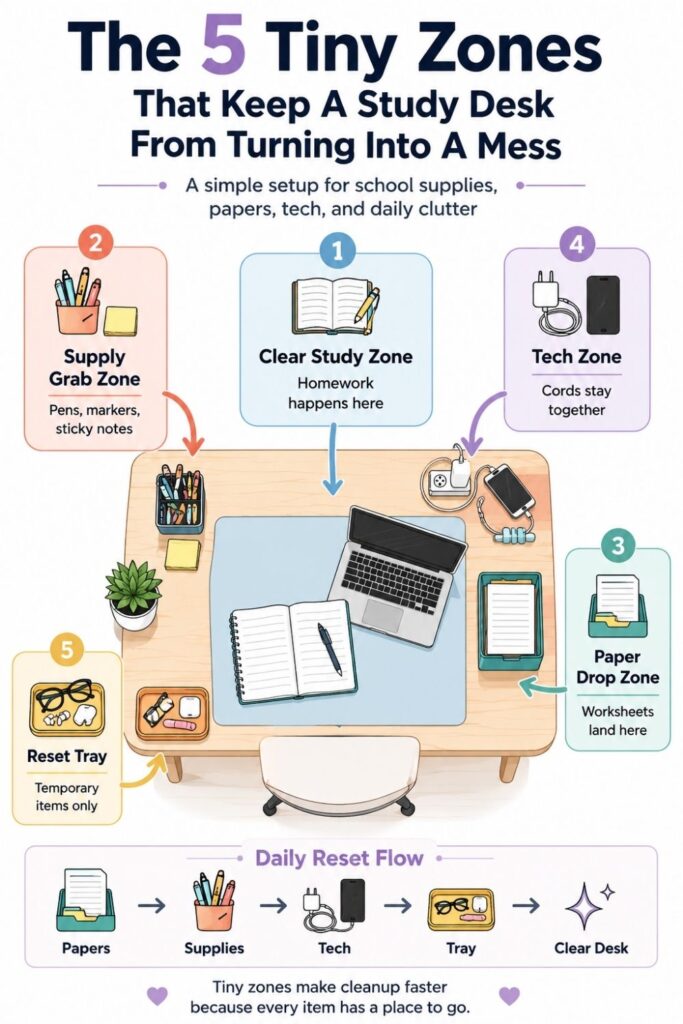
Small school supplies create a lot of desk clutter because they are used often and put down quickly. Pens roll under notebooks. Sticky notes get buried. Highlighters end up in backpacks, drawers, beds, and pencil cases.
A supply grab zone keeps these small items together so the student does not waste time hunting for what they need.
Group supplies by use: Sort desk supplies into simple categories like writing tools, highlighting tools, sticky notes, flashcards, clips, scissors, tape, and calculator accessories. Avoid making the categories too detailed or the system becomes harder to maintain.
If you want to get more from your life, and are looking for concrete action steps to get you there, check out our Request a Coach page. It’s a “cut the fence-sitting and take action” way to tackle your issues and actually find success. To get off the fence and start to take action, click or tap here.
Use one container per category: Place each group in a pencil cup, small bin, drawer divider, pouch, or shallow tray. The container creates a clear boundary, which makes it easier to put things back without thinking.
Keep everyday supplies visible: Put the most-used pens, pencils, highlighters, and sticky notes where they are easy to grab. Store backup supplies somewhere else, such as a drawer, shelf, bin, or backpack pocket.
This zone should feel simple and obvious. A student should be able to reach for a pen without opening three drawers or dumping out a pencil case.
For ADHD-friendly organization, visible containers often work better than hidden storage. Clear cups, open bins, and labeled trays can help the student see what they have and where it belongs.
A supply grab zone also helps prevent overbuying. When all pens and highlighters are in one place, it is easier to notice what is actually running low.
The best setup is usually small, open, and close to the study area. If it is too far away, supplies will end up scattered again.
Add A Paper Landing Zone So Worksheets Stop Taking Over
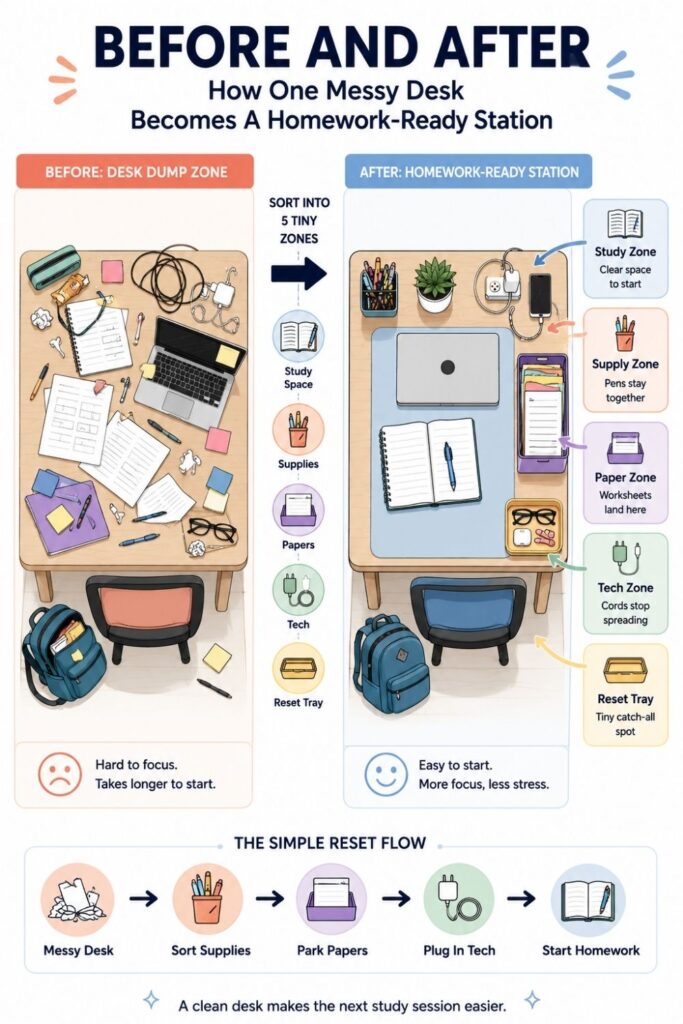
Loose paper is one of the biggest reasons a student desk gets messy. Homework sheets, printed readings, permission slips, test reviews, graded assignments, and random notes can pile up quickly.
The problem is that papers often look important, so students hesitate to throw them away. Instead, they stay on the desk “just in case” until the whole surface feels buried.
If you want to get more from your life, and are looking for concrete action steps to get you there, check out our Request a Coach page. It’s a “cut the fence-sitting and take action” way to tackle your issues and actually find success. To get off the fence and start to take action, click or tap here.
A paper landing zone gives all loose paper one place to go.
Create one inbox spot: Use a tray, folder, clipboard, magazine file, or vertical sorter as the official place for papers that still need attention. This keeps loose sheets from spreading across the desk.
Separate active papers from old papers: Current homework, study guides, and forms that need to be returned should stay in the paper landing zone. Finished work, old notes, and graded papers should move to a binder, folder, file box, or recycling pile.
Do a weekly paper check: Choose one day each week to empty the paper zone. Toss what is no longer needed, file what matters, and move unfinished papers back into the active spot.
The key is to avoid making the paper system too complicated. A student does not always need a color-coded file setup. They need a place where today’s important papers do not disappear.
For visual clarity, label the paper zone with simple words like:
- To Do
- Turn In
- Study
- File Later
A two-folder system can work well too. One folder holds papers that need action. Another holds papers that need to go back to school.
The paper landing zone should be easy to reach from the desk and easy to empty. If it requires too many steps, papers will go right back to piling up on the surface.
If you want to get more from your life, and are looking for concrete action steps to get you there, check out our Request a Coach page. It’s a “cut the fence-sitting and take action” way to tackle your issues and actually find success. To get off the fence and start to take action, click or tap here.
Make A Charging And Tech Zone That Does Not Tangle Into Everything Else
Tech clutter can make a desk feel messy even when there are not many items on it. Chargers, earbuds, tablets, mice, calculators, and cords tend to spread because they are used throughout the day.
A charging and tech zone keeps those items from mixing with papers and supplies.
Pick one charging home: Choose a small area for charging and storing tech accessories. This could be the back corner of the desk, a shelf, a drawer, a nightstand edge, or a small tray beside the desk.
Bundle cords before they spread: Use cord clips, twist ties, small pouches, cable labels, or binder clips to keep chargers contained. Each cord should have a clear home so it does not end up tangled behind books or buried under papers.
Keep only current tech on the surface: The laptop, tablet, or calculator being used can stay in the daily study zone. Extra chargers, backup earbuds, power banks, and unused devices should return to the tech zone.
A tech zone is especially helpful for students who forget to charge devices before school. When everything plugs in from one predictable spot, it is easier to build a nightly charging habit.
It also reduces the “where is my charger?” problem. The charger does not live on the bed, floor, backpack, or kitchen counter. It has one home.
For small bedrooms, use vertical or hidden space when possible. Adhesive cord clips on the side of the desk, a charging basket under the desk, or a wall-mounted pocket can keep the surface clearer.
If you want to get more from your life, and are looking for concrete action steps to get you there, check out our Request a Coach page. It’s a “cut the fence-sitting and take action” way to tackle your issues and actually find success. To get off the fence and start to take action, click or tap here.
The goal is not to hide every cord. It is to keep cords from taking over the study space.
A simple tech zone makes the desk feel less chaotic, and it makes school mornings smoother because devices and accessories are easier to find.
Use A Tray As The Reset Zone For Items That Temporarily Belong
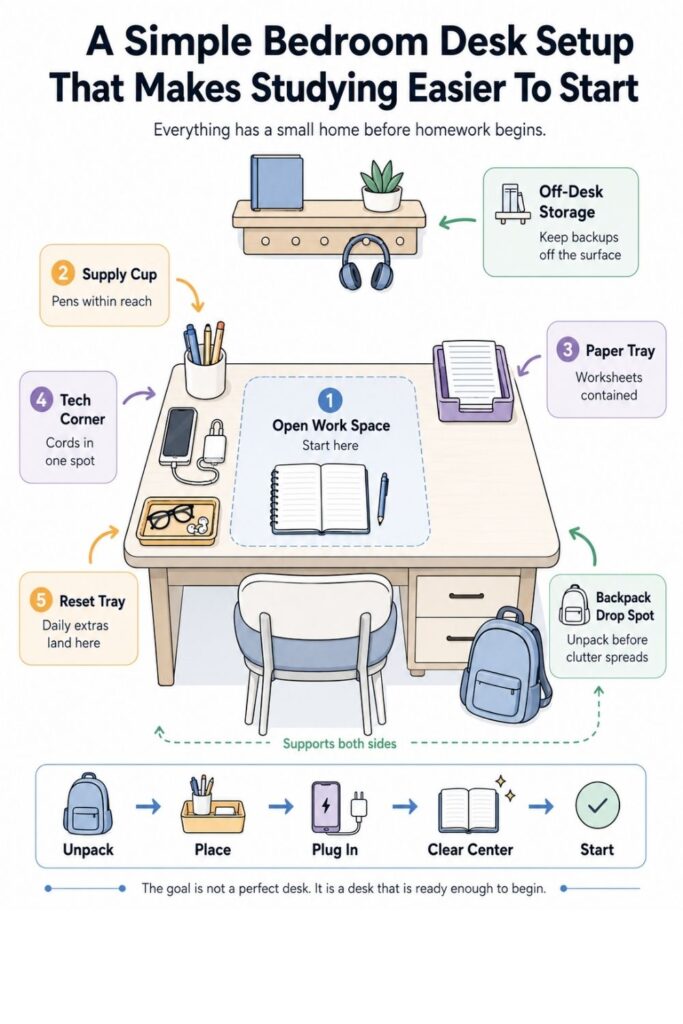
Not every item on a student desk is a school supply. Glasses, lip balm, snacks, earbuds, hair ties, small notebooks, flashcards, and random pocket items often land there during the day.
These things are not always “clutter” in the moment. The problem is that they stay too long.
A reset tray gives temporary items a controlled landing spot.
Choose one small tray: Pick a tray that fits the desk without taking over the surface. It can be a shallow basket, acrylic tray, wood tray, plastic bin lid, or decorative catch-all dish.
Use it only for temporary items: The tray can hold things that show up during the day, but it should not become permanent storage. If an item lives there for a week, it probably needs a real home somewhere else.
Empty it during the desk reset: At the end of the day, return each item to where it belongs. Throw away wrappers, move dishes to the kitchen, put personal items away, and clear the tray for tomorrow.
If you want to get more from your life, and are looking for concrete action steps to get you there, check out our Request a Coach page. It’s a “cut the fence-sitting and take action” way to tackle your issues and actually find success. To get off the fence and start to take action, click or tap here.
This is useful because it gives mess a boundary. Instead of spreading across the desk, temporary clutter lands in one contained place.
For students who struggle with all-or-nothing cleanup, this can make resetting feel less intimidating. They do not have to solve the whole room. They only have to empty the tray.
The tray also gives the desk a visual cue. When the tray is full, it is time for a quick reset.
Keep the tray small enough that it cannot hold too much. A giant tray can turn into a second desk pile, which defeats the purpose.
A reset tray works best when it is paired with a short routine. At night, clear the tray. In the morning, the desk feels ready again.
Create A Backpack Transfer Zone For School-To-Desk Movement
A lot of desk mess starts at the backpack. Students come home, drop the bag, pull out a few things, leave papers on the desk, forget which folder something is in, and then rush the next morning trying to pack again.
A backpack transfer zone creates a smoother path between school and the bedroom desk.
Give the backpack a home: Choose one spot where the backpack always goes after school. This could be a hook, chair side, floor basket, closet corner, or wall peg near the desk.
If you want to get more from your life, and are looking for concrete action steps to get you there, check out our Request a Coach page. It’s a “cut the fence-sitting and take action” way to tackle your issues and actually find success. To get off the fence and start to take action, click or tap here.
Unpack into zones: Move homework to the paper landing zone, writing tools to the supply zone, tech to the charging zone, and books to a shelf or stack. This keeps school items from spreading across the bed, floor, dresser, and desk.
Pack from the zones: Before school, use the desk setup as a checklist. Grab finished assignments, required books, charged devices, planner, calculator, and supplies from their zones instead of relying on memory.
This system is especially helpful for small bedrooms because it keeps the backpack from becoming another clutter pile. The bag has a parking spot, and the items inside have a process.
A good backpack transfer zone should be close enough to the desk that unpacking feels natural. If the backpack lives across the room, papers may never make it to the paper zone.
It can also help to keep a small checklist nearby:
- Homework finished
- Papers packed
- Laptop charged
- Charger packed
- Planner checked
- Water bottle ready
- Lunch or snack added
The goal is to stop the daily cycle of dumping and searching. When the backpack, desk, and school supplies work together, the student starts and ends the day with less friction.
Set Up A 10-Minute Desk Reset Checklist
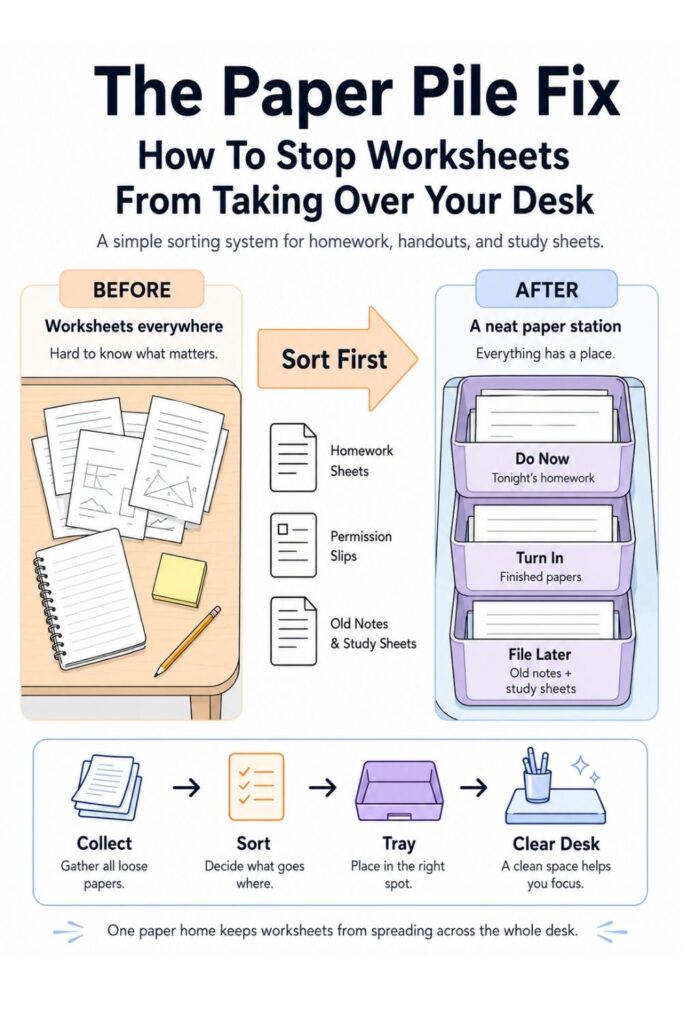
A desk system only works if it can be reset quickly. If cleaning the desk takes 45 minutes, it will not happen on a normal school night.
A 10-minute reset checklist keeps the routine small enough to repeat.
If you want to get more from your life, and are looking for concrete action steps to get you there, check out our Request a Coach page. It’s a “cut the fence-sitting and take action” way to tackle your issues and actually find success. To get off the fence and start to take action, click or tap here.
Make the reset short and specific: Use a few clear steps instead of a vague reminder to “clean your desk.” A student should know exactly what to do without deciding from scratch.
Attach the reset to an existing habit: Do it after homework, before bed, after packing the backpack, or before plugging in devices. A routine is easier to remember when it connects to something that already happens.
Keep the checklist visible: Put it on a sticky note, index card, whiteboard, planner page, or small sign near the desk. The checklist should be easy to see, not hidden inside a notebook.
A simple reset might look like this:
- Throw away trash
- Put pens and supplies back
- Move papers to the paper tray
- Plug in devices
- Clear the reset tray
- Pack the backpack
- Leave the middle of the desk open
The reset does not need to make the whole bedroom perfect. It only needs to make the desk usable again.
This distinction matters. Students can get stuck because the room feels too messy to fix. A desk reset gives them one small win that makes studying easier the next day.
For ADHD-friendly setups, the checklist should be concrete and visible. Instead of “organize desk,” use action steps like “put pens in cup” and “put papers in tray.”
A timer can also help. Set it for 10 minutes and stop when the desk is functional. The goal is consistency, not perfection.
If you want to get more from your life, and are looking for concrete action steps to get you there, check out our Request a Coach page. It’s a “cut the fence-sitting and take action” way to tackle your issues and actually find success. To get off the fence and start to take action, click or tap here.
Make The System ADHD-Friendly Without Making It Complicated
An ADHD-friendly desk setup should reduce decisions, lower friction, and make important items easier to notice. It should not depend on perfect memory or hidden storage that only works when life is already organized.
The best systems are simple enough to use on tired days.
Use visible homes for important items: Keep daily tools in open containers, clear bins, trays, or labeled spots. If an item disappears into a drawer, it may also disappear from the student’s routine.
Give each item one obvious place: Avoid creating multiple possible homes for the same item. Pens go in the cup. Papers go in the tray. Chargers go in the tech zone. Backpack goes on the hook or in the basket.
Build in a controlled catch-all: A reset tray or paper inbox gives messy moments somewhere to land. This helps prevent the whole desk from becoming the catch-all.
ADHD-friendly organization should also be forgiving. The system should still work if the student skips a day, comes home tired, or has a heavy homework week.
That is why micro-zones are helpful. If one zone gets messy, the whole desk is not ruined. The student can reset one section at a time.
Labels can help, especially when the setup is new. Use simple words, not complicated categories. For example:
If you want to get more from your life, and are looking for concrete action steps to get you there, check out our Request a Coach page. It’s a “cut the fence-sitting and take action” way to tackle your issues and actually find success. To get off the fence and start to take action, click or tap here.
- Pens
- Papers
- Tech
- To Do
- Backpack
- Trash
Color can also help create quick visual cues. One folder color for homework, one tray for papers, one bin for tech, and one cup for writing tools.
The desk should make the next step obvious. When a student sits down, they should see where to start, where to find supplies, and where to put things back.
That is the real goal. Less searching. Fewer decisions. A desk that supports studying instead of getting in the way.
How An Organization Coach Could Help A Student Build Better Study Zones
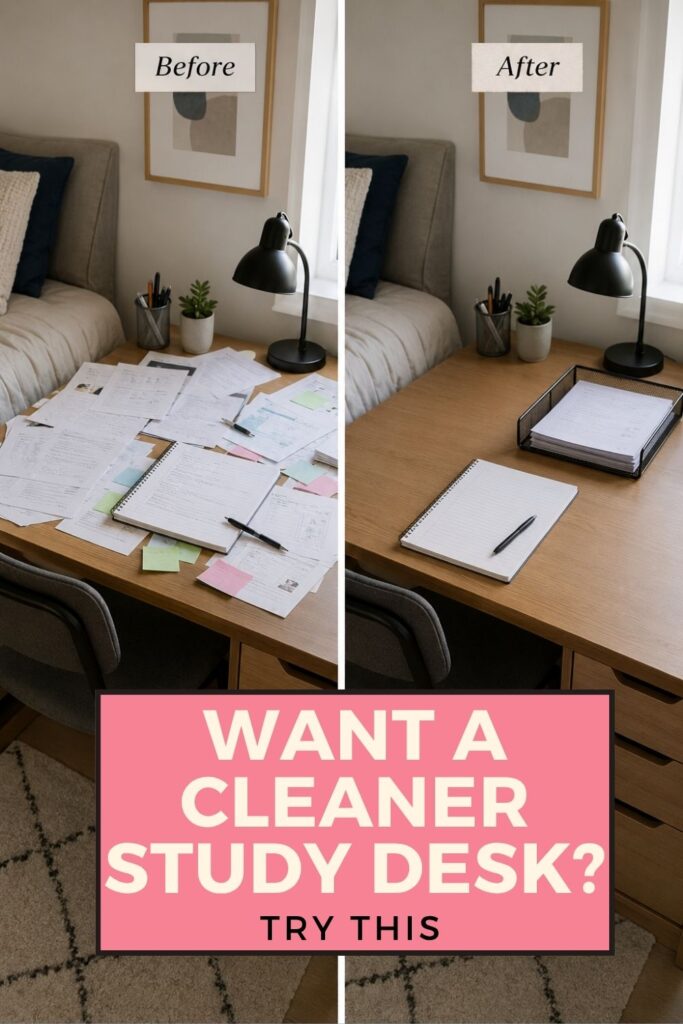
Some students know their desk is not working, but they do not know why. They may keep cleaning it, only to have it fall apart again within a few days.
That is where an organization coach, academic coach, or goal-setting coach can help. The goal is not just to make the desk look better. It is to help the student create a system that matches how they actually study, pack, forget things, and reset.
Identify the real friction points: A coach can help notice where the mess starts. Maybe papers are the issue. Maybe the backpack never gets unpacked. Maybe chargers are always missing. Maybe the student avoids the desk because it feels too crowded.
Turn the setup into a habit: A coach can help the student build a reset routine that is realistic, repeatable, and tied to a daily moment, such as finishing homework or packing for school.
Adjust the zones to the student: Some students need visible supplies. Some need fewer items on the desk. Some need a checklist. Some need a backpack station. A coach can help personalize the system instead of forcing a generic setup.
If you want to get more from your life, and are looking for concrete action steps to get you there, check out our Request a Coach page. It’s a “cut the fence-sitting and take action” way to tackle your issues and actually find success. To get off the fence and start to take action, click or tap here.
A coach can also help students connect organization to bigger goals. For example, the desk reset is not just about having a clean desk. It is about making it easier to start studying, remember assignments, reduce morning panic, and follow through.
The student can track small wins, such as:
- Started homework without clearing the desk first
- Packed the backpack the night before
- Found the charger right away
- Turned in papers on time
- Reset the desk three nights this week
That kind of progress can build confidence. The desk becomes a tool for better routines, not another thing to feel behind on.
A Desk That Makes Starting Easier
A student desk does not need to be perfectly neat to be useful. It needs to be easy to start from, easy to reset, and clear enough for actual work.
That is what micro-zones make possible. Instead of asking a student to keep an entire bedroom organized all the time, the system gives them small areas with simple jobs.
The daily study zone protects the main work surface. The supply zone keeps small tools from scattering. The paper zone stops worksheets from taking over. The tech zone keeps chargers and devices easier to find. The tray catches temporary clutter before it spreads. The backpack zone connects school and home more smoothly.
Together, these zones create a reset system that works in real life.
The most important part is keeping the system small. Too many bins, labels, folders, and rules can make the desk harder to use. A good student desk setup should feel clear, not fussy.
If you want to get more from your life, and are looking for concrete action steps to get you there, check out our Request a Coach page. It’s a “cut the fence-sitting and take action” way to tackle your issues and actually find success. To get off the fence and start to take action, click or tap here.
Start with one zone if the whole desk feels like too much. Clear the center. Add a paper tray. Put pens in one cup. Give the backpack a home. Then build from there.
The desk will still get messy sometimes. That is normal. The difference is that now the mess has places to go back to.
When every common item has an obvious home, cleanup becomes faster. Studying starts with less friction. School mornings feel a little more manageable.
A bedroom desk reset system is not about perfection. It is about making the next study session easier to begin.
*****
Want to try this at home? No worries! Download a copy of our Clutter Reset Guide.
Need some in depth help with organization and productivity ? Drop on by our directories choc full of productivity coaches, minimalist coaches, and work/life balance coaches to get your life organized! Or click here to have us match you to the best.
If you want to get more from your life, and are looking for concrete action steps to get you there, check out our Request a Coach page. It’s a “cut the fence-sitting and take action” way to tackle your issues and actually find success. To get off the fence and start to take action, click or tap here.
Read this next

Spring Clean Your Life!
Get in there and you deep clean everything!
Read More
Clearing Out Your Life’s Clutter
Are you overwhelmed and stressed out because of all the clutter in your life?
Read More
10 Front Door Christmas Decoration Ideas That Make Your Home Feel Magical
Make your front door feel instantly Christmas-ready with easy, magical decorating ideas that work for any porch size or budget.
Read More