


Talk to a coach about Organizational coaching

Crystal Faulk
ACC
I help overwhelmed women in transition gain clarity, confidence, and...

Terrie Hein
Certified Life Coach, Certified Insight Coach Practitioner
Coaching to declutter your life, organize your goals, and cook...

Dr Charlene Ashley
Doctorate - Behaviours
I coach individuals to design fulfilling lives through structure, clarity,...

Paloma Chiara

Lana's Gymnastics Club
"Where the best in gymnastics meets fun. Where every child is a star"
lgclubny.com

Anna Sosnina
ICF (ACC)
ICF ACC certified coach, founder of EssorVie Coaching, passionate about...

Tyler Fink
B.A. in Religion, Anthropology, and Philosophy. Master of Divinity (M.Div.) in Missiology
Pastor, husband, and father helping Christian men pursue faithful growth...

Travis Brown
Professional Life coach
With experience in guiding clients to achieve goals, build confidence,...



Shoe Display Ladder for Narrow Walk-In Closets
Are you all about style, decor and organization? Download a copy of our Clutter Reset Guide.
*****
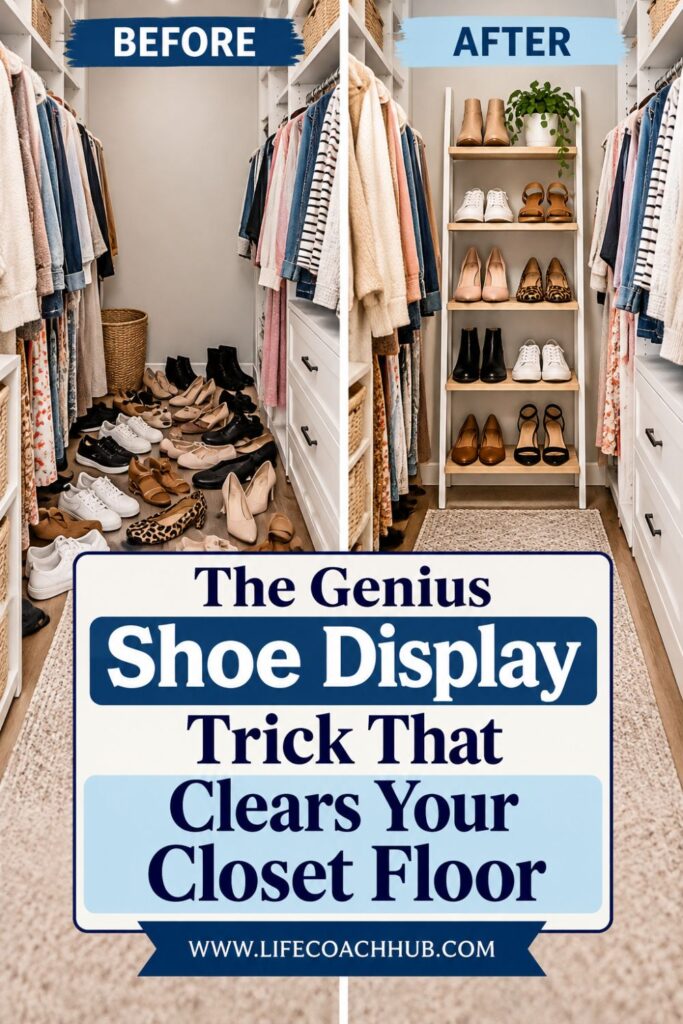
The Narrow Closet Shoe Problem You Can Fix by Going Vertical
A narrow walk-in closet can feel surprisingly cramped once shoes start taking over the floor. Sneakers collect beneath hanging clothes, heels end up pushed into corners, and favorite flats disappear behind other pairs. Before long, even a reasonably sized shoe collection can make your closet difficult to navigate.
The problem is not always having too many shoes. Sometimes, it is simply that your storage is using the wrong part of the closet. Traditional shoe racks spread outward, taking up valuable floor space that you need for walking, changing clothes, and reaching your wardrobe.
A shoe display ladder offers a different approach. By arranging shoes on a series of vertically stacked shelves, you can create an organized storage station along a narrow wall without adding another bulky piece of furniture.
The goal is to make better use of your closet’s height while keeping its limited walking space as open as possible.
Two simple changes can make a noticeable difference:
- Move shoe storage upward: Replace scattered floor-level rows with a tall, narrow ladder-style organizer that puts multiple pairs within easy view and reach.
- Give every pair a designated position: Arrange shoes on individual levels so you can find what you need without moving several other pairs out of the way.
Unlike closed boxes or deep storage bins, an open shoe ladder makes your collection visible. You can quickly compare styles, choose footwear for the day, and return each pair to its assigned location.
If you want to get more from your life, and are looking for concrete action steps to get you there, check out our Request a Coach page. It’s a “cut the fence-sitting and take action” way to tackle your issues and actually find success. To get off the fence and start to take action, click or tap here.
A well-planned ladder also gives your closet a more intentional appearance. Instead of looking like a crowded storage area, your shoes become part of a simple, structured system that supports your daily routine.
You do not need an expensive custom closet renovation to make this work. With careful measurements, a suitably sized organizer, and a practical arrangement, even a narrow walk-in closet can become easier to use.
The secret is choosing a ladder that fits your actual space rather than forcing your closet to accommodate another oversized storage solution.
Need some in depth help with organization and productivity ? Drop on by our directories choc full of productivity coaches, minimalist coaches, and work/life balance coaches to get your life organized! Or click here to have us match you to the best.
Step 1: Find the Best Wall Space for Your Shoe Ladder
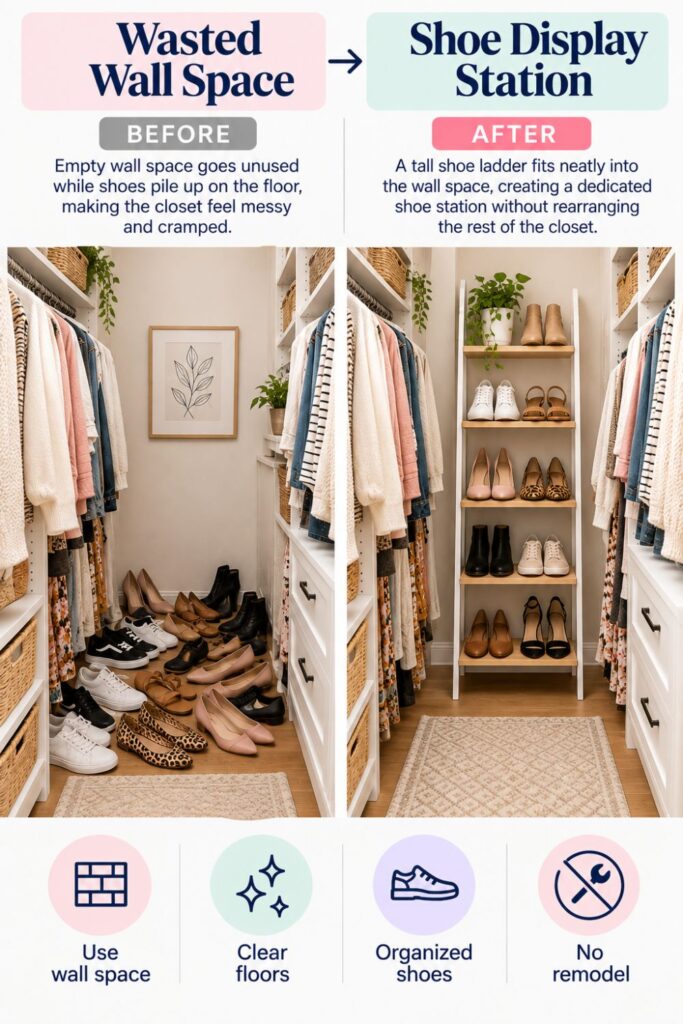
Before shopping for a shoe ladder, look closely at how your narrow walk-in closet is arranged. The most important decision is not which organizer looks nicest. It is where the organizer can fit without making the closet more difficult to use.
Many narrow closets have small sections of wall space that are not being used effectively. These might include a short wall near the entrance, an unused end wall, or an open area beside existing shelving.
Start by identifying one possible location and testing whether it can accommodate vertical shoe storage.
- Measure the available wall section: Record the width and height of the empty area. Measure from the finished floor upward, and account for baseboards, light switches, hanging clothing, and anything else that might interfere with the ladder.
- Check your walking clearance: Measure the available aisle width, then use painter’s tape to mark the proposed organizer’s footprint. Walk through the closet to see whether the reduced space still feels comfortable and allows safe access to your wardrobe.
- Look for overlooked placement opportunities: Examine narrow wall sections beside hanging rods, the end of a closet aisle, or unused spaces between existing storage units. A tall, slim organizer may fit where a conventional wide shoe rack cannot.
- Test nearby doors and drawers: Open closet doors, cabinet doors, drawers, and pull-out accessories completely. Make sure the proposed ladder will not block their movement or create an awkward obstacle.
Pay particular attention to the ladder’s depth. Some leaning ladder shelves extend farther into the room at the bottom than at the top, so measuring only the upper shelves can lead to an unpleasant surprise.
If you want to get more from your life, and are looking for concrete action steps to get you there, check out our Request a Coach page. It’s a “cut the fence-sitting and take action” way to tackle your issues and actually find success. To get off the fence and start to take action, click or tap here.
Also consider how you move through the closet when getting dressed. A ladder that technically fits but forces you to turn sideways every morning is not a successful storage solution.
Once you identify a location, write down the maximum acceptable width, height, and depth. These measurements will help you avoid buying an organizer that looks compact online but feels oversized in your closet.
The right location should add useful shoe storage while preserving the closet’s everyday function.
Step 2: Choose a Slim Shoe Ladder That Fits Your Closet
Not every ladder-style shelf is suitable for storing shoes in a narrow walk-in closet. Some are designed primarily for displaying decorations or books, while others have shelves that are too shallow, widely spaced, or unstable for footwear.
The best choice combines a narrow footprint with practical shelf dimensions. You want enough space to hold several pairs vertically without creating an obstacle in the closet aisle.
Think about the shoes you actually own before deciding what type of ladder to use.
- Select a suitable ladder-style organizer: Look for a tall, slim shelf unit with stable platforms, a sturdy frame, and clear weight limits. A purpose-built shoe ladder is ideal, but a compatible ladder-style shelving unit can also work if the manufacturer permits this use.
- Compare shelf depth with your footwear: Measure your longest everyday shoes from heel to toe. Check whether the ladder’s usable shelf depth will support them securely without leaving the shoes projecting awkwardly into the walkway.
- Choose an easy DIY approach: A ready-to-assemble ladder shelf is usually simpler than constructing an entire organizer from scratch. If you prefer a customized look, choose a suitable unit that can accommodate manufacturer-approved shoe trays or shelf accessories.
- Check how the ladder must be secured: Review the installation instructions before purchasing. Some ladder units require wall fastening or anti-tip hardware, and a leaning design may not be appropriate for every narrow closet.
Consider shelf spacing as well. Flats and sandals generally need less vertical clearance than sneakers or heels, so closely spaced shelves may increase capacity if they still provide enough room to remove shoes comfortably.
Materials also affect practicality. Smooth, cleanable shelves are useful for footwear, while open slats should be spaced closely enough to support shoes without letting narrow heels or soles slip between them.
If you want to get more from your life, and are looking for concrete action steps to get you there, check out our Request a Coach page. It’s a “cut the fence-sitting and take action” way to tackle your issues and actually find success. To get off the fence and start to take action, click or tap here.
Choose a finish that works with your existing closet. White or light wood can blend into a bright interior, while darker finishes may complement black rods or modern shelving.
However, appearance should come after measurements, stability, and access.
A beautiful shoe ladder that blocks your clothes or requires constant rearranging will quickly become frustrating. A straightforward, well-fitted organizer is usually the better long-term investment.
Step 3: Calculate How Many Shoes Your Ladder Can Actually Hold
One of the biggest mistakes when choosing vertical shoe storage is assuming every shelf will hold the same number of pairs. Shoe sizes, styles, and shelf dimensions can change the actual capacity considerably.
A narrow ladder might comfortably hold several pairs of flats but struggle to accommodate the same number of bulky sneakers. Measuring your footwear before arranging it helps you make realistic decisions.
Start by gathering the shoes you intend to keep on the ladder.
- Sort your shoes into categories: Separate sneakers, flats, sandals, heels, and boots. Identify which pairs you wear regularly and which could be stored elsewhere because they are seasonal or reserved for special occasions.
- Measure the width each pair requires: Place two shoes together as you would display them on a shelf. Measure their combined width, including a little extra room so they can be picked up without disturbing neighboring shoes.
- Create a simple shelf capacity map: Write down the usable width and depth of each ladder shelf. Compare those measurements with your shoes, then estimate how many pairs can fit securely on every level.
- Allow room for easy retrieval: Leave enough space to reach each pair without knocking over nearby shoes. Do not count a pair as fitting if it requires unstable stacking or forces footwear to hang dangerously over the edge.
For example, imagine a ladder with five usable shelves. If each shelf comfortably accommodates two pairs, you could potentially organize ten pairs in one vertical station.
That is only an illustration, not a guaranteed capacity. Your actual result depends on the ladder’s dimensions, shelf design, and the shoes you own.
If you want to get more from your life, and are looking for concrete action steps to get you there, check out our Request a Coach page. It’s a “cut the fence-sitting and take action” way to tackle your issues and actually find success. To get off the fence and start to take action, click or tap here.
Remember that some ladder shelves become narrower toward the top. Those upper levels may work well for slim sandals or flats but may not accommodate larger footwear.
It can also help to place shoes on the floor in the arrangement you plan to use. This gives you a quick visual test before committing to the final layout.
The objective is not to squeeze the greatest possible number of shoes onto every shelf. It is to find the highest practical capacity that still allows each pair to remain secure, visible, and easy to access.
Step 4: Set Up Your Shoe Ladder Without a Complicated Closet Makeover
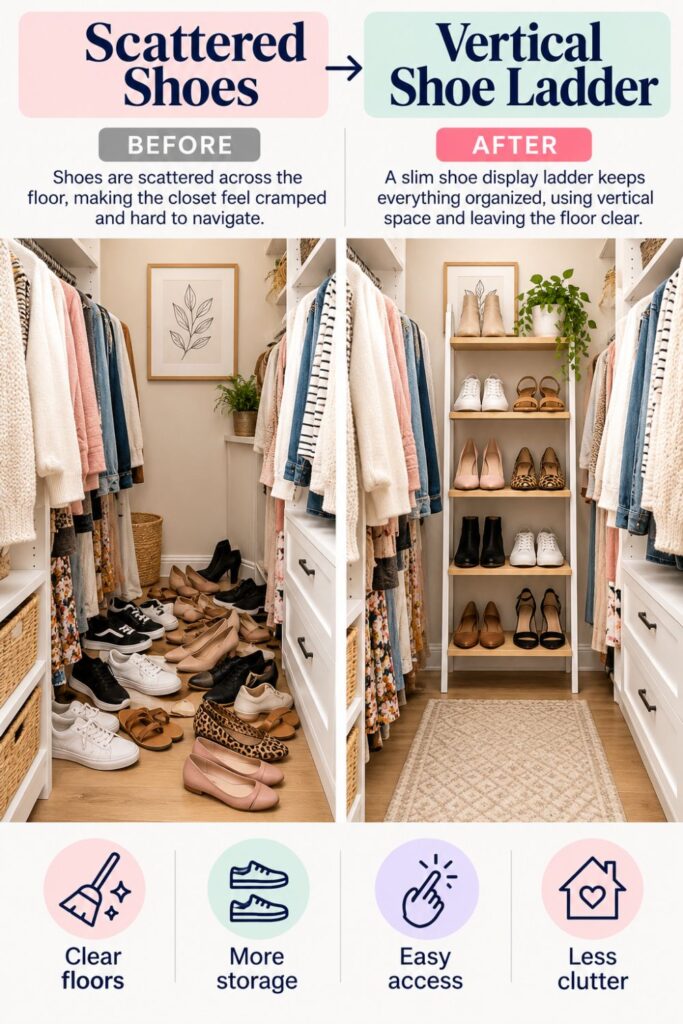
Once you have chosen the right ladder and planned its location, the actual setup can be straightforward. Most ready-to-assemble ladder-style organizers require basic tools and careful attention to the manufacturer’s instructions rather than advanced woodworking skills.
A little preparation will make the process easier, especially if your closet has limited room for moving around.
Clear the installation area before bringing in the organizer. Working in an already crowded closet can make even a simple assembly project unnecessarily awkward.
- Prepare the installation space: Remove shoes, baskets, and other belongings from the selected wall section. Clean the floor and wall, and move nearby clothing temporarily if it will interfere with assembly or installation.
- Assemble the ladder according to its instructions: Lay out the supplied components, identify the correct shelf positions, and secure each connection as directed. Avoid substituting unapproved hardware or modifying structural components.
- Position and secure the organizer: Place the completed ladder in its intended location and install all required mounting or anti-tip hardware. Use fasteners suitable for your wall construction and follow the manufacturer’s anchoring instructions.
- Test the completed setup: Confirm the shelves are properly seated and the unit is stable. Add shoes gradually, staying within the stated weight limits, and check that the organizer remains secure and accessible.
If you are renting, review your lease before drilling into walls. A compatible freestanding design may be an option, but it still needs to meet the manufacturer’s stability requirements. Avoid assuming that a leaning ladder is safe without its specified attachments.
Once installed, step outside the closet and look at the entire arrangement. Check whether the ladder interferes with hanging clothes, lighting, or access to existing storage.
If you want to get more from your life, and are looking for concrete action steps to get you there, check out our Request a Coach page. It’s a “cut the fence-sitting and take action” way to tackle your issues and actually find success. To get off the fence and start to take action, click or tap here.
Next, walk through the closet while reaching for a few different clothing items. This simple test can reveal problems that are not obvious when the closet is empty.
If the organizer is too deep or blocks a frequently used area, reconsider its position before loading it fully.
A successful shoe ladder should feel like a natural addition to your closet, not another object you have to work around. Careful installation now will make the finished system safer and more convenient every day.
Step 5: Arrange Your Shoes to Make Every Shelf Work Harder
Installing a shoe ladder creates more organized storage opportunities, but the way you arrange your footwear determines how useful the system becomes.
A ladder filled randomly with shoes may look better than a floor pile, yet still make getting dressed frustrating. The goal is to organize your collection so the pairs you need most are visible and easy to retrieve.
Start by thinking about how frequently you wear each pair rather than arranging everything by color or style.
- Keep everyday shoes at easy-reach height: Place your most frequently worn sneakers, work shoes, and flats on shelves you can access comfortably. These should be the pairs you can grab without crouching deeply or reaching overhead.
- Position heavier footwear on lower shelves: Keep heavier shoes closer to the bottom of the organizer, provided the shelves are designed to support them. This helps maintain a sensible weight distribution and avoids unnecessarily lifting bulky footwear.
- Group similar styles together: Assign different levels to sneakers, sandals, flats, and heels where space allows. Grouping shoes by category makes the display easier to scan and helps you remember where each pair belongs.
- Adapt shelves for difficult shoe shapes: Use compatible non-slip liners or shallow trays if needed to keep footwear positioned securely. Store tall boots, oversized shoes, or awkward heels elsewhere if they cannot sit safely on the ladder.
Consider arranging one shoe slightly ahead of its matching partner only when the shelf provides adequate support for both. This may improve visibility, but it should never leave shoes balancing precariously or protruding into the walking path.
A practical arrangement could place everyday sneakers around waist height, work flats just above them, and lightweight sandals on an upper shelf. Less frequently worn pairs could occupy the lower levels.
If you want to get more from your life, and are looking for concrete action steps to get you there, check out our Request a Coach page. It’s a “cut the fence-sitting and take action” way to tackle your issues and actually find success. To get off the fence and start to take action, click or tap here.
Your ideal layout will depend on your height, mobility, shoe collection, and closet dimensions.
After arranging everything, practice retrieving several pairs. If you have to remove other shoes to reach the ones you want, adjust the layout.
The best shelf arrangement is the one you can use quickly without thinking. Each pair should have an obvious place, and putting it away should be just as easy as taking it out.
Step 6: Make the Shoe Ladder Look Intentional, Not Crowded
A shoe ladder can improve your closet’s appearance as well as its storage capacity. Because the shoes remain visible, the way you arrange them affects how tidy the entire space feels.
You do not need matching shoes, expensive organizers, or a perfectly coordinated wardrobe to create an attractive display. A few simple visual rules can make ordinary footwear look organized.
The most important principle is consistency. When shoes are arranged predictably, your eye can scan the shelves quickly without being distracted by unnecessary clutter.
- Create consistent spacing between pairs: Leave small, even gaps wherever possible. Avoid pushing shoes tightly together just to fill every inch, particularly when doing so makes them difficult to remove.
- Face shoes in a consistent direction: Arrange most pairs with their toes facing outward so you can identify them quickly. Keep matching shoes together and use the same basic positioning method across the shelves.
- Coordinate the ladder with existing finishes: Choose a color or material that complements your closet rods, shelving, and walls. A simple finish often works better in a narrow space than an elaborate design with unnecessary decorative details.
- Keep unrelated items off the shelves: Remove loose receipts, empty shoe boxes, random accessories, and anything else that does not belong in your shoe station. Give those items separate homes instead of allowing the ladder to become another general storage area.
Think about the appearance of the ladder when viewed from your closet entrance. A clear arrangement with visible gaps can make the storage feel lighter and less crowded.
Shoes that vary in color and shape can still look cohesive when their positioning is consistent. You can group dark footwear together or organize by type, but do not sacrifice easy access simply to create a particular visual pattern.
If you want to get more from your life, and are looking for concrete action steps to get you there, check out our Request a Coach page. It’s a “cut the fence-sitting and take action” way to tackle your issues and actually find success. To get off the fence and start to take action, click or tap here.
Also consider the surrounding space. Hanging clothes that brush against the shoes can make the display look crowded and may transfer dirt or moisture between items.
Leave enough separation to protect both your clothing and footwear.
Finally, check that no shoes project into the aisle beyond the intended shelf footprint.
A successful shoe display ladder should make the closet look more organized because it genuinely functions better. The clean appearance comes from thoughtful placement, clear boundaries, and a system that is easy to maintain.
Step 7: Use a Simple Shoe Rotation System to Keep the Ladder Useful
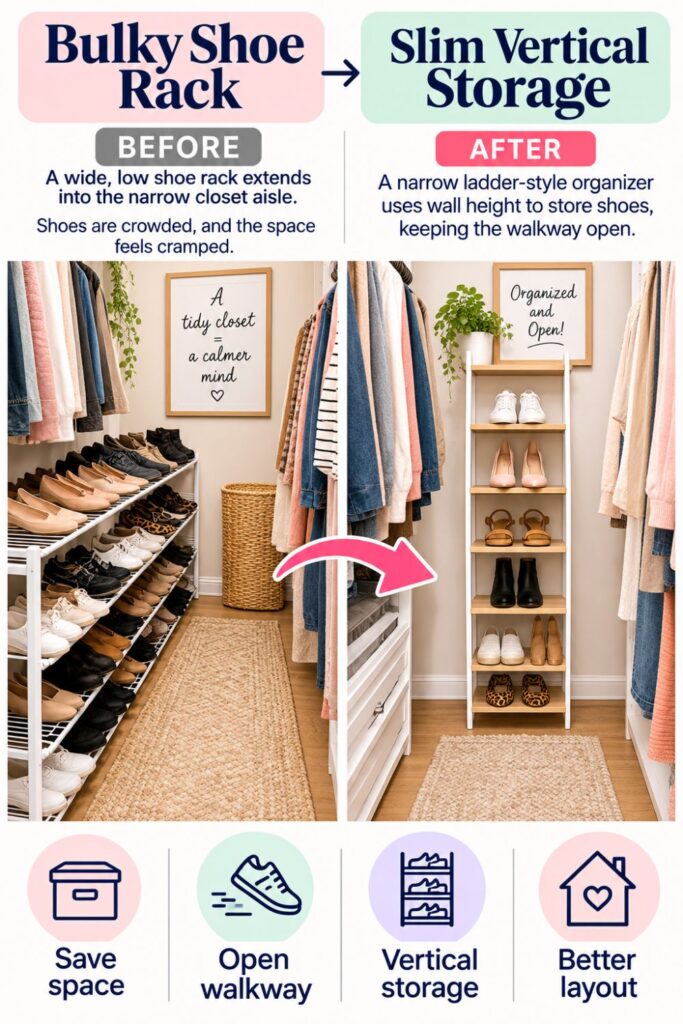
Your shoe ladder will only stay organized if it continues to match the way you use your wardrobe. Without a simple maintenance routine, even a carefully arranged organizer can gradually turn into another crowded storage area.
The good news is that maintaining vertical shoe storage does not require a complicated checklist or frequent closet overhauls.
The easiest approach is to give each shelf a purpose and make small adjustments as your needs change.
- Assign practical roles to your shelves: Reserve the easiest-to-reach levels for daily footwear. Use other shelves for work shoes, weekend styles, or lighter seasonal pairs, depending on what you wear most frequently.
- Return each pair after wearing it: Give shoes an opportunity to dry if necessary, then put them back in their designated position. Avoid leaving them beside the ladder, where a temporary pile can quickly become permanent.
- Rotate your collection seasonally: When the weather changes, move frequently worn seasonal shoes into prime positions. Relocate less useful pairs to another appropriate storage area rather than forcing everything onto the ladder.
- Set a realistic capacity limit: Treat the ladder’s comfortable storage capacity as a boundary. When every shelf is full, review what you own before adding more shoes or overcrowding existing levels.
A simple five-minute weekly check can prevent small problems from building up. Look for misplaced pairs, dirt on shelves, or shoes that have started collecting on the floor.
If you want to get more from your life, and are looking for concrete action steps to get you there, check out our Request a Coach page. It’s a “cut the fence-sitting and take action” way to tackle your issues and actually find success. To get off the fence and start to take action, click or tap here.
If a particular shelf constantly becomes messy, ask why. Maybe the shoes are difficult to reach, the spacing is too tight, or the category does not match your routine.
These are clues that the system needs a small adjustment, not necessarily a complete redesign.
You can also use the ladder to make seasonal wardrobe changes easier. At the beginning of each season, identify the pairs you expect to wear most often and place them where they are most accessible.
This keeps the organizer responsive to your lifestyle without requiring additional storage furniture.
The objective is to make shoe organization nearly automatic. When every pair has a sensible home and the most useful shoes remain within reach, keeping the floor clear becomes much easier.
A good storage system should support your routine rather than demand constant attention.
What to Change When Your Shoe Collection Outgrows the Ladder
Even a well-planned shoe ladder may eventually feel crowded. You might purchase new footwear, change jobs, develop different style preferences, or discover that certain shoes need more room than expected.
When that happens, the first solution should not automatically be purchasing another organizer.
If you want to get more from your life, and are looking for concrete action steps to get you there, check out our Request a Coach page. It’s a “cut the fence-sitting and take action” way to tackle your issues and actually find success. To get off the fence and start to take action, click or tap here.
In a narrow walk-in closet, adding more furniture can undo the original benefit of using vertical storage. Instead, review how your current ladder is being used and determine whether the available space could work better.
Start by identifying which shelves are overcrowded and why.
- Find the source of the overflow: Check whether the problem involves too many pairs, bulky footwear, poor shelf assignments, or shoes that do not belong in your everyday rotation.
- Rearrange existing shelf space: Group compact footwear together and move larger shoes to shelves that accommodate them properly. Consider whether a different arrangement could make better use of the available width without compromising stability.
- Move occasional shoes elsewhere: Store rarely worn heels, formal footwear, or out-of-season pairs in appropriate boxes or containers on existing closet shelves. Keep the ladder focused on shoes you reach for regularly.
- Review your storage limits before expanding: Recheck the ladder’s dimensions and the available walkway. If you still need additional storage, look for solutions that use an existing underutilized area rather than narrowing the aisle further.
This is also a useful opportunity to reconsider which shoes deserve accessible storage.
You may discover that some pairs are uncomfortable, damaged, difficult to style, or simply no longer part of your everyday wardrobe.
Set those pairs aside and decide whether to repair, donate, sell, or responsibly discard them.
Avoid treating decluttering as a requirement to own fewer shoes. The purpose is to ensure that your storage supports the collection you actually want and use.
If your wardrobe genuinely requires more footwear than one ladder can accommodate, consider combining the display with seasonal storage elsewhere.
A shoe ladder does not need to hold every pair you own to be successful.
If you want to get more from your life, and are looking for concrete action steps to get you there, check out our Request a Coach page. It’s a “cut the fence-sitting and take action” way to tackle your issues and actually find success. To get off the fence and start to take action, click or tap here.
Its greatest value is keeping your most useful shoes visible, accessible, and organized while protecting the limited floor space in your closet.
How an Organizing Coach Can Help You Build a Closet System That Lasts
Sometimes, the difficult part of closet organization is not installing new storage. It is deciding what belongs where and developing habits that keep everything organized after the initial makeover.
If your closet repeatedly becomes crowded despite trying different organizers, working with a professional organizer or organizing coach can help you identify what is not working.
An organizing coach may focus on habits, priorities, and routines, while a professional organizer can provide practical support with space planning and storage systems.
The most useful approach combines an understanding of your daily behavior with realistic solutions for your closet.
- Identify how you actually use your shoes: Review which pairs you wear during a typical week. A coach can help you recognize patterns, such as reaching for the same sneakers daily while keeping less-used footwear in the most convenient positions.
- Build storage zones around your lifestyle: Divide your ladder into categories that reflect how you get dressed. You might create workday, errands, weekend, and special-occasion zones instead of organizing everything strictly by shoe style.
- Simplify decisions about your collection: Use guided questions to identify which shoes deserve accessible space. Consider whether each pair fits your current lifestyle, remains comfortable, and earns its place in your regular rotation.
- Develop a manageable maintenance routine: Create a brief weekly reset that fits your schedule. Focus on returning misplaced shoes, checking shelf capacity, and adjusting categories when your needs change.
You can also try a simple self-coaching exercise without hiring anyone.
Ask yourself: Which shoes do I reach for most often? What makes putting them away inconvenient? Which parts of my closet repeatedly become cluttered?
Your answers may reveal that the problem is not a lack of storage but a mismatch between your habits and your current layout.
If you want to get more from your life, and are looking for concrete action steps to get you there, check out our Request a Coach page. It’s a “cut the fence-sitting and take action” way to tackle your issues and actually find success. To get off the fence and start to take action, click or tap here.
For example, if you regularly change between work shoes and comfortable shoes, keeping those pairs together may make more sense than separating them by color.
An effective organizing system should reflect your real life rather than an idealized version of how you think your closet should look.
With the right combination of practical storage and sustainable habits, your shoe ladder can remain useful long after the initial setup.
Make Your Narrow Walk-In Closet Work Smarter From the Floor Up
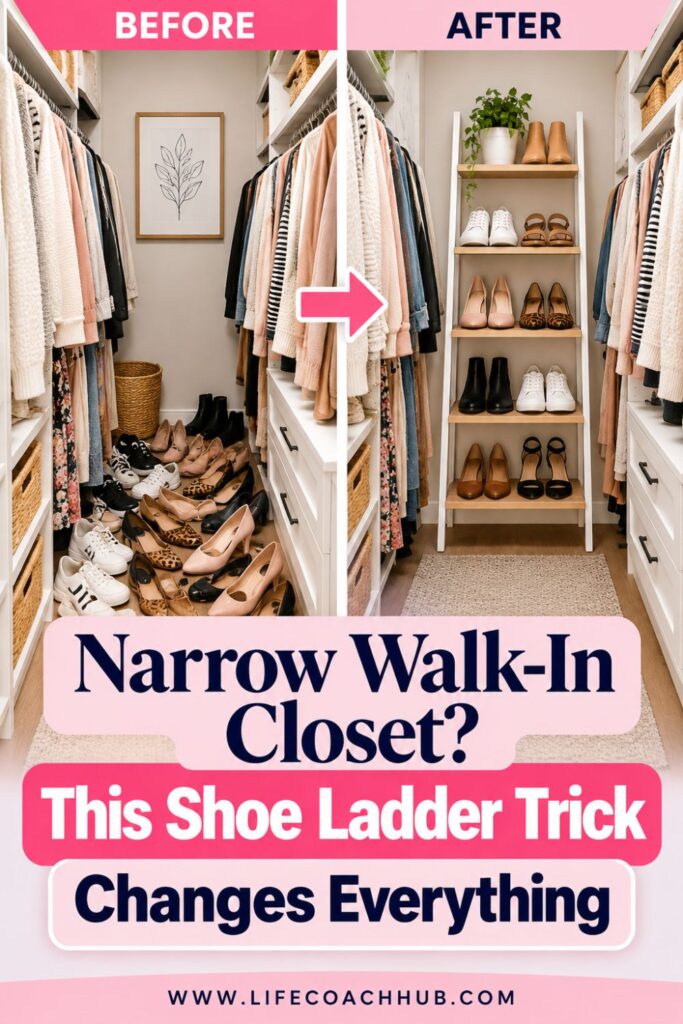
A narrow walk-in closet does not have to feel crowded simply because you own several pairs of shoes. Often, the issue is how the available space is being used rather than the overall size of the closet.
A carefully selected shoe display ladder offers a practical way to make use of vertical wall space. Instead of spreading footwear across the floor, you can arrange everyday pairs on accessible shelves that keep your collection visible and organized.
The key is to approach the project as a complete storage system, not just another furniture purchase.
Start by measuring your closet, identifying an appropriate wall section, and choosing an organizer that fits within your available dimensions.
Then concentrate on arranging your shoes according to their size, weight, and frequency of use.
If you want to get more from your life, and are looking for concrete action steps to get you there, check out our Request a Coach page. It’s a “cut the fence-sitting and take action” way to tackle your issues and actually find success. To get off the fence and start to take action, click or tap here.
Two principles will help you get the most from the finished setup:
- Protect your walking space first: Choose a slim, stable ladder that accommodates your footwear without blocking access to clothing, drawers, or the closet entrance. More shoe capacity is only useful if the closet remains comfortable to use.
- Make the organization easy to maintain: Give frequently worn shoes the most accessible positions and establish a simple return-and-rotation routine. An arrangement that works naturally with your habits is more valuable than one that only looks attractive immediately after setup.
Remember that your ladder does not have to display every shoe you own. It can serve as the main station for your everyday footwear while seasonal or occasional pairs remain stored elsewhere.
Small adjustments can also make a meaningful difference. Changing shelf assignments, grouping similar pairs, or moving less-used shoes to another location may improve capacity without requiring more furniture.
Above all, avoid measuring success by how many shoes you can squeeze onto the shelves.
A better measure is whether you can see your favorite pairs, reach them easily, and move through your closet without stepping around clutter.
By organizing upward instead of outward, you can turn a narrow walk-in closet into a more practical, streamlined space that makes getting dressed a little easier every day.
*****
Are you all about style, decor and organization? Download a copy of our Clutter Reset Guide.
If you want to get more from your life, and are looking for concrete action steps to get you there, check out our Request a Coach page. It’s a “cut the fence-sitting and take action” way to tackle your issues and actually find success. To get off the fence and start to take action, click or tap here.
Need some in depth help with organization and productivity ? Drop on by our directories choc full of productivity coaches, minimalist coaches, and work/life balance coaches to get your life organized! Or click here to have us match you to the best.
If you want to get more from your life, and are looking for concrete action steps to get you there, check out our Request a Coach page. It’s a “cut the fence-sitting and take action” way to tackle your issues and actually find success. To get off the fence and start to take action, click or tap here.
Read this next

Beware! The DIY Organization Mistakes That Could Cost You More Than Just Space
You want a home that feels calm, cool, and functional—but DIY organizing can quickly backfire if you’re not careful. Here are 7 mistakes that cost more than just space. Need […]
Read More
Why Your Galentine’s Aesthetic Should Be the First Decision You Make
Are you all about style, decor and organization? Download a copy of our Decluttering Workbook.**** A Galentine’s night isn’t just about pink décor or matching pajamas — it’s about creating […]
Read More
How to Decorate for Christmas Based on Your Aesthetic: The Luxury Lover, Modern Minimalist, Vintage Soul & Boho Dreamer
Are you all about style, decor and organization? Download a copy of our Decluttering Workbook. **** Your Christmas decor says more about you than any trend ever could. It’s not […]
Read More