


Talk to a coach about Organizational coaching

Crystal Faulk
ACC
I help overwhelmed women in transition gain clarity, confidence, and...

Terrie Hein
Certified Life Coach, Certified Insight Coach Practitioner
Coaching to declutter your life, organize your goals, and cook...

Dr Charlene Ashley
Doctorate - Behaviours
I coach individuals to design fulfilling lives through structure, clarity,...

Paloma Chiara

Lana's Gymnastics Club
"Where the best in gymnastics meets fun. Where every child is a star"
lgclubny.com

Anna Sosnina
ICF (ACC)
ICF ACC certified coach, founder of EssorVie Coaching, passionate about...

Tyler Fink
B.A. in Religion, Anthropology, and Philosophy. Master of Divinity (M.Div.) in Missiology
Pastor, husband, and father helping Christian men pursue faithful growth...

Travis Brown
Professional Life coach
With experience in guiding clients to achieve goals, build confidence,...






Lidded Box Charging Station for Tech Accessories at Your Desk

Your Charging Cables Don’t Need to Live All Over Your Desk
Charging clutter has a way of spreading across a desk without you noticing. One phone cable becomes two, earbuds get dropped beside the keyboard, a smartwatch charger sits behind the monitor, and suddenly half your work surface is covered with little pieces of technology.
The frustrating part is that most of these items are things you genuinely use. You cannot simply declutter every cord and device because you still need to charge your phone, earbuds, watch, stylus, power bank, and other small electronics.
What is usually missing is not more storage. It is one clear place where charging happens.
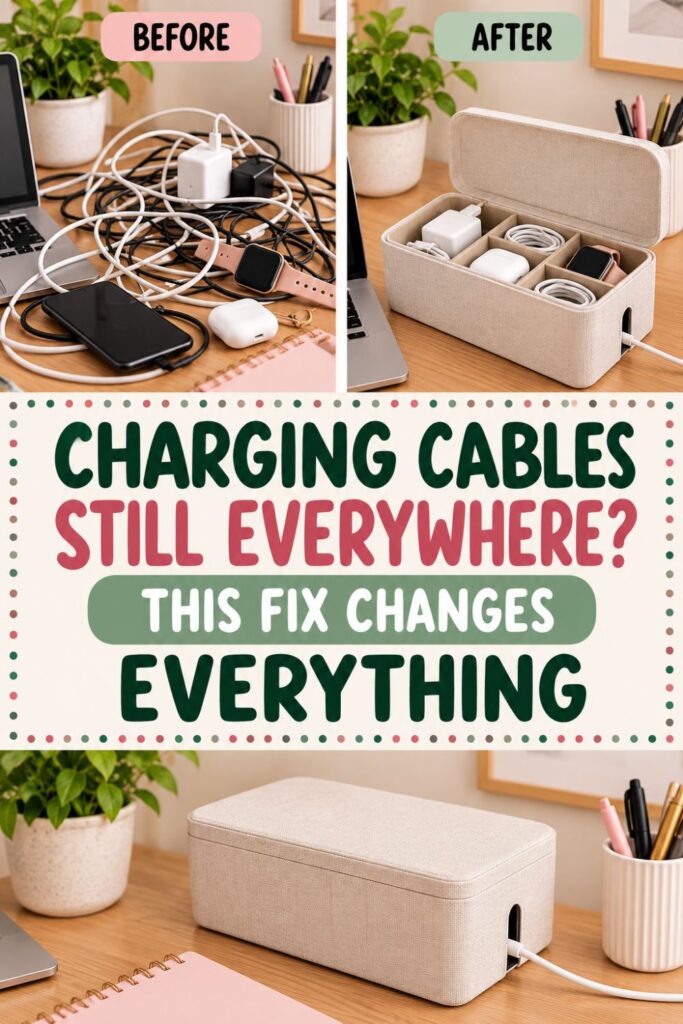
A simple lidded box can become that place. Instead of leaving cords loose across your work surface, you can gather the accessories you actually use and create a small charging station that keeps most of the visual clutter contained.
This works especially well if you want a solution that does not involve drilling holes, installing cable trays, mounting organizers, or buying an elaborate charging dock. You can create the basic setup with a box you already own, provided cords can pass through an existing opening or gap without being pinched.
The goal is not to hide every piece of technology. It is to make the charging process predictable.
A useful charging box should help you:
- Keep frequently used charging cords together.
- Give earbuds and small devices a defined home.
- Reduce loose cables across the desktop.
- Make chargers easy to find when you need them.
- Reset your desk quickly at the end of the day.
The lid helps reduce visual clutter, but the real benefit comes from creating one dedicated charging zone. Once your brain knows where charging accessories belong, you spend less time searching for them or moving them out of the way.
If you want to get more from your life, and are looking for concrete action steps to get you there, check out our Request a Coach page. It’s a “cut the fence-sitting and take action” way to tackle your issues and actually find success. To get off the fence and start to take action, click or tap here.
The setup can also be surprisingly quick. With the right box and a little sorting, you can create a functional desk charging station without turning it into a weekend organization project.
1. Decide What Your Charging Station Actually Needs to Hold
Before you look for the perfect box, figure out what actually needs to go inside it. Starting with the contents prevents you from choosing a container that is either far too large or frustratingly small.
Begin by collecting the charging accessories currently scattered around your desk. Look behind your monitor, under notebooks, inside drawers, and anywhere else cords tend to migrate.
You may find more than you expected.
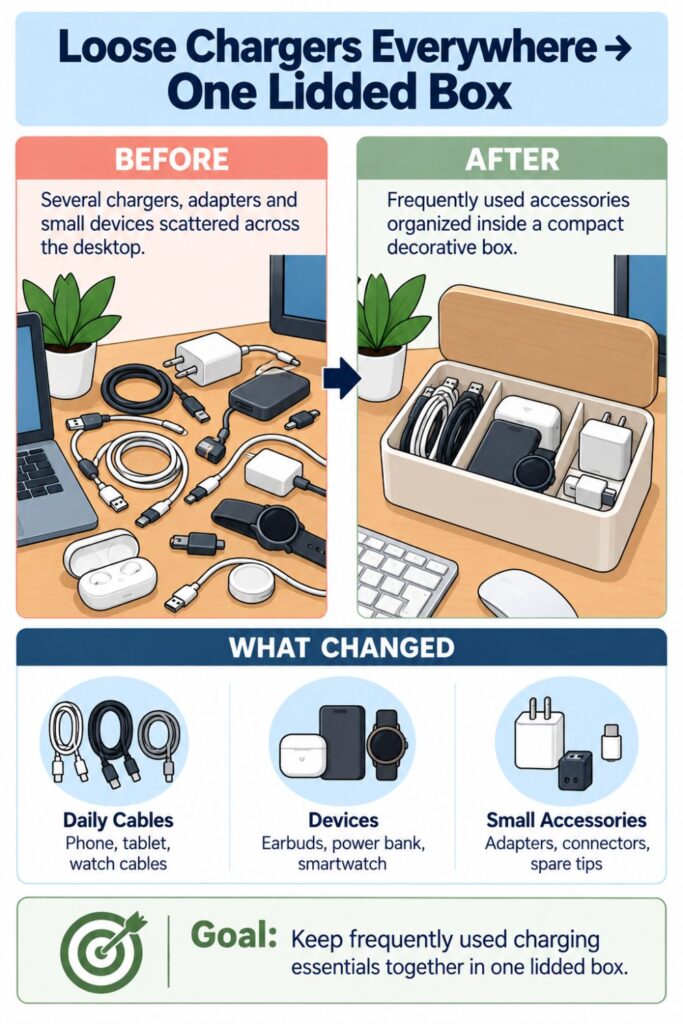
Gather your everyday charging items: Collect the cables, earbuds, smartwatch chargers, power banks, styluses, adapters, and small devices that regularly appear around your workspace. Keep them together temporarily so you can see the full charging category.
Separate daily items from occasional tech: Ask which accessories you actually use during a normal week. A cable for an old phone or an adapter you use twice a year probably does not need prime space in your everyday charging station.
Identify duplicate cables: You may discover that three identical charging cords have slowly accumulated on your desk. Keep the number you realistically need and move backup cords somewhere else.
Check mystery cables before keeping them: If you do not immediately know what a cable belongs to, identify it before adding it to the box. Unknown technology has a habit of becoming permanent clutter because nobody wants to throw away something that might be important.
If you want to get more from your life, and are looking for concrete action steps to get you there, check out our Request a Coach page. It’s a “cut the fence-sitting and take action” way to tackle your issues and actually find success. To get off the fence and start to take action, click or tap here.
A simple first sort might look like this:
- Daily phone cable
- Earbud charging cable
- Smartwatch charger
- Stylus charger
- Small power bank
- One frequently used adapter
Then create a separate home for backup cords and rarely used electronics.
The charging box should solve an everyday desk problem, not become permanent storage for every technology accessory you own. The fewer items it needs to hold, the easier it will be to keep organized.
A good rule is to organize around your normal routine rather than every possible charging scenario. If you usually charge two or three devices during the workday, design the station around those devices.
That keeps the box small, practical, and much easier to maintain.
2. Choose a Lidded Box That Works Without Drilling or Cutting
Once you know what needs to go inside, you can choose a box that supports the charging setup without requiring tools or permanent modifications.
The best container is not necessarily a special cable-management box. A decorative storage box, photo box, sturdy gift box, or compact desktop box may work perfectly if it has the right shape and an existing way for cords to pass through.
Look for an existing cable route: Check for handle openings, finger notches, small side gaps, loose-fitting lids, or another natural opening. The goal is to pass charging cables through without drilling, cutting, or forcing the lid shut.
If you want to get more from your life, and are looking for concrete action steps to get you there, check out our Request a Coach page. It’s a “cut the fence-sitting and take action” way to tackle your issues and actually find success. To get off the fence and start to take action, click or tap here.
Choose a relatively shallow box: Deep containers may look spacious, but small chargers can quickly disappear underneath one another. A shallower box keeps the contents visible and easier to reach.
Allow room for gentle cable curves: Charging cords should not have to bend sharply to fit inside the container. Choose a box with enough space for cables to loop naturally.
Check how the lid sits: Close the lid with a charging cable running through the intended opening. Make sure the cord is not tightly compressed between the lid and the box.
Measure the desk space first: Decide where the station will live before buying or repurposing a container. A huge box may hide your cables beautifully while creating an entirely new desk-space problem.
You do not need a perfectly fitted container. In fact, a little extra room often makes the setup easier to use.
You may also want to think about how visible the box will be. If it sits beside your monitor every day, choosing one that blends with your office can make the entire workspace feel calmer.
Function should come first, though.
A beautiful box with no practical cable opening will quickly become annoying. A simple container that allows cables to move freely and devices to fit comfortably will usually work much better.
If you want to get more from your life, and are looking for concrete action steps to get you there, check out our Request a Coach page. It’s a “cut the fence-sitting and take action” way to tackle your issues and actually find success. To get off the fence and start to take action, click or tap here.
The right box should make charging easier without requiring another DIY project before you can use it.
3. Pick the Safest Place for the Box on Your Desk
Where you place your charging station matters almost as much as what goes inside it. If the box is inconvenient to reach, you will eventually start dropping devices and charging cords somewhere else.
Look at the way you naturally use your workspace. Notice where your phone usually lands, where you remove your earbuds, and which side of your desk is closest to power.
The best location is often close enough to reach easily but far enough away that the box does not interfere with your primary work area.
Keep it outside your main work zone: Your keyboard, mouse, notebook, and active work materials should have priority. Place the box near the back corner, beside a monitor, on a desk shelf, or on a nearby side surface.
Choose a location near available power: The closer the charging station is to an outlet or appropriate power source, the fewer long cables you will need to stretch across the desk.
Protect cables from moving parts: Avoid routing cords through drawer tracks, folding desk mechanisms, chair wheels, or other places where they may repeatedly get caught or crushed.
Give the box a permanent home: Moving the charging station around makes the system harder to remember. Pick one location and allow that spot to become associated with charging.
If you want to get more from your life, and are looking for concrete action steps to get you there, check out our Request a Coach page. It’s a “cut the fence-sitting and take action” way to tackle your issues and actually find success. To get off the fence and start to take action, click or tap here.
You should also think about heat and ventilation.
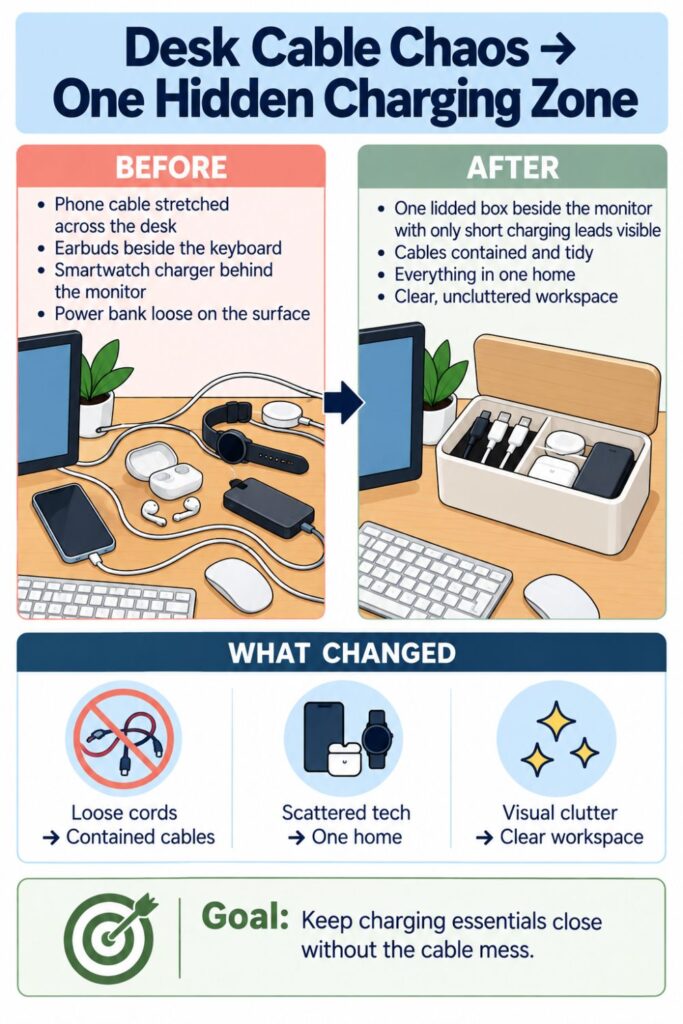
A decorative lidded box is useful for organizing charging cables and small devices, but it should not automatically become an enclosed home for equipment that generates significant heat. Power strips, larger adapters, and other mains-powered components may require more ventilation than a simple box provides.
When in doubt, keep the main power equipment outside the container and use the box primarily to control low-voltage charging leads and small accessories.
After choosing the location, sit at your desk and test it.
Can you reach the box comfortably? Can you place your phone there without standing up? Can you grab your earbuds without moving your computer?
If the answer is yes, you have probably found a location you can realistically maintain.
4. Route the Power Without Turning This Into a DIY Project
Cable management often becomes complicated because people assume they need to permanently attach, cut, drill, or mount something. For this charging station, the simplest route is usually the most useful.
You want electricity to reach the charging area while keeping the number of visible cables as low as reasonably possible.
If you want to get more from your life, and are looking for concrete action steps to get you there, check out our Request a Coach page. It’s a “cut the fence-sitting and take action” way to tackle your issues and actually find success. To get off the fence and start to take action, click or tap here.
Start by looking at your existing power setup. You may already have a nearby wall outlet, USB hub, monitor charging port, or desktop power source that can support your everyday devices.
Bring the power source close to the station: Whenever possible, reduce the distance between your charging area and the available power connection. This keeps long cables from stretching across the desk.
Feed charging leads through an existing opening: Use a handle slot, finger notch, lid gap, or similar opening in the box. Avoid cutting new holes if your goal is a quick, no-tools setup.
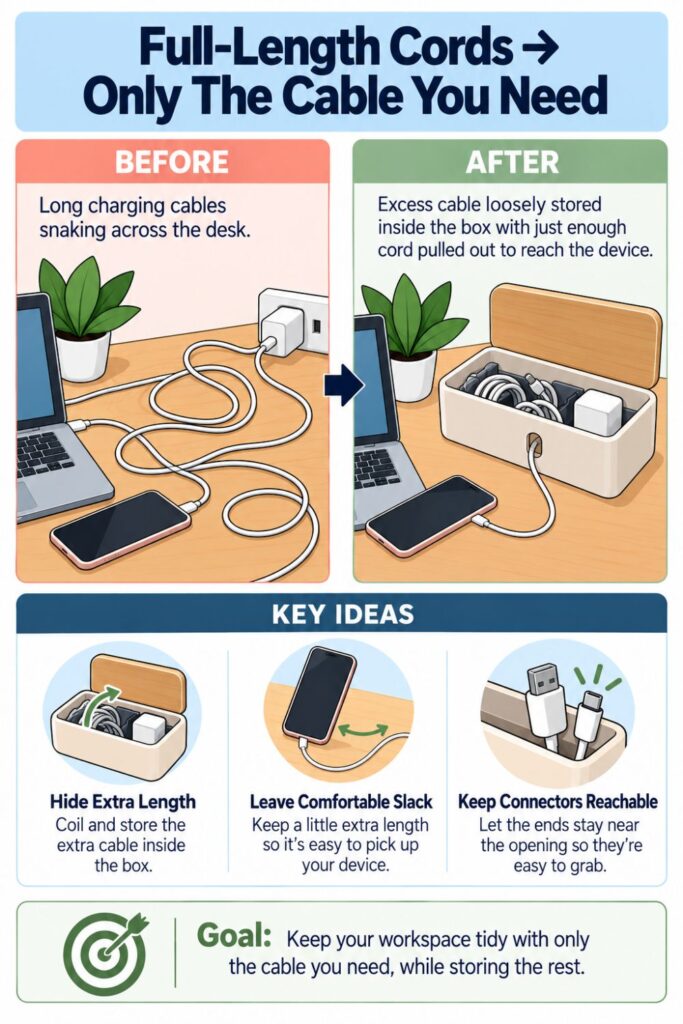
Pull excess cable length inside: If a charging cable is much longer than necessary, loosely coil the unused portion inside the designated cable area instead of leaving it spread across the desktop.
Leave enough slack for normal movement: Do not pull cables tight. You should be able to connect a phone or other device comfortably without putting tension on the connector.
Check the lid before you finish: Close the container and inspect every cable that passes through it. Nothing should be pinched tightly or forced into an unnatural bend.
The visible part of each charging cord should be long enough to function but short enough that it does not become a new source of clutter.
You may need to adjust the cable length a few times. That is normal.
If you want to get more from your life, and are looking for concrete action steps to get you there, check out our Request a Coach page. It’s a “cut the fence-sitting and take action” way to tackle your issues and actually find success. To get off the fence and start to take action, click or tap here.
Plug in your most-used device and see how much cord you actually need. Then pull the unnecessary slack back into the box.
This simple adjustment can make a surprisingly large visual difference.
Instead of several full-length cords sprawled across the workspace, you see only the short portions required to connect the devices you actually use.
5. Divide the Inside Into Simple Charging Zones
Putting a lid over tangled cables technically hides the mess, but it does not make the station easier to use. If you have to dig through a knot of cords every time your earbuds need charging, the system will become frustrating quickly.
A little internal zoning can keep the box functional without turning it into an elaborate organizer.
You do not necessarily need dividers. In many cases, simply assigning different areas of the box is enough.
Create a cable side: Use one portion of the container for loose cable length and cords that need to remain connected to the power source. Coil them loosely instead of tightly wrapping them.
Create a device side: Reserve another area for the phone, earbuds, watch, stylus, or other small device that may sit in the station while charging.
If you want to get more from your life, and are looking for concrete action steps to get you there, check out our Request a Coach page. It’s a “cut the fence-sitting and take action” way to tackle your issues and actually find success. To get off the fence and start to take action, click or tap here.
Give tiny accessories one predictable spot: Small adapters and charging pieces disappear easily. Keep them together in the same corner or in a very small removable cup or tray if needed.
Keep everyday items closest to the opening: The accessories you use most often should be the easiest to reach. Backup items can sit farther toward the back.
Avoid creating too many categories: A box divided into nine tiny zones may look impressive but require too much effort to maintain. Keep the layout broad and obvious.
A simple setup might contain just three zones:
- Active charging cables
- Devices currently charging
- Small charging accessories
That may be all you need.
The goal is not perfect alignment. It is being able to open the lid and immediately understand where something belongs.
If you can return your earbuds without thinking and find your watch charger without searching, the system is working.
This is especially important for low-effort organization. A system that takes several decisions every time you use it creates friction.
If you want to get more from your life, and are looking for concrete action steps to get you there, check out our Request a Coach page. It’s a “cut the fence-sitting and take action” way to tackle your issues and actually find success. To get off the fence and start to take action, click or tap here.
Simple zones reduce those decisions.
The easier the box is to reset, the more likely it is to remain useful long after the initial setup.
6. Set Up the Box So You Can Charge Without Emptying It
One of the most common problems with hidden storage is that everything looks neat until you actually need to use it. Then the entire container has to be emptied just to find one cable.
Your charging station should work while everything else remains in place.
The easiest way to accomplish this is to treat the connector ends of your cables as active tools. They need to remain visible and accessible.
Position connector ends near the top: Arrange your most-used charging leads so the ends do not sink underneath coils of excess cable.
Keep each lead long enough to reach its device: Pull enough cable through the box that your phone, earbuds, or other accessory can rest comfortably in its charging position.
Separate cables that tangle easily: If two cords repeatedly twist together, give them slightly different routes or place their excess cable in different sections of the box.
If you want to get more from your life, and are looking for concrete action steps to get you there, check out our Request a Coach page. It’s a “cut the fence-sitting and take action” way to tackle your issues and actually find success. To get off the fence and start to take action, click or tap here.
Test every daily device: Connect each item you expect to charge regularly. Make sure you do not have to rearrange the entire station to plug it in.
Practice removing the device: Once it is charged, unplug it and return the cable end to its normal place. The connector should remain easy to find for the next use.
This testing step is more important than making the inside look perfect.
A charging station is successful when you can use it quickly.
For example, imagine your earbuds are almost dead before a video call. You should be able to open the box, locate the correct cable, and connect them immediately.
If instead you have to untangle three cords and remove your power bank first, change the layout.
Small adjustments can make the setup dramatically easier.
Move daily cables forward. Push backup accessories toward the back. Reduce the number of items inside if necessary.
If you want to get more from your life, and are looking for concrete action steps to get you there, check out our Request a Coach page. It’s a “cut the fence-sitting and take action” way to tackle your issues and actually find success. To get off the fence and start to take action, click or tap here.
The best organization is usually the arrangement that removes the most friction from a task you already do frequently.
7. Use a Simple “Charge, Grab, Return” Routine
Even a well-designed charging station can fall apart if the accessories never return to it. The physical container creates the home, but a tiny routine helps keep everything there.
The routine does not need to be complicated.
Think of it as three basic actions: charge, grab, return.
Charge devices in the same place: Instead of plugging your phone in wherever a cable happens to be available, use the charging station as your default location.
Grab the device, not the whole setup: When your phone or earbuds finish charging, unplug the device but leave the charging cable assigned to the station.
Return small accessories after use: Earbuds, watch chargers, adapters, and other charging pieces should return to the box rather than landing beside your keyboard.
Close the lid when the station is not actively being used: This creates an immediate visual reset and makes the desktop feel less busy.
If you want to get more from your life, and are looking for concrete action steps to get you there, check out our Request a Coach page. It’s a “cut the fence-sitting and take action” way to tackle your issues and actually find success. To get off the fence and start to take action, click or tap here.
You can also attach the routine to something you already do.
At the end of the workday, for example, you might:
- Put your earbuds back in their charging case.
- Connect your smartwatch.
- Plug in a power bank if needed.
- Return any loose cable ends.
- Close the box.
- Clear the remaining workspace.
That takes very little time once the station is established.
The benefit is that tomorrow’s desk already starts in a better condition.
This type of system works particularly well because it does not ask you to become a completely different person. You do not need to suddenly love cable management or perform a ten-minute desk reset every evening.
You simply give a handful of frequently used objects one obvious destination.
If you find yourself repeatedly leaving one item outside the box, do not immediately blame the routine. Look at the setup.
The item may need a more convenient location or easier access.
If you want to get more from your life, and are looking for concrete action steps to get you there, check out our Request a Coach page. It’s a “cut the fence-sitting and take action” way to tackle your issues and actually find success. To get off the fence and start to take action, click or tap here.
A good organization system should support the way you behave, not constantly fight against it.
8. Stop the Charging Box From Becoming a Tech Junk Drawer
Any container with a lid is vulnerable to one particular problem. Once clutter disappears inside it, the temptation to add more clutter becomes very strong.
The charging station can quickly turn into a home for batteries, old flash drives, paper clips, random adapters, instruction manuals, pens, and unidentified technology.
Eventually, you have simply created a smaller junk drawer.
The easiest solution is to give the box a strict purpose.
Use a charging-only rule: If an item is not actively involved in charging one of your regularly used devices, it probably belongs somewhere else.
Remove obsolete chargers quickly: When you replace a device, check whether its charging cable still serves a purpose. If not, remove it before it becomes permanent box clutter.
Keep backup cables somewhere else: Your charging station should contain active tools. Extra cords can live in a separate technology-storage area.
If you want to get more from your life, and are looking for concrete action steps to get you there, check out our Request a Coach page. It’s a “cut the fence-sitting and take action” way to tackle your issues and actually find success. To get off the fence and start to take action, click or tap here.
Do a fast untangle when needed: If cords begin twisting together, spend a minute separating them before the problem becomes frustrating.
Treat overflow as a warning: If the lid stops closing comfortably or devices are stacked on top of one another, edit the contents before buying a larger box.
A quick monthly check may be enough.
Open the station and ask:
- Do I recognize every cable?
- Have I used these accessories recently?
- Is anything broken?
- Are duplicate cords accumulating?
- Can I still reach the items I use most?
You do not need to empty and reorganize the entire container every month. The point is simply to catch clutter before it quietly takes over.
A limited-capacity box can actually help you here.
Because the container cannot expand indefinitely, it gives you a natural boundary. When new technology comes in, something old may need to move out.
That boundary helps the charging station remain what it was designed to be: a quick, low-effort system for everyday tech, not permanent storage for every cable you have ever owned.
If you want to get more from your life, and are looking for concrete action steps to get you there, check out our Request a Coach page. It’s a “cut the fence-sitting and take action” way to tackle your issues and actually find success. To get off the fence and start to take action, click or tap here.
9. Adjust the Setup for the Way You Actually Work
There is no single correct way to arrange a charging box because different workspaces create different charging habits.
Someone working from a small bedroom desk may need a different setup than someone with a large home office. A shared family workstation will also need different rules from a desk used by one person.
Start with the basic system, then adjust it around your routine.
Create a workday charging version: Prioritize the devices you use while working, such as your phone, earbuds, smartwatch, stylus, or power bank. Keep these cords easiest to reach.
Create an end-of-day charging version: Use the station mainly at night. Return devices to the box as part of shutting down your workspace so they are charged and ready the next morning.
Create a tiny-desk version: Place the box on a nearby shelf, narrow side table, or desk riser instead of using valuable desktop space. Only the essential cable needs to reach your immediate work area.
Create a shared-desk version: Assign each person one cable or one small area inside the box. This prevents one person’s accessories from constantly getting mixed with another’s.
Create a mobile-accessory version: If you frequently take earbuds, a power bank, or other small technology with you, keep those items together within one easily accessible section.
If you want to get more from your life, and are looking for concrete action steps to get you there, check out our Request a Coach page. It’s a “cut the fence-sitting and take action” way to tackle your issues and actually find success. To get off the fence and start to take action, click or tap here.
Pay attention to repeated annoyances.
If you always charge your phone outside the box because the cable is too short, increase the accessible length.
If your earbuds keep getting buried, move them toward the front.
If the station takes up too much desktop space, relocate the container rather than abandoning the entire idea.
Organization becomes much easier when you treat the first setup as a starting point rather than a permanent design.
The most useful version is the one that fits your actual behavior.
A charging station should quietly make the desk easier to use. You should not have to constantly think about maintaining it.
When the layout supports your routine, putting things away begins to feel almost automatic.
If you want to get more from your life, and are looking for concrete action steps to get you there, check out our Request a Coach page. It’s a “cut the fence-sitting and take action” way to tackle your issues and actually find success. To get off the fence and start to take action, click or tap here.
10. How an Organizing Coach Could Make the System Easier to Maintain
Sometimes a messy charging area is not really a cable problem. It is one visible example of a larger pattern where everyday objects do not have obvious homes.
An organizing coach or professional organizer can help identify why a system keeps breaking down instead of simply adding another storage container.
That can be especially useful if you have already tried multiple desk organizers but still end up surrounded by loose supplies and technology.
Identify the real point of friction: A coach can help you notice where the system fails. Maybe the box is too far away, the lid creates an extra step, or you regularly use more devices than the station was designed to hold.
Build around existing habits: Instead of expecting yourself to remember a completely new routine, a coach can connect the charging reset to something you already do, such as ending work, shutting down your computer, or preparing for the next morning.
Simplify systems that require too many decisions: If every cable has a complicated label, compartment, or storage rule, maintaining the setup may require more effort than you want to give it. A coach can help reduce unnecessary steps.
Look beyond the charging box: The same pattern may be affecting papers, office supplies, notebooks, and other parts of the workspace. Solving those areas can make the charging station easier to maintain too.
Create realistic reset expectations: You may not need a perfectly styled desk every evening. A short reset that returns key items to their zones can be enough.
If you want to get more from your life, and are looking for concrete action steps to get you there, check out our Request a Coach page. It’s a “cut the fence-sitting and take action” way to tackle your issues and actually find success. To get off the fence and start to take action, click or tap here.
The value of coaching is not necessarily creating a more sophisticated organization system.
Often, the opposite is more useful.
A good system should ask as little as possible from you while still keeping the space functional.
If your desk organization repeatedly falls apart, look for friction before adding more containers.
The charging box itself can become a helpful example. Once one category has a clear home and simple routine, you can use the same principle elsewhere.
One category. One obvious location. As few steps as possible.
A Small Box Can Remove a Surprising Amount of Visual Clutter
A charging station does not need to be complicated to make a noticeable difference.
The basic idea is simple: gather the cords and small devices that already live around your desk, give them one defined home, and keep unnecessary cable length and accessories contained inside a lidded box.
If you want to get more from your life, and are looking for concrete action steps to get you there, check out our Request a Coach page. It’s a “cut the fence-sitting and take action” way to tackle your issues and actually find success. To get off the fence and start to take action, click or tap here.
That single change can reduce a surprising amount of visual noise.
Instead of seeing several separate chargers, earbuds, adapters, and loose cables, you see one container with a clear purpose.
The easiest version follows a few simple principles:
- Keep only frequently used charging accessories inside.
- Choose a box that works without cutting or drilling.
- Route cords through an existing opening or safe gap.
- Keep daily connectors easy to reach.
- Give devices and cables broad internal zones.
- Return accessories after using them.
- Remove obsolete items before they accumulate.
Most importantly, resist the temptation to turn this into a bigger project than it needs to be.
You do not need custom dividers, elaborate cable labels, permanent mounting hardware, or an entire desk makeover before you can get control of charging clutter.
Start with one box.
Test it with the devices you use most.
Live with the setup for a few days and notice what feels awkward. Then make small adjustments to cable length, placement, or contents.
If you want to get more from your life, and are looking for concrete action steps to get you there, check out our Request a Coach page. It’s a “cut the fence-sitting and take action” way to tackle your issues and actually find success. To get off the fence and start to take action, click or tap here.
The best organizing systems often become easier over time because they are shaped around real behavior.
Once the charging station has a permanent location, it becomes much easier to remember where earbuds belong, where the phone gets charged, and where loose cords should return.
That predictability is what makes the setup valuable.
A lidded box may look like a very small organization fix, but when it removes one recurring source of clutter from your workspace every day, that small fix can make the entire desk feel easier to manage.
If you want to get more from your life, and are looking for concrete action steps to get you there, check out our Request a Coach page. It’s a “cut the fence-sitting and take action” way to tackle your issues and actually find success. To get off the fence and start to take action, click or tap here.
Read this next

10 Christmas Table Decoration & Centerpiece Ideas Designers Swear By (Super Simple Settings to Copy)
Are you all about style, decor and organization? Download a copy of our Decluttering Workbook. **** Most people think Christmas table décor requires elaborate centerpieces, matching dish sets, and hours […]
Read More
How to Make Your Front Door the Star of Christmas (With the Right Wreath)
Are you all about style, decor and organization? Download a copy of our Decluttering Workbook. **** Your front door is where holiday magic begins. It’s the first glimpse guests get […]
Read More
9 Christmas Staircase Decor Upgrades Designers Love (Super Easy to Copy)
Are you all about style, decor and organization? Download a copy of our Decluttering Workbook. **** Your staircase is one of the first things guests see, but it’s usually the […]
Read More