


Talk to a coach about Organizational coaching

Crystal Faulk
ACC
I help overwhelmed women in transition gain clarity, confidence, and...

Terrie Hein
Certified Life Coach, Certified Insight Coach Practitioner
Coaching to declutter your life, organize your goals, and cook...

Dr Charlene Ashley
Doctorate - Behaviours
I coach individuals to design fulfilling lives through structure, clarity,...

Paloma Chiara

Lana's Gymnastics Club
"Where the best in gymnastics meets fun. Where every child is a star"
lgclubny.com

Anna Sosnina
ICF (ACC)
ICF ACC certified coach, founder of EssorVie Coaching, passionate about...

Tyler Fink
B.A. in Religion, Anthropology, and Philosophy. Master of Divinity (M.Div.) in Missiology
Pastor, husband, and father helping Christian men pursue faithful growth...

Travis Brown
Professional Life coach
With experience in guiding clients to achieve goals, build confidence,...




Desk Micro-Zone Map for Tiny Work Surfaces
Want to try this at home? No worries! Download a copy of our Clutter Reset Guide.
*****
A tiny desk can feel impossible to keep clear because every item seems to need the same small patch of space. Your laptop needs room. Your notebook needs room. Your pens, chargers, sticky notes, planner, water bottle, and papers all want to be close enough to reach.
The fix is not always a bigger desk. Sometimes the better answer is a clearer desk map.
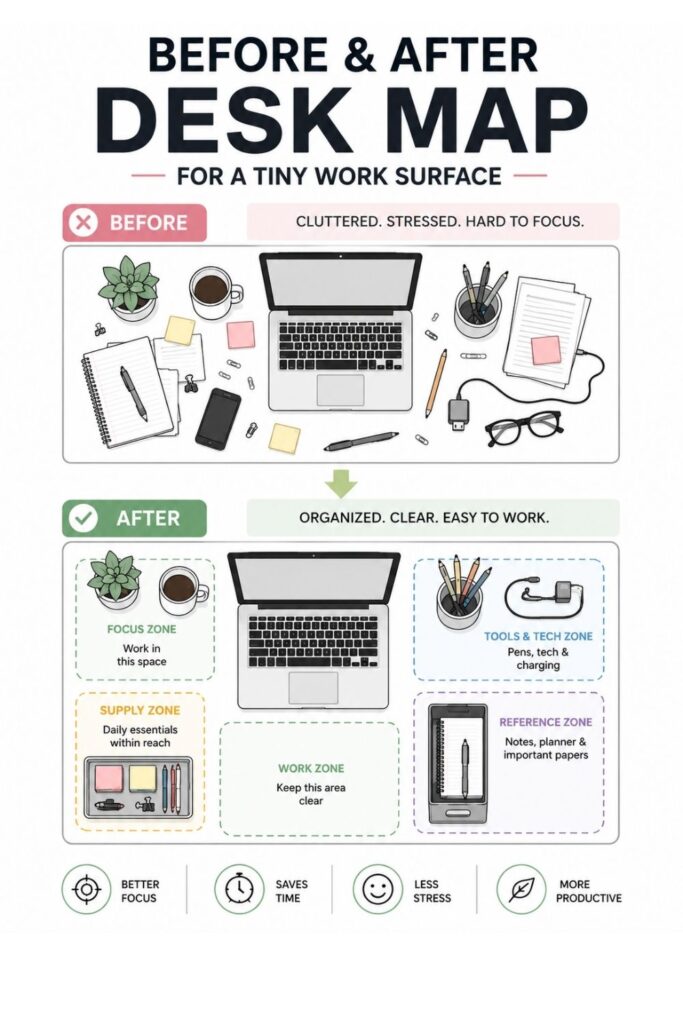
A desk micro-zone map divides your surface into small, intentional areas. Each zone has one job, so your supplies stay reachable without spreading everywhere. Instead of asking, “Where should this go?” every time you sit down, the desk already answers that question for you.
This works especially well for small desks, bedroom workstations, shared tables, home office corners, and study spaces where there is not much room to spare. You are not trying to create a picture-perfect desk. You are building a surface that helps you start work faster and reset with less effort.
The goal is simple:
- Keep the center open for active work
- Give daily tools a small home
- Move paper and supplies into tighter zones
- Stop cords from taking over
- Create a tiny landing spot for temporary items
- Make the whole setup easy to reset
Think of the desk like a mini floor plan. Even if the surface is small, it can still have a “work zone,” a “supply zone,” a “paper zone,” and a “charging zone.” Once those zones are clear, the desk starts feeling less like one crowded surface and more like a small system.
If you want to get more from your life, and are looking for concrete action steps to get you there, check out our Request a Coach page. It’s a “cut the fence-sitting and take action” way to tackle your issues and actually find success. To get off the fence and start to take action, click or tap here.
You do not need fancy products to make this work. A tray, cup, file holder, clip, small box, wall pocket, or even a clear section of desktop can act as a zone marker. The most important part is deciding what belongs where before clutter decides for you.
Need some in depth help with organization and productivity ? Drop on by our directories choc full of productivity coaches, minimalist coaches, and work/life balance coaches to get your life organized! Or click here to have us match you to the best.
1. Start With the Real Work You Do at Your Desk
Before you move anything around, look at what actually happens at your desk. A lot of desk organization fails because it is built around an ideal routine instead of your real one. You might imagine using the desk for deep work, planning, journaling, bills, laptop tasks, and creative projects, but most tiny desks cannot support every activity at the same time.
Start by naming the main job of the desk. Is it where you work on a laptop? Study? Take calls? Write in a planner? Sort papers? Do homework? Create content? Pay bills? The clearer you are about the main activity, the easier it becomes to decide what deserves space.
Name your main desk activity: Pick the one activity that happens here most often. If the desk has two main jobs, such as laptop work and studying, write both down, but do not let the list grow too long.
Next, list what you actually touch during a normal session. Not what you might need someday. Not what looks nice in a desk photo. Only the items that support the main work.
For example, your daily-use list might include:
- Laptop
- Notebook
- One pen
- Planner
- Sticky notes
- Phone charger
- Headphones
- Water bottle
- One active folder
List what must stay within reach: Write down only the items you use during a regular work session, then remove anything that does not directly support that session.
If you want to get more from your life, and are looking for concrete action steps to get you there, check out our Request a Coach page. It’s a “cut the fence-sitting and take action” way to tackle your issues and actually find success. To get off the fence and start to take action, click or tap here.
This is where the desk starts to breathe. Extra pens, old receipts, backup notebooks, unopened mail, random tech accessories, and decorative extras can usually move somewhere else. They may still be useful, but useful does not always mean desktop-worthy.
Remove “just in case” desk items: Move backup supplies, old papers, duplicate tools, and rarely used items into a drawer, bin, shelf, or nearby storage spot.
Finally, choose one simple reset goal. This gives the entire desk map a purpose. Maybe you need enough space to open a notebook beside your laptop. Maybe you need to stop losing pens. Maybe you need the desk to be clear enough for a study session in under two minutes.
Choose your desk reset goal: Pick one practical goal that would make the desk noticeably easier to use, such as “I need room to type and write at the same time.”
2. Create a Main Work Zone in the Center
The center of the desk should be protected like prime real estate. This is the space where the actual work happens, so it cannot also be the mail pile, snack zone, supply shelf, and charging station. On a tiny surface, the center needs one clear job.
Think of this area as the “active work zone.” It should hold the task you are doing right now, not every task waiting for your attention. If you are writing, it may hold a notebook and pen. If you are working on a laptop, it may hold the laptop and mouse. If you are studying, it may hold the book, notes, and one writing tool.
Claim the center for active work: Keep the middle of the desk reserved for whatever task is happening right now, so the surface does not get buried before you even begin.
A visual boundary makes this much easier. You can use a desk mat, a laptop stand, a placemat, a notebook-sized open space, or even the front edge of the desk as a mental line. The point is to make the active zone visible enough that you notice when clutter starts creeping into it.
If you want to get more from your life, and are looking for concrete action steps to get you there, check out our Request a Coach page. It’s a “cut the fence-sitting and take action” way to tackle your issues and actually find success. To get off the fence and start to take action, click or tap here.
Set a clear boundary: Use a mat, notebook, laptop edge, or open rectangle of desktop to show where the main work zone begins and ends.
Do not overload this area. A tiny desk cannot handle five open notebooks, three drinks, a laptop, mail, pens, and a planner at once. The more you let into the center, the harder it becomes to start or finish anything.
A helpful rule is “current task only.” If an item is not part of the thing you are doing right now, it belongs in another zone.
Limit the center to current-use items: Keep only the laptop, notebook, document, or tool needed for the active task in the center zone.
This also makes task switching easier. Before you move from laptop work to paper planning, clear the laptop-related extras. Before you switch from studying to bills, remove the books and notes. You are not doing a full cleanup every time, just resetting the active zone.
Reset the center between tasks: Clear the previous task before bringing in the next one so the desk does not become layered with half-finished work.
3. Build a Side Supply Zone for Daily Tools
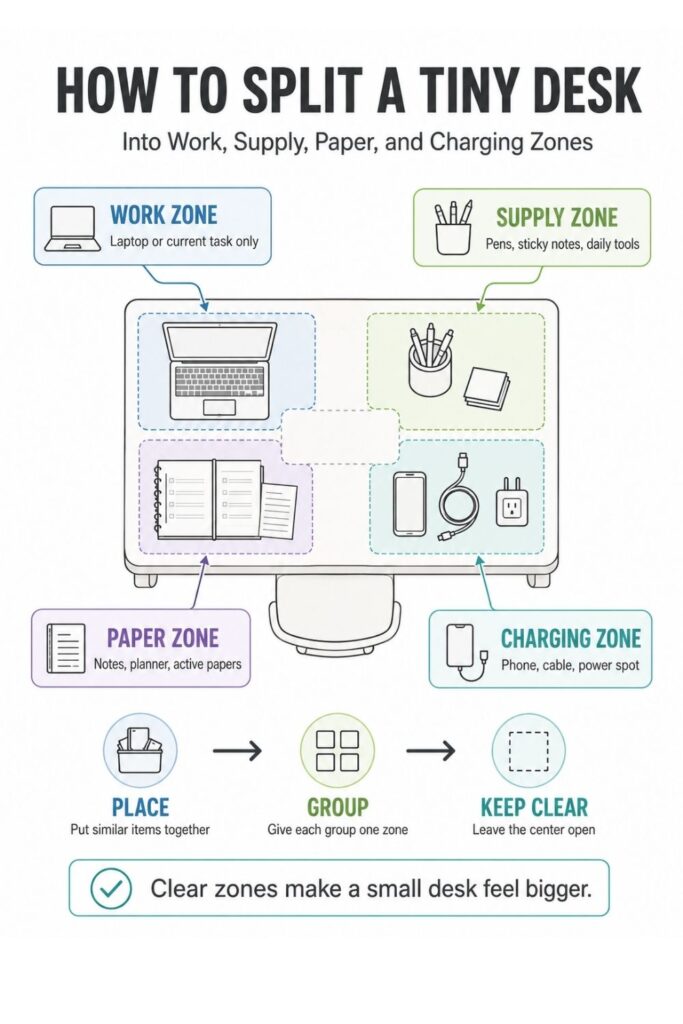
Once the center is protected, your daily tools need a small side zone. This keeps pens, sticky notes, highlighters, scissors, clips, and other small items nearby without letting them scatter across the desk.
The side supply zone works best when it is placed where your hand naturally reaches. If you are right-handed, that may be the right front or right side of the desk. If you are left-handed, the left side may feel better. The goal is to grab what you need without leaning, digging, or interrupting your work.
If you want to get more from your life, and are looking for concrete action steps to get you there, check out our Request a Coach page. It’s a “cut the fence-sitting and take action” way to tackle your issues and actually find success. To get off the fence and start to take action, click or tap here.
Pick your dominant-hand side: Place the daily supply zone where your hand naturally reaches during a normal work session.
This zone does not need to be large. In fact, it should not be. A small cup, shallow tray, pencil pouch, narrow bin, or drawer insert can be enough. The container is not just for storage. It creates a border, which is what stops small supplies from spreading.
Use one small container: Choose a cup, mini tray, pencil case, or shallow box so daily tools have a defined home instead of rolling across the desk.
Be strict about what counts as daily. If you keep twenty pens on a tiny desk, they will not feel like supplies. They will feel like clutter. One or two pens, one highlighter, one small pad of sticky notes, and maybe scissors or clips may be plenty.
A good side supply zone might include:
- Two favorite pens
- One highlighter
- Sticky notes
- Small scissors
- Page flags
- One binder clip
- Earbuds, if used daily
Keep only the daily set: Store the tools you reach for every day and move duplicates, specialty supplies, and extras somewhere nearby but off the desktop.
The easiest systems are the ones that are simple to reset. If the cup is stuffed or the tray is packed edge to edge, putting things away becomes annoying. Leave a little breathing room inside the container so items can be dropped back quickly.
Make the zone easy to return to: Keep the container loose enough that supplies can be put away in seconds without rearranging everything.
If you want to get more from your life, and are looking for concrete action steps to get you there, check out our Request a Coach page. It’s a “cut the fence-sitting and take action” way to tackle your issues and actually find success. To get off the fence and start to take action, click or tap here.
This side zone is small, but it changes the whole desk. It lets your tools stay close without stealing the main work surface.
4. Add a Vertical Zone for Items That Do Not Need Flat Space
A tiny desk runs out of surface space quickly, so anything that can stand up should probably stop lying flat. Papers, folders, notebooks, planners, and reference items often take over because they are stacked horizontally. A vertical zone gives those items a place to live without covering the work area.
Vertical storage can be as simple as a file sorter, wall pocket, bookend, monitor stand shelf, pegboard, narrow crate, or upright magazine holder. You are not trying to store every paper you own. You are creating a visible, limited place for active items.
Move standing items upward: Use a file sorter, wall pocket, shelf, monitor stand, or upright organizer for notebooks, folders, and current papers.
This matters because flat piles hide what is inside them. Once papers stack up, every item feels equally urgent and equally forgotten. A vertical zone makes it easier to see categories and pull one thing out without disturbing everything else.
However, this zone can become cluttered if it turns into archive storage. The vertical zone should hold current papers, current notebooks, or reference items you use often. Old documents, completed forms, expired coupons, and papers you are avoiding should not live there forever.
Separate active from archive: Keep only current papers, active folders, and often-used notebooks in the vertical zone, then move finished items into longer-term storage.
It helps to make the items readable at a glance. Turn folder labels outward. Face notebook spines forward. Use colored tabs only if they make the setup easier, not more complicated.
If you want to get more from your life, and are looking for concrete action steps to get you there, check out our Request a Coach page. It’s a “cut the fence-sitting and take action” way to tackle your issues and actually find success. To get off the fence and start to take action, click or tap here.
Face labels or covers outward: Position folders, notebooks, or files so you can identify them quickly without pulling out the whole stack.
Placement also matters. Put the vertical zone along the back edge or one side of the desk. Avoid placing it right where your arms need to move. The goal is to support the desk, not box you in.
Keep the desktop edge clear: Place vertical storage along the back or side so it frees up the center instead of crowding your active work zone.
This one change can make a small desk feel much bigger. When papers stand up instead of spreading out, the surface becomes easier to use and easier to reset.
5. Create a Cable and Charging Zone That Stays Put
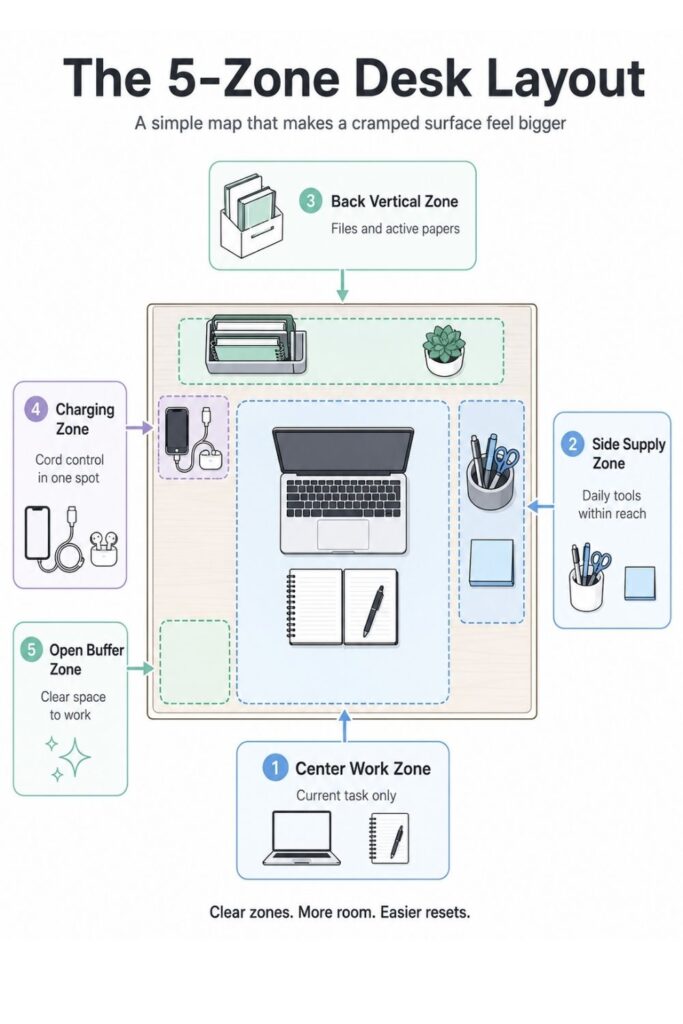
Cords can make a tiny desk feel messy even when everything else is organized. Chargers slide forward. Earbuds tangle with pens. Laptop cords cut across notebooks. Phone cables fall behind the desk and somehow end up wrapped around everything.
A charging zone gives all of that one clear place.
Start by choosing one corner or edge for power-related items. This should be close to the outlet if possible, but not in the center of the desk. The back left, back right, or side edge usually works best.
Choose one charging corner: Pick one edge or corner where chargers, cords, earbuds, and power accessories belong.
If you want to get more from your life, and are looking for concrete action steps to get you there, check out our Request a Coach page. It’s a “cut the fence-sitting and take action” way to tackle your issues and actually find success. To get off the fence and start to take action, click or tap here.
Once the spot is chosen, anchor the cords. You do not need an elaborate cable system. A few cable clips, binder clips, Velcro ties, twist ties, adhesive hooks, or a small cord box can make a big difference. The goal is to stop cords from migrating into your work zone.
Anchor the cords: Use clips, ties, hooks, or a small cord container so chargers stay in place instead of sliding across the desk.
Be honest about how many cords need to live on the desk. If you have three old charging cables, two device cords, spare earbuds, and a mystery adapter sitting there, the zone will get messy fast. Keep only what you use regularly.
Store extra cords elsewhere: Move backup chargers, old cables, adapters, and rarely used tech into a labeled pouch, drawer, or bin.
The best charging setup is one you can use without thinking. If you have to crawl under the desk or untangle the cord every time, you will avoid using the system. Leave the charging end reachable, but contained.
Make plugging in a one-step habit: Position the cord end where it can be grabbed quickly without digging, bending, or untangling.
You can also add a small “device parking” spot beside the charger. This is helpful if your phone, earbuds, tablet, or smartwatch tends to float around the desk. A small coaster, tray, or empty corner can become the device zone.
Keep this area tight. The charging zone should not become a second supply zone or a junk drawer without walls. Its job is power, cords, and devices. That is enough.
If you want to get more from your life, and are looking for concrete action steps to get you there, check out our Request a Coach page. It’s a “cut the fence-sitting and take action” way to tackle your issues and actually find success. To get off the fence and start to take action, click or tap here.
6. Use a Landing Zone for Temporary Items
Every desk needs a place for things that are not ready to be filed, tossed, or handled yet. Without that spot, temporary items land in the center of the desk and stay there. Mail, forms, receipts, school papers, sticky notes, books, and random reminders slowly take over.
A landing zone gives those items a temporary place to wait. The key word is temporary.
This zone should be small and obvious. A shallow tray, clipboard, slim basket, file folder, or far corner of the desk can work. It should not be so large that it invites everything in the room to pile up.
Give incoming items one stop: Create a small place for papers, mail, forms, receipts, or items that need a decision but should not cover the whole desk.
The size of the landing zone matters. If you use a giant basket, it will fill. If you use a tiny tray, it forces decisions sooner. For a tiny desk, the landing zone should hold only a short stack of papers or a few items waiting for action.
Keep the landing zone intentionally small: Use a tray, clipboard, folder, or small corner so temporary clutter has a clear limit.
Next, give the zone a time rule. This keeps it from becoming permanent storage. You might clear it every afternoon, every Friday, before starting work, or when the tray gets full. The exact rule matters less than having one.
Add a time rule: Decide when the landing zone gets cleared, such as daily, every Friday, or before the next work session.
If you want to get more from your life, and are looking for concrete action steps to get you there, check out our Request a Coach page. It’s a “cut the fence-sitting and take action” way to tackle your issues and actually find success. To get off the fence and start to take action, click or tap here.
When you clear it, sort by next action. This is better than sorting by vague categories like “important” or “later.” Action categories tell you what happens next.
Useful action categories include:
- Toss
- File
- Reply
- Pay
- Scan
- Sign
- Move elsewhere
- Add to calendar
Sort by next action: Decide what each item needs next so the landing zone does not become a pile of delayed decisions.
A landing zone is not a failure point. It is a pressure valve. It gives real life a place to land without letting real life take over the whole desk.
7. Map the Desk by Reach Level
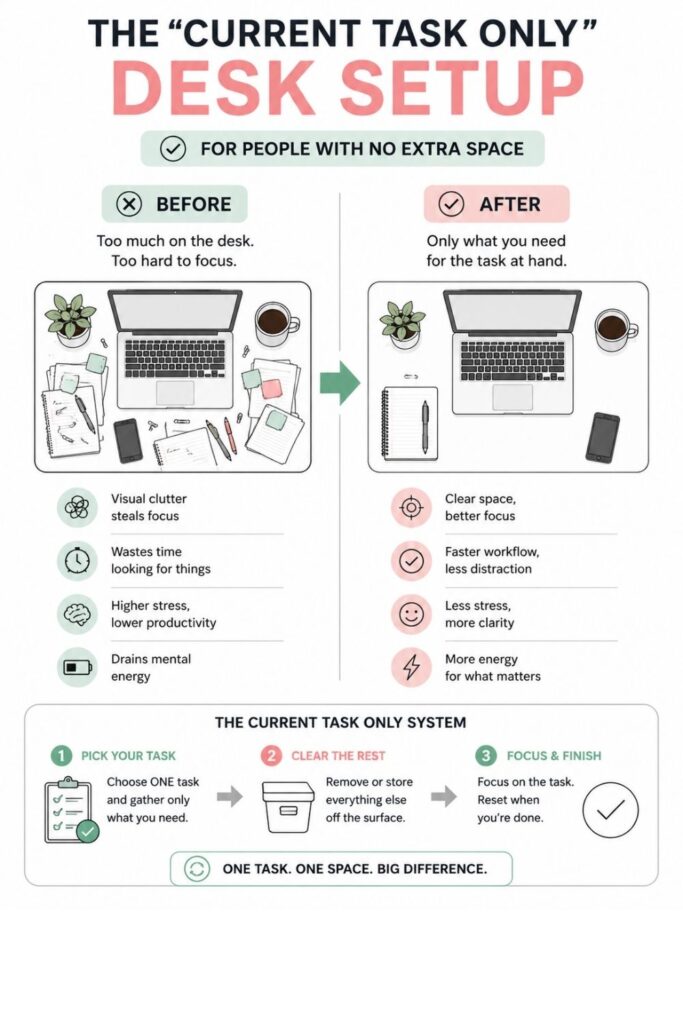
A tiny desk works better when the most-used items are closest and the least-used items are farther away. This sounds obvious, but many desks are arranged by what fits, not by what actually gets used. That is how backup supplies end up in prime space while daily tools get buried.
Start by sitting at the desk as if you are about to work. Notice where your hands naturally land. That front and side area is your closest reach zone. It should be reserved for the items you use constantly.
Place daily tools closest: Keep the items used multiple times per session within easy reach, such as your notebook, pen, charger, planner, mouse, or headphones.
Next, identify what you use weekly or only during certain tasks. These items can stay nearby, but they do not need the best surface space. They might go in a drawer, on a shelf, in a file sorter, or at the back of the desk.
If you want to get more from your life, and are looking for concrete action steps to get you there, check out our Request a Coach page. It’s a “cut the fence-sitting and take action” way to tackle your issues and actually find success. To get off the fence and start to take action, click or tap here.
Move weekly tools farther back: Put less-used items like extra paper, tape, stamps, backup notebooks, or reference books outside the main reach zone.
Then look for rare-use items. These are the things that technically belong to work or study life, but do not need to live on the desk. Extra chargers, old notebooks, instruction manuals, seasonal supplies, and specialty tools often fall into this category.
Remove rare-use items completely: Store occasional, duplicate, or seasonal items away from the desk so the surface only holds what supports regular use.
A helpful way to think about reach levels is:
- Reach level 1: Used every session
- Reach level 2: Used weekly or for specific tasks
- Reach level 3: Used rarely, stored away
- Reach level 4: No longer useful, remove completely
After sorting, test the layout. Pretend to start a normal work session. Open your laptop. Grab a pen. Check your planner. Plug in your phone. Reach for a paper. Notice what feels easy and what feels annoying.
Test your reach pattern: Move through a normal task and adjust anything that makes you twist, dig, stack, or stop working.
The goal is not perfection. The goal is fewer interruptions. When the things you need most are easiest to reach, the desk starts working with you instead of against you.
8. Make the Zones Visible Enough to Maintain
A desk zone only works if you can see it, feel it, or understand it quickly. If the system exists only in your head, it is easy to ignore when you are busy. Tiny desks need visual anchors because there is not much margin for drifting clutter.
If you want to get more from your life, and are looking for concrete action steps to get you there, check out our Request a Coach page. It’s a “cut the fence-sitting and take action” way to tackle your issues and actually find success. To get off the fence and start to take action, click or tap here.
A visual anchor can be a tray, mat, cup, box, file holder, riser, label, or clear empty space. It does not need to be decorative. It just needs to make the zone obvious.
Use visual anchors: Let a tray, mat, container, file holder, or clear desktop area show where each zone begins and ends.
This is especially helpful for people who clear the desk and then watch it get messy again within a day. The problem may not be discipline. It may be that the desk does not show where things go. When each zone has a visible boundary, resetting takes less thought.
Avoid invisible systems: Do not rely only on memory if the desk gets messy quickly, because visible borders make cleanup easier.
Start with fewer zones than you think you need. A tiny desk with ten zones will feel crowded and confusing. Three to five zones is usually enough.
A simple setup might include:
- Main work zone
- Daily supply zone
- Paper landing zone
- Charging zone
- Vertical storage zone
Choose fewer zones than you think: Start with three to five clear zones instead of trying to assign every tiny item its own special place.
One of the most important zones is actually empty space. A desk without any open space will always feel like it is one item away from chaos. Leave a small blank pocket for movement, shifting papers, setting down a drink, or opening a notebook.
If you want to get more from your life, and are looking for concrete action steps to get you there, check out our Request a Coach page. It’s a “cut the fence-sitting and take action” way to tackle your issues and actually find success. To get off the fence and start to take action, click or tap here.
Leave one empty pocket: Keep a small open area so the desk has room for real-life movement during work.
Once the zones are visible, make a quick reset rule. For example, at the end of each session, return tools to the side zone, move papers to the landing tray, plug devices into the charging zone, and clear the center.
The reset should take two minutes or less. If it takes longer, the system may be too complicated for the space.
9. Tiny Desk Zone Ideas for Different Work Styles
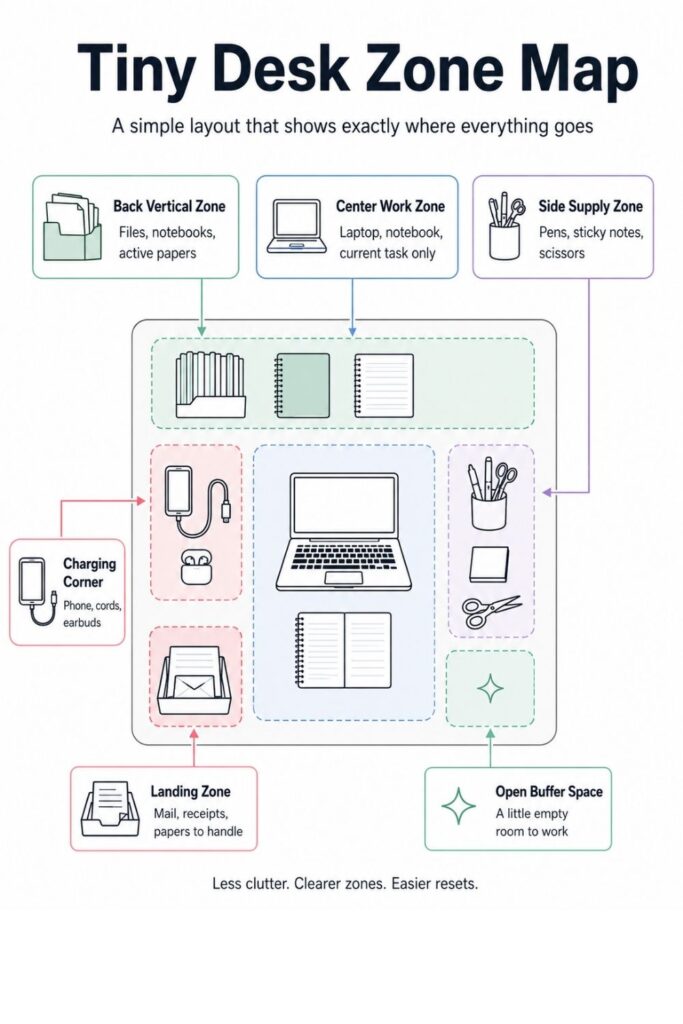
Not every tiny desk needs the same map. A student desk, remote work desk, planning station, and shared family desk all have different pressure points. The best micro-zone setup is the one that matches how the surface is actually used.
For students, the biggest issue is often switching between subjects, supplies, devices, and papers. The desk needs to support focus without turning into a backpack explosion. A center study zone, side supply cup, upright notebook holder, and charging corner can keep the setup simple.
For students: Create a study zone in the center, school supply zone on one side, notebook or textbook zone at the back, and charger zone near the outlet.
For remote workers, the desk often has to support laptop work, calls, notes, devices, and follow-up papers. The main goal is usually keeping the work surface professional enough for the day without letting admin clutter build up.
For remote workers: Set up a laptop zone, note-taking zone, call tools zone, charging zone, and one small landing tray for follow-up papers.
If you want to get more from your life, and are looking for concrete action steps to get you there, check out our Request a Coach page. It’s a “cut the fence-sitting and take action” way to tackle your issues and actually find success. To get off the fence and start to take action, click or tap here.
For planners, journalers, and paper lovers, the challenge is keeping beloved paper tools accessible without letting them cover the desk. A planner can stay in the active zone, while stickers, pens, and extra papers live in contained zones nearby.
For planners and paper lovers: Keep the planner in the center, pens and stickers in a side container, current papers in a vertical sorter, and extra supplies off the desk.
For shared desks, portability matters. If several people use the same surface, permanent zones may not work. Instead, each person can have a portable caddy, folder, or tray that comes out during use and gets put away afterward.
For shared desks: Use portable zones, such as a supply caddy, laptop tray, personal folder, or labeled bin, so each person can reset the surface quickly.
For tiny bedroom desks, the desk often collects non-work items because it is close to everything else in the room. Add a landing zone, but make it strict. Clothes, beauty products, snacks, and unrelated items should not become permanent desk residents.
For bedroom desks: Keep the work zone clear, add one tiny landing tray, and move room-related clutter somewhere else before it settles on the desk.
For creative work, supplies can multiply fast. Use a “current project only” rule on the surface. Store extra materials nearby, but keep the desktop focused on the project in progress.
For creative desks: Keep only the active project supplies on the surface and store backup materials in bins, drawers, or rolling storage.
If you want to get more from your life, and are looking for concrete action steps to get you there, check out our Request a Coach page. It’s a “cut the fence-sitting and take action” way to tackle your issues and actually find success. To get off the fence and start to take action, click or tap here.
The zones can change by work style, but the principle stays the same. Give each item a job-based home, keep the center open, and make the reset simple enough to repeat.
10. How an Organization Coach Could Help You Fine-Tune the Desk Map
If your desk keeps getting messy even after you organize it, the issue may not be the desk itself. It may be the routine around it. An organization coach can help look at how the desk is being used, where the friction starts, and what kind of system you are most likely to maintain.
A coach can start by identifying the real problem. For one person, it might be too many supplies. For another, it might be paper decisions. For someone else, it might be that the desk is being asked to support too many activities with no reset between them.
Identify the real friction point: A coach can help spot whether the issue is too many items, unclear categories, poor reach, delayed decisions, or a reset habit that feels too hard.
A good desk map is not only about where objects go. It is also about what the desk cues you to do. For example, a planner in the front zone can cue a daily check-in. A landing tray can cue a Friday paper sweep. A charging corner can cue an end-of-day reset.
Turn the desk into a routine cue: A coach can help connect each zone to a habit, such as reviewing the planner, clearing papers, or plugging in devices before ending work.
This is especially useful for people who organize in a burst, then lose the system a week later. The system may be too detailed, too hidden, or too disconnected from the way they naturally work. A coach can help simplify it.
Create a reset rule that fits your life: Instead of a perfect routine, a coach can help choose a realistic reset rhythm, such as two minutes after work or one weekly paper sweep.
If you want to get more from your life, and are looking for concrete action steps to get you there, check out our Request a Coach page. It’s a “cut the fence-sitting and take action” way to tackle your issues and actually find success. To get off the fence and start to take action, click or tap here.
The best time to adjust the desk map is after testing it. Use the setup for a week, then notice what stayed tidy and what drifted. If pens kept landing in the center, the supply zone may be too far away. If papers kept piling up, the landing zone may need a clearer action rule.
Adjust the system after testing: Review what worked, what failed, and which zones need to be smaller, closer, clearer, or easier to reset.
A coach can also help connect the desk to bigger goals. If the reader wants to study more consistently, work from home with less friction, manage admin better, or create a calmer start to the day, the desk setup can support that. Small space design is not just about storage. It is about making the next right action easier.
A Tiny Desk Can Still Have a Clear System
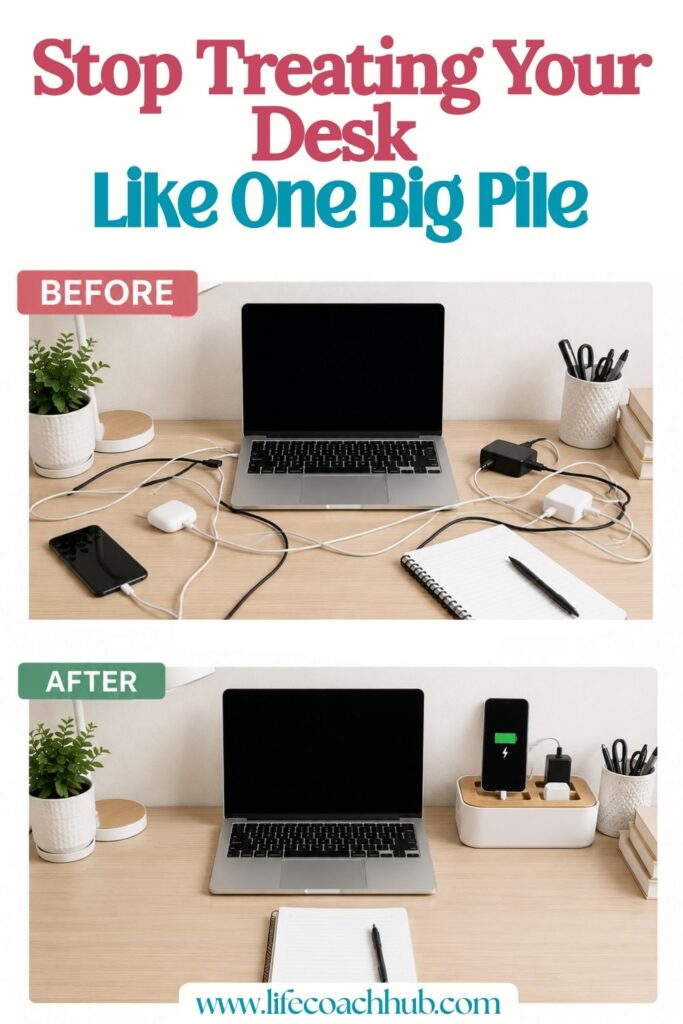
A cramped work surface does not need a complicated organizing makeover. It needs a simple map. When every item has a small job-based zone, the desk becomes easier to use, easier to reset, and less likely to disappear under clutter.
Start with the center. Keep it open for active work. Then build around it with a side supply zone, a vertical paper zone, a charging zone, and a small landing zone for temporary items. Those few areas can completely change how the surface feels.
The most important part is not making the desk look perfect. It is making the desk easier to return to. If you can sit down and know where your tools are, where your papers go, and where your current task belongs, the space is already doing its job.
A tiny desk may never hold everything, and that is actually the point. It should not hold every paper, every pen, every cord, every book, and every backup supply. It should hold what helps you start, focus, and finish.
Keep the system small:
If you want to get more from your life, and are looking for concrete action steps to get you there, check out our Request a Coach page. It’s a “cut the fence-sitting and take action” way to tackle your issues and actually find success. To get off the fence and start to take action, click or tap here.
- One center work zone
- One daily supply zone
- One paper zone
- One charging zone
- One temporary landing zone
- One small area of empty space
That is enough for most tiny work surfaces.
Once the zones are in place, the desk no longer has to be cleared from scratch every day. You only need to return items to the right small homes. Pens go back to the side zone. Papers go to the tray. Chargers stay in the corner. The center gets cleared for the next task.
A small desk can still feel workable when the layout is intentional. With clear micro-zones and low-effort reset habits, even the tightest surface can become a place where work feels easier to begin.
*****
Want to try this at home? No worries! Download a copy of our Clutter Reset Guide.
Need some in depth help with organization and productivity ? Drop on by our directories choc full of productivity coaches, minimalist coaches, and work/life balance coaches to get your life organized! Or click here to have us match you to the best.
If you want to get more from your life, and are looking for concrete action steps to get you there, check out our Request a Coach page. It’s a “cut the fence-sitting and take action” way to tackle your issues and actually find success. To get off the fence and start to take action, click or tap here.
Read this next

My Secret Sauce for Good Organization
Why am I always so well organised and never miss a deadline? Find out im this short video! If you want to get more from your life, and are looking […]
Read More
8 Iconic Holiday Movie-Inspired Wreaths to Transform Your Door This Christmas
Are you all about style, decor and organization? Download a copy of our Decluttering Workbook. **** There’s something about Christmas movies that makes us want to press pause on real […]
Read More
Budget-Friendly DIY Organization Hacks: How to Save Big with Clever Tricks
We all dream of a Pinterest-worthy home where every item has its place, but getting organized can often feel expensive. Between custom storage bins, acrylic drawer systems, and built-in shelving, […]
Read More