


Talk to a coach about Organizational coaching

Terrie Hein
Certified Life Coach, Certified Insight Coach Practitioner
Coaching to declutter your life, organize your goals, and cook...

Jennifer Loehding
Success Architect | Certified DreamBuilder Coach | Certified NEUROFIT Trainer™ | Certified Keto, Carnivore, PSMF and Supplement Coach
Life, business, health, and wellness coaching for balanced personal and...

Crystal Faulk
ACC
I help overwhelmed women in transition gain clarity, confidence, and...

Mark Gordon
Certified Life Coach (ICF Accredited), Certified Transformation & CBT Life Coach
I empower people in their midlife, who feel stuck, gain...

Michael Muscari
Positive Intelligence Coaching (PQ) | High Flow Coaching | NLP Practitioner | BS Business Management
🔥 Inner Fire Igniter & Transformational Coach | Helping People...

Nikki Babs
The Go-to Career Coach for Executives & Mid-level Professionals, ICF Certified Master Life Coach, MBA, HR
Your rise to Executive Leadership starts here.

Aiden (a.k.a. Sensei Aodhán) Murtagh
Jay Shetty Certified Success & Life Coach
Coach helping high achievers reset, rebuild confidence, and move forward...

Christian Hartley, MSIOP, PCC
Professional Certified Coach
Our partnership will empower you to eliminate fear and doubt...


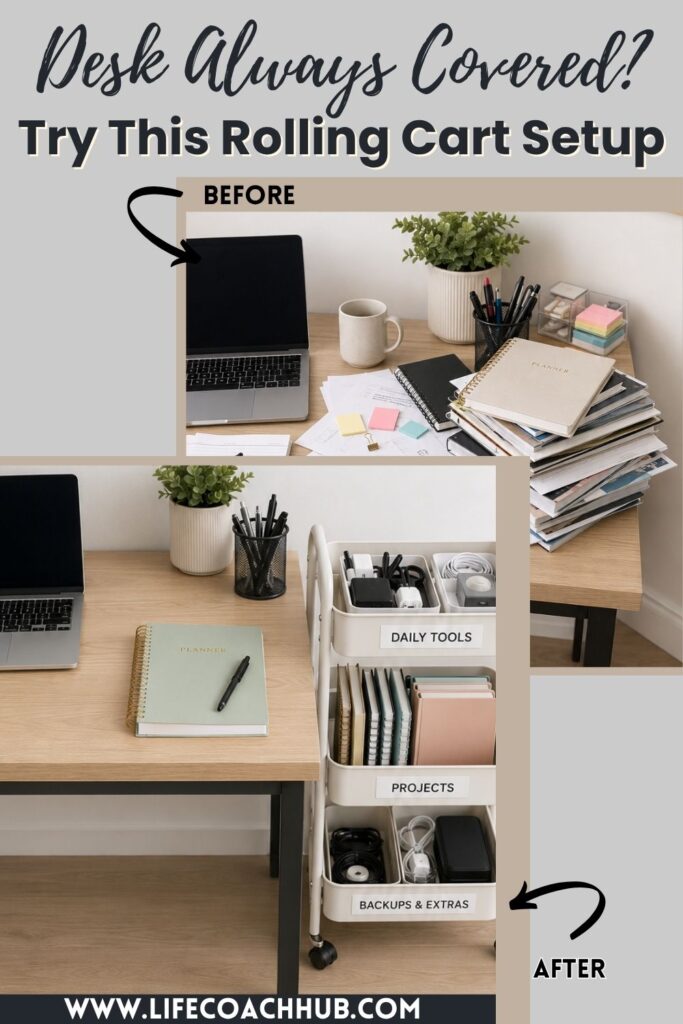
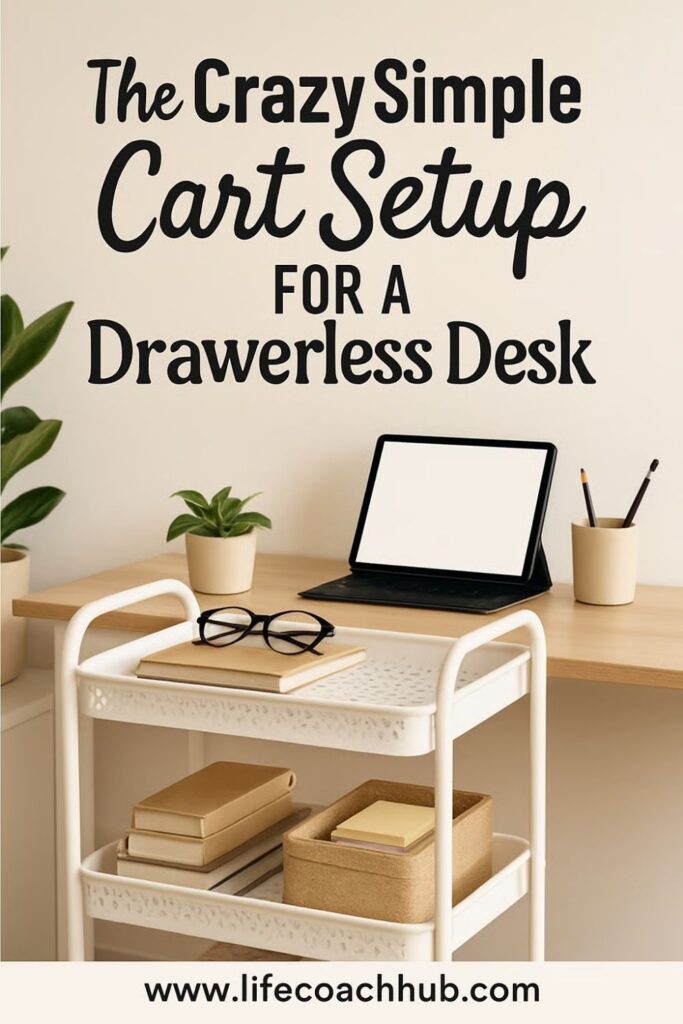
Sidecar Cart System for Desks With No Drawer Space
Want to try this at home? No worries! Download a copy of our Clutter Reset Guide.
*****
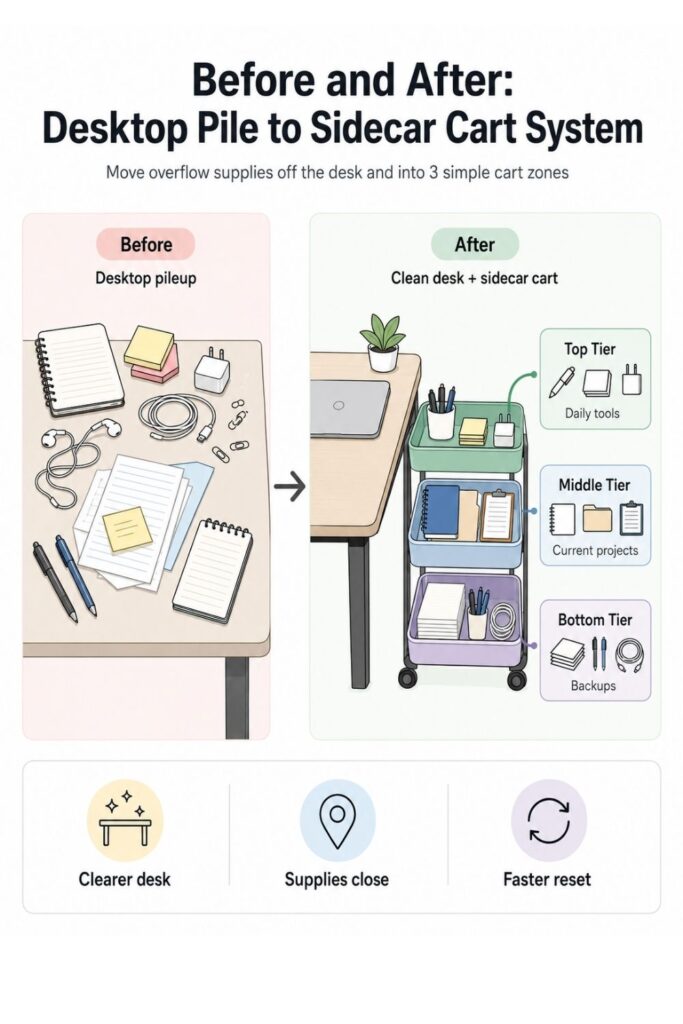
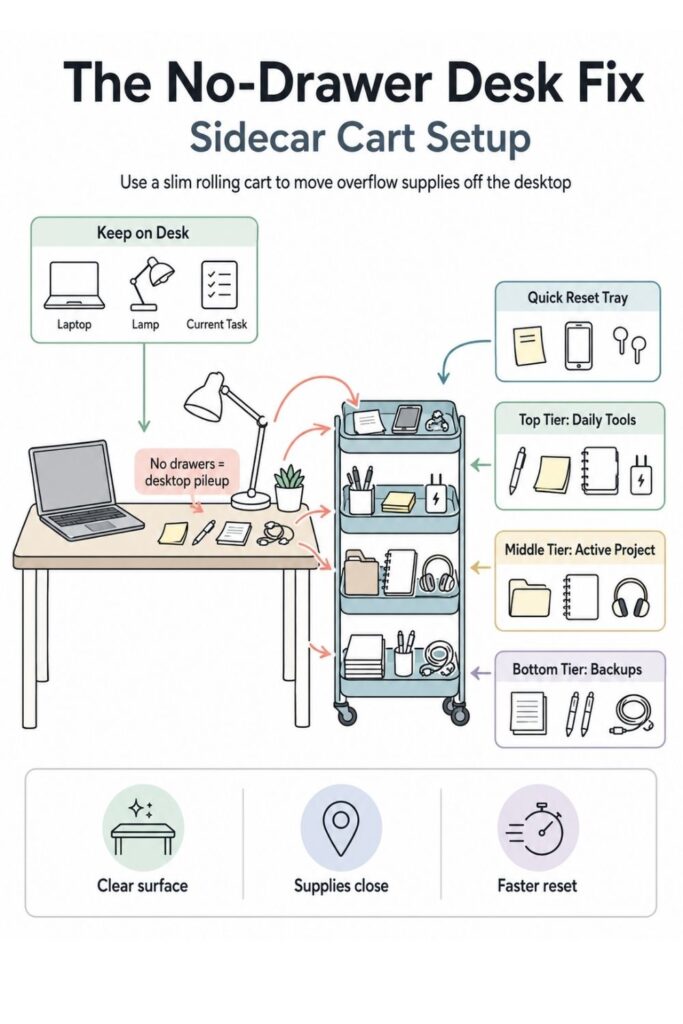
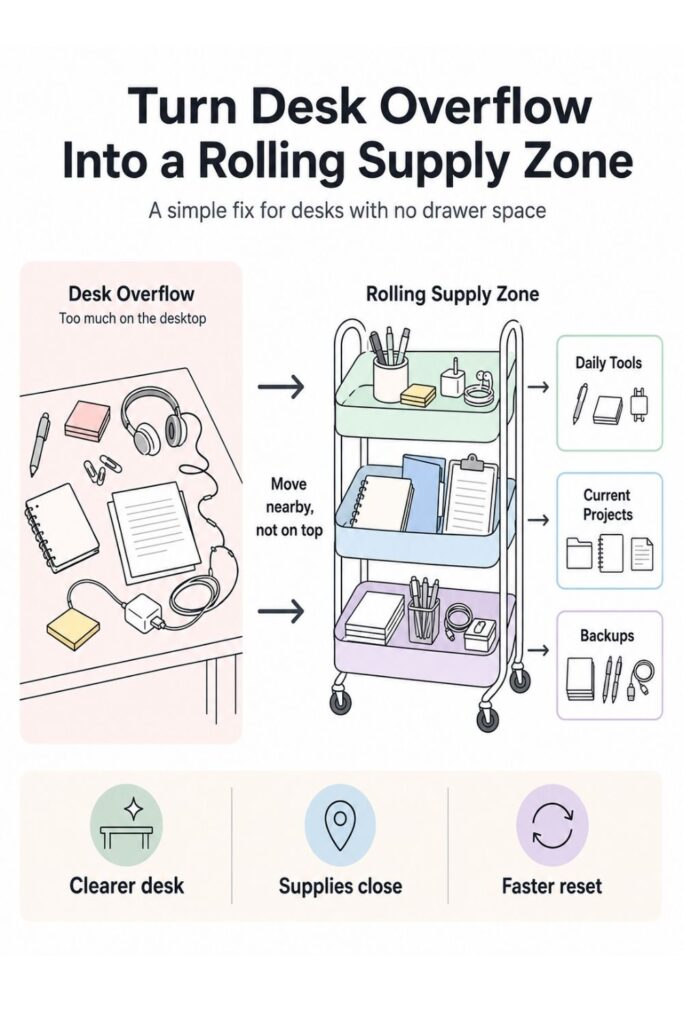
A desk with no drawers can feel impossible to keep clear. Even when you are not trying to be messy, the everyday supplies have nowhere to go. Pens stay out. Notebooks stack up. Chargers tangle across the surface. Random papers keep landing beside the keyboard because there is no easy “next place” for them.
A sidecar cart fixes that by giving your desk a nearby storage zone that does not steal your actual work surface. Instead of trying to cram everything into cups, piles, or boxes on top of the desk, you move the overflow to a slim cart beside it.
The key is to treat the cart like part of the desk system, not like a random rolling storage bin. Each tier needs a clear job. The top shelf should hold what you reach for every day. The middle shelf can hold active project supplies. The bottom shelf can handle backups and refills.
This works especially well for small home offices, bedrooms, study corners, craft desks, and work-from-home setups where a full filing cabinet or drawer unit would take up too much room. It is also renter-friendly because you do not need to install shelves or change the desk.
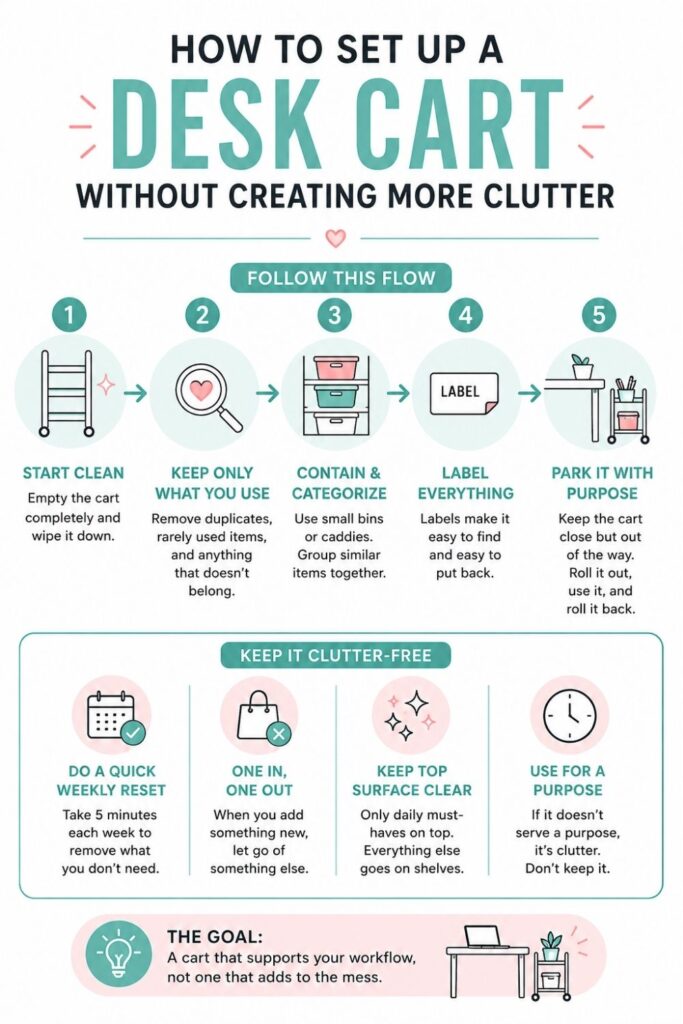
A good sidecar cart should help you:
- Keep the desktop open for actual work
- Store supplies close enough to reach
- Separate daily items from backup items
- Stop papers and cords from spreading
- Make desk cleanup faster at the end of the day
The best part is that this system does not require a complicated organizing overhaul. You can build it with a small rolling cart, a few bins or trays, and a simple plan for what belongs where.
If you want to get more from your life, and are looking for concrete action steps to get you there, check out our Request a Coach page. It’s a “cut the fence-sitting and take action” way to tackle your issues and actually find success. To get off the fence and start to take action, click or tap here.
The goal is not to make your desk look perfect every minute. The goal is to give all the loose items a nearby home so they stop living on the desk by default.
Need some in depth help with organization and productivity ? Drop on by our directories choc full of productivity coaches, minimalist coaches, and work/life balance coaches to get your life organized! Or click here to have us match you to the best.
1. Choose the Right Sidecar Cart Size
Before buying or setting up a cart, measure the space where it will actually live. This is the step that keeps the system useful instead of annoying. A cart that is too wide, too tall, or always in the way will become one more thing you have to work around.
Start by looking at the area beside your desk. Check both sides if you have room. You may find that one side gives you better access to an outlet, better chair clearance, or a smoother path around the room.
Use a tape measure and check:
- The width of the open space beside the desk
- The depth from the wall to the front edge of the desk
- The height of the desk surface
- The space your chair needs to roll or turn
- Any nearby doors, closet openings, or walkways
A slim rolling cart is usually best for this setup. You want enough room for supplies, but not so much space that the cart becomes a dumping ground. For most no-drawer desks, a two-tier or three-tier cart is enough.
Think about what you are actually trying to store. If your main issue is pens, chargers, notebooks, and sticky notes, a narrow cart is fine. If you need to hold paper files, binders, or project folders, look for shelves that can handle upright organizers or shallow bins.
Also pay attention to the cart’s wheels. A cart that rolls easily is helpful when you need to clean, access cords, or shift the setup. But it should not roll away every time you reach for a pen. Locking wheels are a nice bonus if the cart will sit on a hard floor.
If you want to get more from your life, and are looking for concrete action steps to get you there, check out our Request a Coach page. It’s a “cut the fence-sitting and take action” way to tackle your issues and actually find success. To get off the fence and start to take action, click or tap here.
Choose function before looks. A pretty cart that does not fit your supplies will frustrate you quickly. The right cart should feel like a small extension of your desk, not like extra furniture squeezed into the room.
Once you have the size right, the rest of the system becomes much easier to build.
2. Sort Supplies Into Daily, Weekly, and Backup Categories
The easiest way to ruin a sidecar cart is to load it with everything at once. If you skip the sorting step, the cart may look organized for a day, then slowly turn into a rolling junk drawer. The goal is to decide what the cart should hold before you start arranging it.
Begin by clearing the desk surface. Take off everything that is not your computer, monitor, lamp, or other permanent setup item. Gather the loose supplies from nearby shelves, bags, baskets, and floor piles too.
You may find more than you expected. That is normal. Desks without drawers tend to scatter items because there is no single place for overflow.
Sort everything into three basic categories:
- Daily items: Things you use almost every work session
- Weekly items: Things you use sometimes, but not constantly
- Backup items: Extras, refills, duplicates, and supplies you only need occasionally
Daily items might include your planner, favorite pen, sticky notes, headphones, current notebook, glasses, or main charger. Weekly items might include folders, paper clips, tape, labels, project notes, or a reference binder. Backup items might include spare pens, printer paper, extra cords, notebooks, refills, envelopes, or extra sticky notes.
Be honest about what you actually use. Something can be useful without needing to sit within arm’s reach every day. The cart should make your desk easier to work at, not hold every office supply you own.
If you want to get more from your life, and are looking for concrete action steps to get you there, check out our Request a Coach page. It’s a “cut the fence-sitting and take action” way to tackle your issues and actually find success. To get off the fence and start to take action, click or tap here.
This is also a good time to remove duplicates. If you have twelve pens but only use two, keep the favorites near the top and move the extras lower. If you have multiple cords and do not know what they belong to, label them or test them before they go back.
A simple sorting rule helps:
- Used today? Top zone.
- Used this week? Middle zone.
- Used someday? Bottom or elsewhere.
Once your supplies are sorted by use, the cart becomes easier to organize because each shelf can have a purpose instead of becoming one big mixed storage area.
3. Give the Top Tier Fast-Reach Items Only
The top tier is the most valuable part of the sidecar cart. It is the easiest shelf to see and reach, so it should only hold the items you grab all the time. Think of it as your desk’s missing top drawer.
This shelf should not hold everything you like having nearby. It should hold what actively supports your work during the day. If you overload the top tier, it will become almost as cluttered as the desktop you are trying to clear.
Good top-tier items include:
- Your current planner
- One daily notebook
- Favorite pens or markers
- Sticky notes
- Earbuds or headphones
- Reading glasses
- A small timer
- The charger you use most often
- A small tray for loose items
Use small containers to divide the shelf. A pen cup, a shallow tray, and one slim notebook holder may be enough. Avoid deep bins on the top tier because they make it harder to see what is inside.
The top tier should also have a little breathing room. This matters because real life is messy. During the day, you may need a place to set down a receipt, a note, a phone, or a file you are using for a few minutes. If the shelf is already packed, those items will go right back onto the desk.
If you want to get more from your life, and are looking for concrete action steps to get you there, check out our Request a Coach page. It’s a “cut the fence-sitting and take action” way to tackle your issues and actually find success. To get off the fence and start to take action, click or tap here.
Try using the “one open hand” rule. Leave enough open space on the top shelf to place your hand flat or set down one active item. That tiny bit of space makes the cart feel usable instead of crammed.
You can also create a small “return here first” tray on the top tier. This is where loose items go when you are clearing the desk quickly. The tray should be small on purpose. If it fills up, that is your signal to reset it.
The top tier should make your workday smoother. When you reach to the side, you should immediately find the few things you use most, without digging, shifting, or sorting through backup supplies.
4. Use the Middle Tier for Active Project Supplies
The middle tier is perfect for active work that does not need to stay on your desk all day. This is where your current project materials can live between work sessions. It keeps them close, but prevents them from spreading across the desktop.
Think of this shelf as a temporary project zone. It is not for long-term storage. It is for the papers, folders, notebooks, tools, or reference materials connected to what you are working on right now.
This works well if you often have several things going at once, such as:
- Work notes
- School papers
- Client folders
- Home admin documents
- Craft supplies
- Bills to review
- Receipts to enter
- Printouts for a current task
- A notebook for one specific project
Use one container per active project. That could be a shallow bin, a tray, a magazine file, a folder holder, or even a labeled document box. The point is to keep each project grouped so it does not become a loose stack.
For example, if you are working on a tax folder, put the forms, receipts, notes, and checklist in one tray. If you are planning content, put the notebook, printed outline, and reference papers in another. If you homeschool or study, one bin can hold the supplies for the current subject.
If you want to get more from your life, and are looking for concrete action steps to get you there, check out our Request a Coach page. It’s a “cut the fence-sitting and take action” way to tackle your issues and actually find success. To get off the fence and start to take action, click or tap here.
Try not to let the middle tier hold every unfinished thing in your life. That will make it feel heavy and confusing. Limit it to one to three active zones, depending on the cart size.
A helpful rule is:
- Current work goes on the middle shelf.
- Finished work leaves the cart.
- Paused work gets stored somewhere else.
This keeps the cart moving with your real workflow. When you finish a project, clear its container and reset the space. When a new project starts, give it a clean tray or folder.
The middle tier should make it easier to stop and restart work without losing your place. Instead of leaving everything on the desk “so you remember,” you create a visible, contained project zone right beside you.
5. Put Backup Supplies on the Bottom Tier
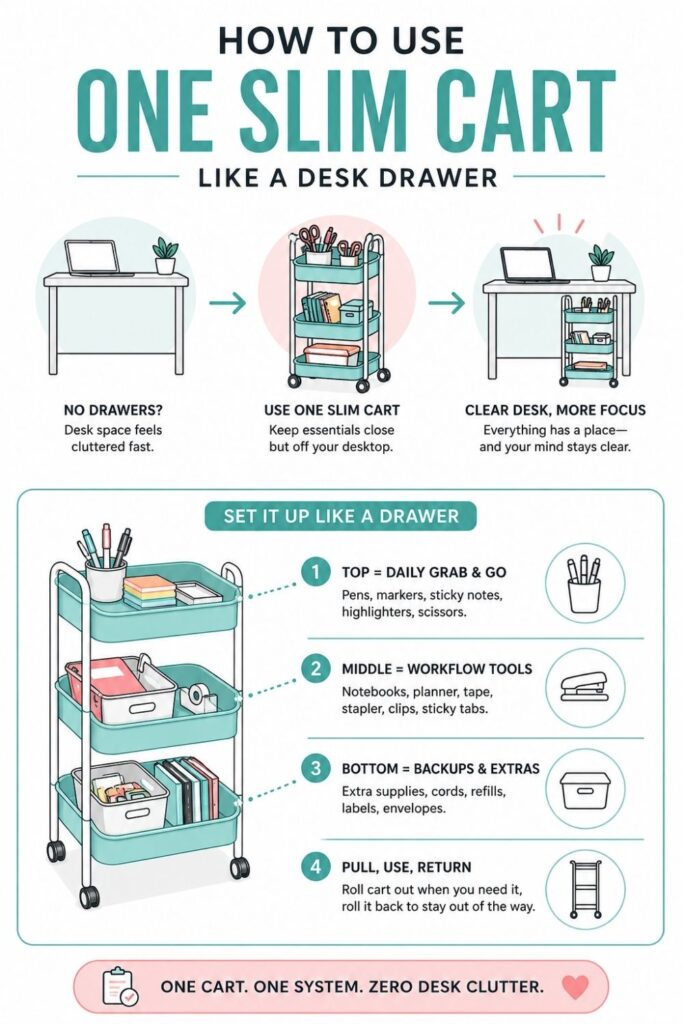
The bottom tier is best for items you need nearby, but not directly in your face. This shelf should support the desk without competing with your daily work tools. It is the right place for refills, extras, and supplies that are useful but not urgent.
Because the bottom shelf is harder to see and reach, it should be organized in clear containers. If you toss loose items down there, they will disappear. You will forget what you have, buy duplicates, and eventually end up with a cluttered cart base.
Good bottom-tier items include:
- Extra pens and pencils
- Printer paper
- Sticky note refills
- Tape
- Labels
- Envelopes
- Charging cords you use occasionally
- Spare notebooks
- Binder clips
- Paper clips
- Batteries
- Small tech accessories
Use bins, boxes, or pouches to separate categories. You do not need anything fancy. Even basic containers work if they keep like items together.
If you want to get more from your life, and are looking for concrete action steps to get you there, check out our Request a Coach page. It’s a “cut the fence-sitting and take action” way to tackle your issues and actually find success. To get off the fence and start to take action, click or tap here.
Try simple labels such as:
- Paper
- Refills
- Cords
- Writing Tools
- Mailing
- Tech Extras
The bottom tier is also where you can store items that would visually clutter the top of the cart. A closed box for spare cords looks much cleaner than a tangle of cables sitting out. A lidded container for extras can keep the cart from feeling busy.
Be careful with “just in case” storage. A few backups are useful. Too many backups turn the cart into overflow storage for things you do not really need near your desk.
Use this question when deciding what belongs there: “Would I reasonably need this while working at this desk?” If yes, it can stay. If not, move it to a closet, cabinet, or general supply area.
The bottom shelf should quietly support the system. You should not need it constantly, but when you run out of something, it should be easy to find exactly what you need.
6. Add a Cable and Charging Station Without Creating Cord Mess
A sidecar cart can be a great place for charging, especially if your desk has no drawers and not much surface room. But cords can get messy fast. If you do not set up the charging area carefully, cables may dangle into the wheels, drag on the floor, or creep back onto the desk.
Start by choosing one charging location on the cart. This might be the back corner of the top tier, the side rail, or a small tray on the middle shelf. The goal is to give devices and cables a predictable home.
You may want the charging zone to hold:
If you want to get more from your life, and are looking for concrete action steps to get you there, check out our Request a Coach page. It’s a “cut the fence-sitting and take action” way to tackle your issues and actually find success. To get off the fence and start to take action, click or tap here.
- Phone charger
- Tablet charger
- Earbud case
- Smartwatch charger
- Laptop cord when not in use
- Power bank
- Small charging dock
If you use a power strip, attach it safely and keep it off the floor if possible. Some carts have metal sides where cords can be clipped or tied. Others may need adhesive cord clips, hook-and-loop straps, or cable ties.
Keep the setup simple. More charging options do not always make the cart better. If you add too many cords, the cart starts to feel like a tech nest instead of a desk helper.
A clean charging zone usually needs three things:
- A place for the device to rest
- A way to hold the cable end
- A way to bundle extra cord length
Cable clips are especially useful because they stop charger ends from falling behind the cart. If your cart rolls, leave enough slack for movement, but not so much that cords get caught under the wheels.
You can also use a small pouch or labeled box for occasional tech items. Put adapters, USB drives, spare cables, and power banks in one place instead of letting them mix with pens and paper.
The goal is not to hide every cord perfectly. The goal is to stop cords from taking over your desk surface. A simple charging station on the sidecar cart keeps your devices close, powered, and easier to put away.
7. Create a “Desk Clear” End-of-Day Drop Zone
Even with a good cart system, your desk will still collect a few loose items during the day. That is normal. The problem is not that things land on the desk. The problem is when they have nowhere easy to go afterward.
A small end-of-day drop zone gives you a quick place to clear the desk without pretending you will perfectly sort every item at the exact moment you finish working. It is a practical bridge between real life and organization.
If you want to get more from your life, and are looking for concrete action steps to get you there, check out our Request a Coach page. It’s a “cut the fence-sitting and take action” way to tackle your issues and actually find success. To get off the fence and start to take action, click or tap here.
Choose a small tray, shallow basket, or open container for this purpose. Put it on the top tier of the cart if you want it easy to reach. If the top tier is already full, use the front of the middle shelf.
This tray is for temporary loose items such as:
- Pens
- Sticky notes
- Receipts
- Small reminders
- Earbuds
- Paper scraps
- Business cards
- Cords you pulled out
- A notebook you forgot to put back
The most important part is size. Keep the tray small. If it is too large, it will become a permanent catchall. A small tray gives you enough room to reset quickly, but not enough room to avoid sorting forever.
At the end of the workday, do a two-minute sweep. Move loose items off the desk and into the tray. Then, once or twice a week, empty the tray completely.
You can sort the tray with a simple decision process:
- Trash goes out.
- Supplies return to their shelf.
- Papers go into a project tray or file.
- Random items leave the desk area.
- Unknown items get handled immediately or removed.
This system is especially helpful if you struggle with the “I’ll put it away later” pile. Instead of letting that pile grow on the desk, you contain it in one visible spot.
The drop zone keeps the desktop usable without requiring a perfect cleanup every single day. It gives you a realistic reset point, which is often what makes the whole cart system easier to maintain.
8. Position the Cart So It Supports Your Workflow
Where you place the cart matters as much as what you put on it. If the cart is technically organized but awkward to reach, you will stop using it. The best spot is close enough that grabbing supplies feels easier than leaving things on the desk.
If you want to get more from your life, and are looking for concrete action steps to get you there, check out our Request a Coach page. It’s a “cut the fence-sitting and take action” way to tackle your issues and actually find success. To get off the fence and start to take action, click or tap here.
Start by placing the cart on your dominant side if possible. If you are right-handed, the right side may feel more natural. If you are left-handed, the left side may work better. But the room layout matters too, so test both sides before deciding.
Sit at your desk and move through your normal routine. Reach for a pen. Plug in your phone. Grab your planner. Pull out a folder. If you have to twist too far, roll your chair awkwardly, or stand up for every small item, the cart is not in the right place.
Check for common placement problems:
- The cart blocks your chair
- The wheels hit the desk legs
- You cannot reach the top shelf comfortably
- The cart blocks a closet, drawer, or doorway
- Cords stretch too tightly
- The cart makes the room feel cramped
The cart should sit slightly beside and slightly behind your main work zone, not directly in the path of your arms or legs. It should be close, but not crowding your chair.
If your room is very small, you may need to tuck the cart under the desk edge when not in use. In that case, make sure the cart height fits under the desktop and the supplies on top do not scrape the underside.
You can also use the cart as a mobile station. Roll it beside the desk during work hours, then park it against a wall afterward. This works well in bedrooms, shared spaces, or dining-table workstations.
A good position should feel natural after a few days. You should not have to think hard about using the cart. It should quietly catch the overflow that used to take over the desk.
9. Label the Shelves by Function, Not Just Item Type
Labels are useful, but only if they help you make faster decisions. A sidecar cart works best when the labels describe what each area does, not just what objects are inside. This is especially helpful when multiple types of items share the same shelf.
If you want to get more from your life, and are looking for concrete action steps to get you there, check out our Request a Coach page. It’s a “cut the fence-sitting and take action” way to tackle your issues and actually find success. To get off the fence and start to take action, click or tap here.
Instead of labeling every tiny container with exact item names, start with function-based labels. These tell you how to use the shelf at a glance.
Try labels like:
- Daily Tools
- Current Projects
- Tech + Charging
- Paper + Files
- Backup Supplies
- Quick Reset
- Mailing Supplies
- Desk Refills
Function labels are easier to maintain because they match the way you work. For example, “Daily Tools” can include pens, sticky notes, glasses, and earbuds. You do not need a separate mental category for every object.
Use item labels only where they reduce confusion. A box of mixed cords should be labeled “Cords.” A pouch of stamps and envelopes can be labeled “Mailing.” A bin of extra pens and sticky notes can be labeled “Refills.”
Keep labels short. Long labels are harder to scan, and the point is to make cleanup faster. You can use a label maker, sticky notes, painter’s tape, small tags, or simple handwritten labels.
If you share the desk area with someone else, labels become even more useful. They show where things belong without needing to explain the system every time.
A simple cart label setup could look like this:
- Top tier: Daily Tools + Quick Reset
- Middle tier: Current Projects + Paper
- Bottom tier: Refills + Tech Extras
Do not worry if the first labels are not perfect. Use temporary labels for a week and see what actually makes sense. If you keep putting items in the “wrong” place, the label may need to change.
If you want to get more from your life, and are looking for concrete action steps to get you there, check out our Request a Coach page. It’s a “cut the fence-sitting and take action” way to tackle your issues and actually find success. To get off the fence and start to take action, click or tap here.
The best labels support your habits instead of fighting them. They should make it easier to return things quickly, even when you are tired, busy, or trying to clean up in a hurry.
10. Build a Weekly Cart Reset Routine
A sidecar cart is low effort, but it is not no effort. Like any desk system, it needs a small reset routine to keep it from slowly filling with random items. The good news is that the reset does not need to take long.
Choose one day each week to refresh the cart. This could be Friday afternoon, Sunday evening, Monday morning, or whatever time already feels natural in your routine. The goal is to connect the reset to a moment you can remember.
A weekly cart reset can be very simple:
- Throw away trash
- Empty the quick reset tray
- Return loose supplies to their zones
- Move finished project papers off the cart
- Restock daily items
- Check cords and chargers
- Remove anything that does not belong near the desk
Set a loose time limit of ten minutes. This keeps the task from feeling like a major organizing project. If the cart regularly takes longer than ten minutes to reset, it may be holding too much.
The active project shelf is the most important area to review. Finished projects should leave the cart. Paused projects should move into a file, bin, or storage spot. Current projects can stay, but they should be straightened so they are easy to restart.
Also check the backup shelf. If you keep adding extras but never using them, the bottom tier may need a cleanout. Keep only the amount that is useful near the desk.
You can make the reset easier by keeping a tiny trash bag, recycling bin, or paper shred spot nearby. Paper clutter often builds up because disposal is not convenient.
If you want to get more from your life, and are looking for concrete action steps to get you there, check out our Request a Coach page. It’s a “cut the fence-sitting and take action” way to tackle your issues and actually find success. To get off the fence and start to take action, click or tap here.
The weekly reset is what keeps the sidecar cart from becoming another clutter zone. It gives the system a rhythm. Instead of waiting until the desk area feels out of control, you bring it back to order in a few minutes.
A small reset habit can make the cart feel reliable, which makes it much easier to keep using.
How an Organization Coach Could Help You Set Up the System
A sidecar cart can be simple to set up, but the deeper issue is often the pattern behind the clutter. An organization coach can help you figure out why the desk keeps filling up in the first place. That matters because the best cart setup is not just tidy. It is designed around how you actually work.
For example, some people have desk clutter because they do not have enough storage. Others have clutter because they keep too many projects open at once. Some avoid filing because the system feels too complicated. Others need visual reminders, so they leave papers out because putting them away feels like forgetting.
A coach can help you identify which pattern is happening. Then the cart can be set up to solve the real issue.
They might help you decide:
- What needs to stay within arm’s reach
- What can move farther away
- How many active projects should be visible
- What kind of labels you will actually use
- When to reset the cart
- Which supplies are creating clutter instead of helping
This can be especially helpful for people who work from home, manage multiple roles, study in a bedroom, or feel like their desk has to hold everything. A coach can help turn the cart into a workflow tool instead of just another storage item.
They can also help you build rules that are easy to follow. For example, you might create a rule that only one active project tray can sit on the cart at a time. Or you might decide that the quick reset tray has to be emptied every Friday before you stop working.
If you want to get more from your life, and are looking for concrete action steps to get you there, check out our Request a Coach page. It’s a “cut the fence-sitting and take action” way to tackle your issues and actually find success. To get off the fence and start to take action, click or tap here.
The goal is not to make your desk look like someone else’s. It is to make your desk easier for you to use.
A coach can help you create a system that fits your habits, your space, and your energy level. That makes the sidecar cart more likely to last beyond the first organizing burst.
Small Upgrades That Make the Cart Work Better
Once the basic cart zones are working, small upgrades can make the system easier to use. The key is to add tools that solve specific problems, not just accessories that make the cart look fuller.
Start with containers. A cart shelf without containers can still get messy because everything slides together. Small bins, cups, trays, and file holders create boundaries. Boundaries help you see what belongs where.
Useful cart upgrades include:
- A pen cup for daily writing tools
- A shallow tray for quick reset items
- A magazine file for folders or notebooks
- A small pouch for cords
- A lidded box for backup supplies
- Adhesive clips for chargers
- Labels for each shelf or bin
- A small hook for headphones
- A clipboard or folder for active papers
Do not buy everything at once. Use the cart for a few days first. Notice what keeps falling over, getting lost, or landing back on the desk. Then add the container that solves that exact problem.
For example, if notebooks slump sideways, add a file holder. If pens scatter, add a cup. If cords tangle, add cable ties or a pouch. If papers spread out, add a tray or upright folder.
You can also add a small visual cue to make the cart easier to reset. A label on the quick drop tray, a “current project” folder, or a small checklist taped inside a bin can remind you what the cart is supposed to do.
If you want to get more from your life, and are looking for concrete action steps to get you there, check out our Request a Coach page. It’s a “cut the fence-sitting and take action” way to tackle your issues and actually find success. To get off the fence and start to take action, click or tap here.
Avoid decorating the cart before it functions. Decorative items can be fun, but they also take up valuable storage space. If your desk has no drawers, the cart’s first job is to hold the supplies that keep crowding your workspace.
Once the system works, you can add one or two personal touches if there is room. Just keep the main zones clear.
The best upgrades make the cart easier to use on a busy day. If an item helps you grab, return, charge, file, or reset faster, it earns its place.
Keep the Desk Clear Without Overthinking It
A sidecar cart works because it gives your desk a nearby support system. Instead of expecting a no-drawer desk to hold everything on its surface, you move the overflow into simple zones beside you. That one change can make the whole workspace feel easier to manage.
The system does not need to be complicated. Start with the items that currently crowd your desk. Sort them by how often you use them. Put daily tools on the top tier, active projects in the middle, and backup supplies on the bottom.
Then add a small reset tray for the loose items that appear during real life. This gives you a fast way to clear the desktop without pretending every cleanup will be perfect.
The most important thing is to keep each part of the cart clear and specific. When every shelf has a job, it is easier to know where things belong.
A simple setup might look like this:
If you want to get more from your life, and are looking for concrete action steps to get you there, check out our Request a Coach page. It’s a “cut the fence-sitting and take action” way to tackle your issues and actually find success. To get off the fence and start to take action, click or tap here.
- Top shelf: Planner, pens, sticky notes, headphones, daily charger
- Middle shelf: Current project tray, folders, active notebook
- Bottom shelf: Paper, refills, extra cords, backup supplies
- Side or corner: Charging zone
- Small tray: End-of-day desk reset
That is enough for most small desks. You do not need a full office system to make a no-drawer desk work better. You just need a place for the things that keep landing on the surface.
Over time, adjust the cart based on what you actually use. If something always ends up on the desk, it may need a better spot on the cart. If something sits untouched for weeks, it probably does not need to be so close.
The goal is a desk that stays open enough to work on. Not perfect. Not empty. Just clear, usable, and easier to reset when the day is done.
*****
Want to try this at home? No worries! Download a copy of our Clutter Reset Guide.
Need some in depth help with organization and productivity ? Drop on by our directories choc full of productivity coaches, minimalist coaches, and work/life balance coaches to get your life organized! Or click here to have us match you to the best.
If you want to get more from your life, and are looking for concrete action steps to get you there, check out our Request a Coach page. It’s a “cut the fence-sitting and take action” way to tackle your issues and actually find success. To get off the fence and start to take action, click or tap here.
Read this next

Easter Decor Ideas That Feel Intentional (Not Overdone)
Simple Easter decor formulas for porches, doors, mantels, and entryways that feel collected, cozy, and easy to reuse every spring.
Read More
How to Transform Household Items into Tiny Bathroom Organizing Tools
Small bathrooms don’t have to mean small solutions. In fact, when you start looking at your household items with fresh eyes, you’ll find your home is filled with organizing potential. […]
Read More
7 Window Christmas Decor Ideas That Look Luxe With Almost No Effort
Are you all about style, decor and organization? Download a copy of our Decluttering Workbook. **** Bare windows can make a whole room feel unfinished, even if your tree looks […]
Read More