


Talk to a coach about Organizational coaching
Terrie Hein
Certified Life Coach, Certified Insight Coach Practitioner
Coaching to declutter your life, organize your goals, and cook...

Jennifer Loehding
Success Architect | Certified DreamBuilder Coach | Certified NEUROFIT Trainer™ | Certified Keto, Carnivore, PSMF and Supplement Coach
Life, business, health, and wellness coaching for balanced personal and...

Crystal Faulk
ACC
I help overwhelmed women in transition gain clarity, confidence, and...

Mark Gordon
Certified Life Coach (ICF Accredited), Certified Transformation & CBT Life Coach
I empower people in their midlife, who feel stuck, gain...

Michael Muscari
Positive Intelligence Coaching (PQ) | High Flow Coaching | NLP Practitioner | BS Business Management
🔥 Inner Fire Igniter & Transformational Coach | Helping People...

Nikki Babs
The Go-to Career Coach for Executives & Mid-level Professionals, ICF Certified Master Life Coach, MBA, HR
Your rise to Executive Leadership starts here.

Aiden (a.k.a. Sensei Aodhán) Murtagh
Jay Shetty Certified Success & Life Coach
Coach helping high achievers reset, rebuild confidence, and move forward...

Christian Hartley, MSIOP, PCC
Professional Certified Coach
Our partnership will empower you to eliminate fear and doubt...
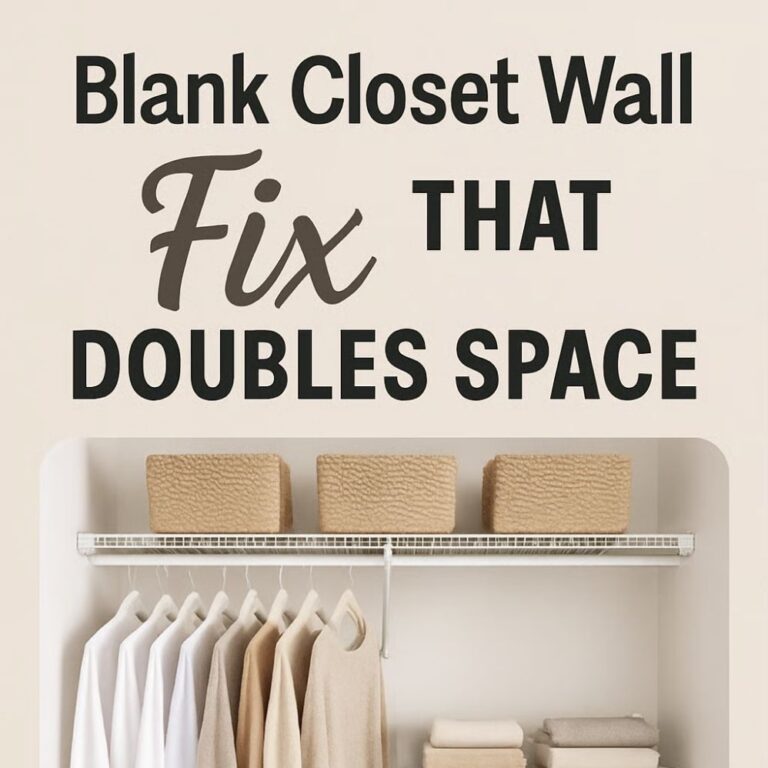


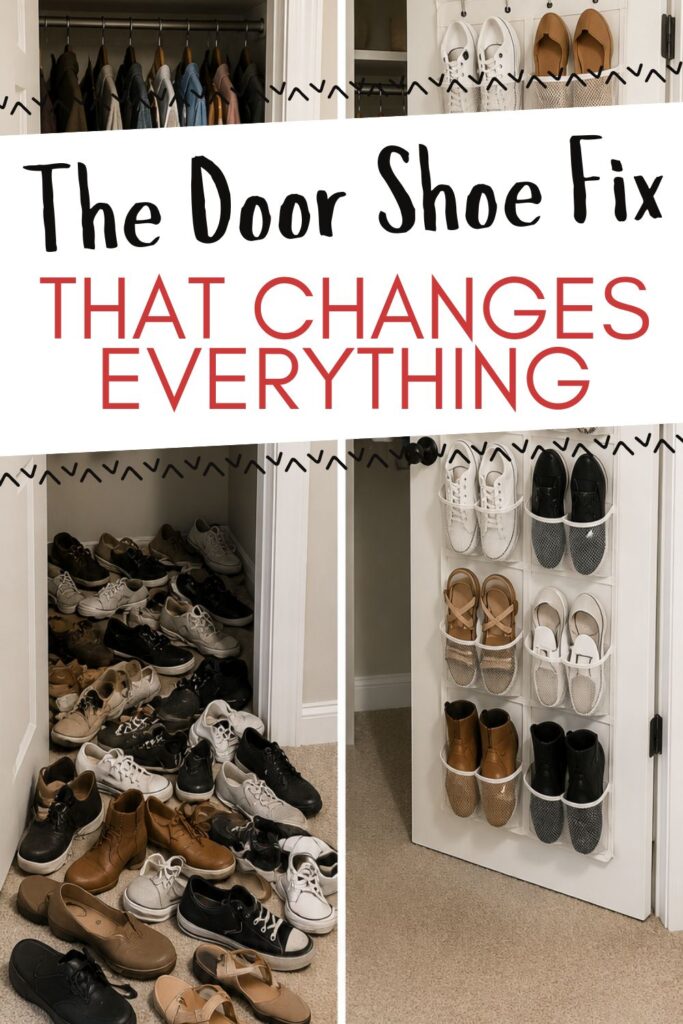
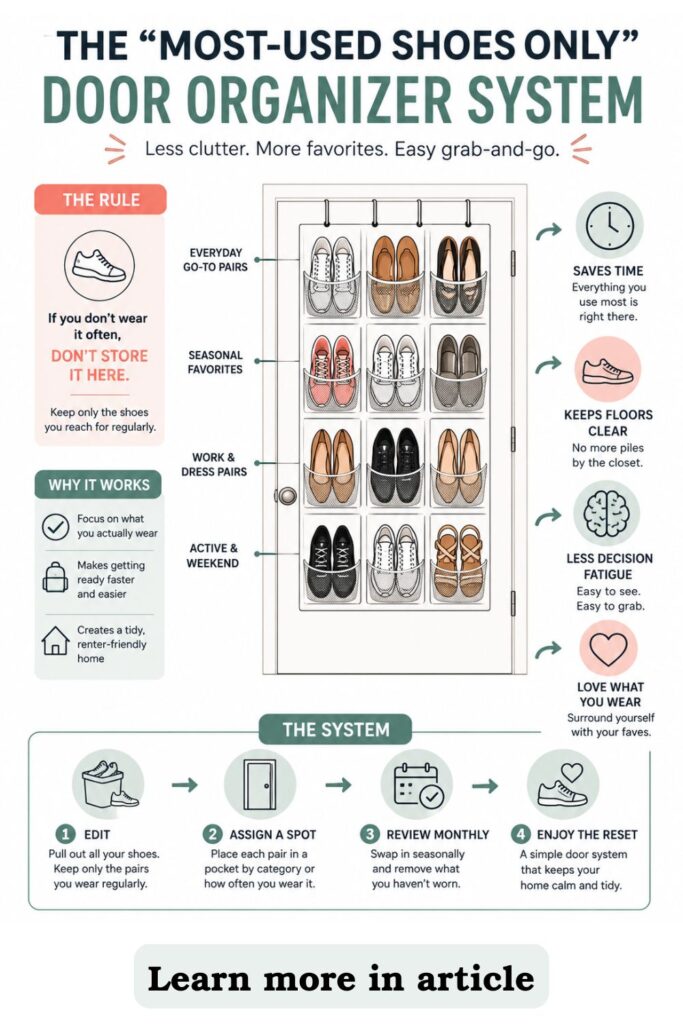
Renter-Friendly Shoe Zone Using Door Space
Are you all about style, decor and organization? Download a copy of our Clutter Reset Guide.
****
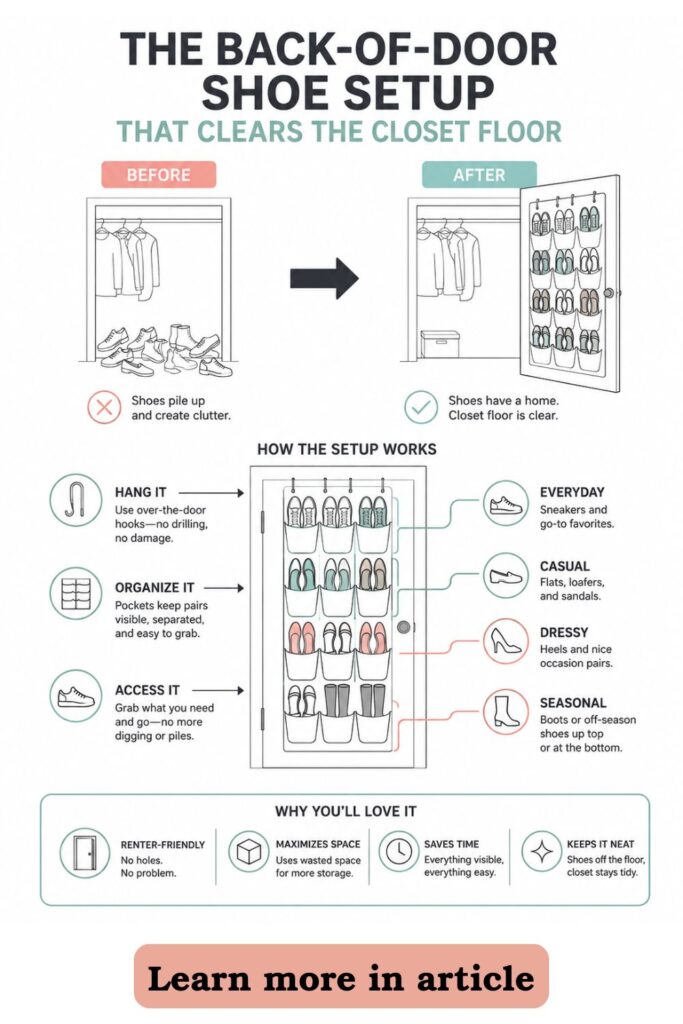
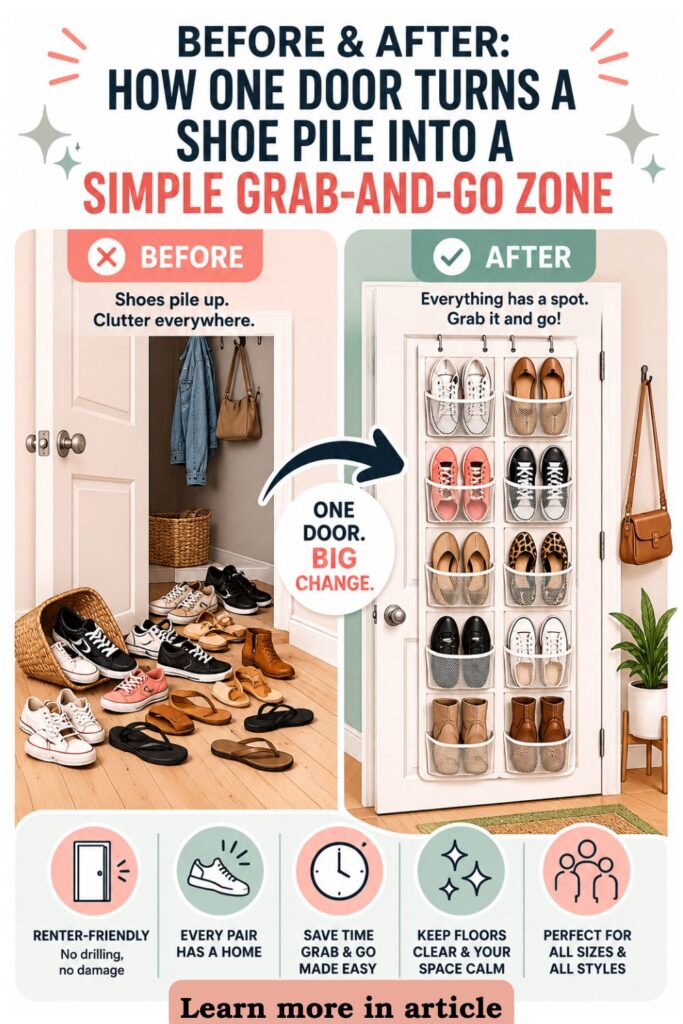
Shoes have a sneaky way of turning into a pile even when you technically have storage. One pair lands by the closet. Another gets kicked near the bedroom door. Then the everyday sneakers, sandals, slippers, and work shoes all end up in the same messy corner.
The problem is usually not that you own too many shoes. It is that the shoes you reach for most do not have a home that is easy enough to use every day.
That is where the back of a door can help. It gives you vertical storage without using floor space, adding shelves, or drilling into rental walls. For small apartments, shared bedrooms, narrow closets, or entry areas with no room for a shoe rack, the door can become a simple shoe zone that keeps the daily pairs contained.
This setup works best when it is treated as a “most-used shoes only” system. You are not trying to store every shoe you own on one door. You are creating a quick, practical landing place for the pairs that usually end up on the floor.
A good renter-friendly shoe zone should be:
- Easy to reach
- Easy to put back
- Safe for the door
- Light enough to stay secure
- Simple enough to maintain
The goal is not a perfect closet makeover. It is a low-effort fix that stops shoes from piling up where you walk, dress, or open the closet.
If you want to get more from your life, and are looking for concrete action steps to get you there, check out our Request a Coach page. It’s a “cut the fence-sitting and take action” way to tackle your issues and actually find success. To get off the fence and start to take action, click or tap here.
Need some in depth help with organization and productivity ? Drop on by our directories choc full of productivity coaches, minimalist coaches, and work/life balance coaches to get your life organized! Or click here to have us match you to the best.
1. Pick the Right Door for Your Shoe Zone
Choose the door that matches your real routine: Start by looking at where your shoes already pile up. That spot is giving you useful information. If shoes collect beside the closet, the closet door is probably the best choice. If they pile near the bedroom entrance, the bedroom door may work better. If everyone drops shoes near the front door, an entry closet door could be the most useful option.
Do not choose a door just because it is empty. Choose the one that sits closest to the habit you are trying to fix. A shoe zone only works if it is easier than dropping shoes on the floor.
Check how the door opens and closes: Open the door all the way and look at what it touches. Does it swing against a wall? Does it hit closet shelving? Does it sit close to a bed, dresser, hamper, or laundry basket?
A door organizer adds thickness, so the door needs enough room to move comfortably. If the door already opens tightly, a bulky shoe rack may become annoying fast.
Check for:
- Light switches
- Door trim
- Closet rods
- Shelving
- Wall hooks
- Furniture
- Laundry hampers
- Full-length mirrors
Look at the hidden side first: If possible, use the side of the door that is less visible from the room. This keeps the shoe zone practical without making the whole space feel busier.
For a bedroom closet, the inside of the closet door is often best. For an entry closet, the inside door surface can hide the shoes when the closet is closed. For a bedroom door, the back side may be fine if it is not the first thing you see from the bed.
If you want to get more from your life, and are looking for concrete action steps to get you there, check out our Request a Coach page. It’s a “cut the fence-sitting and take action” way to tackle your issues and actually find success. To get off the fence and start to take action, click or tap here.
Test the clearance before buying anything: Before ordering an organizer, do a quick test. Hang a towel, hanger, or piece of folded cardboard over the top of the door. Close the door slowly and see whether it rubs, catches, or leaves enough space.
This tiny test can save you from buying an organizer that technically fits but becomes irritating every day.
2. Choose a No-Drill Organizer That Fits Your Shoes
Use pocket organizers for flat and lightweight shoes: Pocket-style over-the-door organizers work well for shoes that are light and flexible. They are especially useful for sandals, flats, slippers, kids’ shoes, flip-flops, and thin sneakers.
Clear pockets make it easier to see what is inside. Fabric pockets can look softer and hide visual clutter, but they may make it harder to find the exact pair you want. Choose based on what matters more in your space: visibility or a cleaner look.
Pocket organizers are best when your shoes can slide in without forcing the seams. If every pocket is stretched tight, the organizer will look messy and wear out faster.
Use rack-style organizers for bulkier pairs: If you need to store sneakers, loafers, or sturdier everyday shoes, an over-the-door shoe rack may work better. Rack styles usually hold shoes more openly, so bulkier pairs are easier to grab.
The tradeoff is that rack organizers can look busier and may stick out farther from the door. They also need more clearance behind the door when it opens.
Before choosing one, think about the actual shoes you wear most often. A soft pocket organizer may look neat online, but it will not help much if your daily shoes do not fit.
If you want to get more from your life, and are looking for concrete action steps to get you there, check out our Request a Coach page. It’s a “cut the fence-sitting and take action” way to tackle your issues and actually find success. To get off the fence and start to take action, click or tap here.
Avoid overloading the door: The back of a door is useful, but it is not meant to hold every heavy shoe you own. Heavy boots, thick athletic shoes, and rarely worn pairs are better stored elsewhere.
Overloading the organizer can cause:
- Sagging pockets
- Bent hooks
- Door rubbing
- Noisy swinging
- Frustrating daily use
Match the organizer to the door width: Measure your door before buying. This matters even more if you have a narrow closet door, bifold closet door, older apartment door, or unusually thick trim.
Look at the width, height, and top edge. Thin over-door hooks may close better than chunky metal brackets. If the door frame is tight, search for slim-profile hooks or organizers made specifically for tight doors.
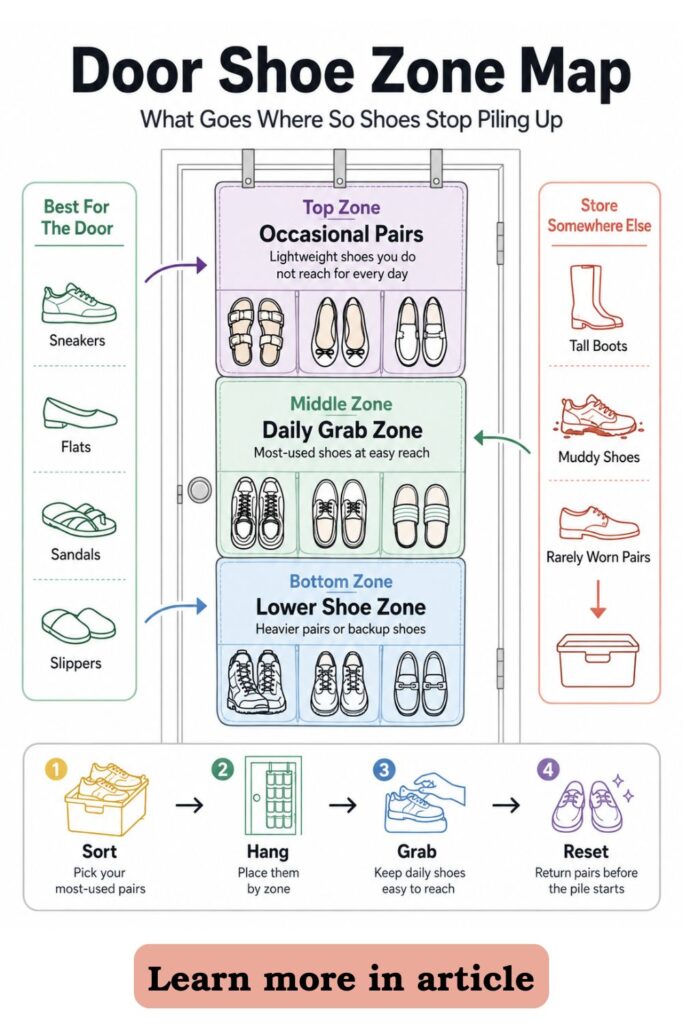
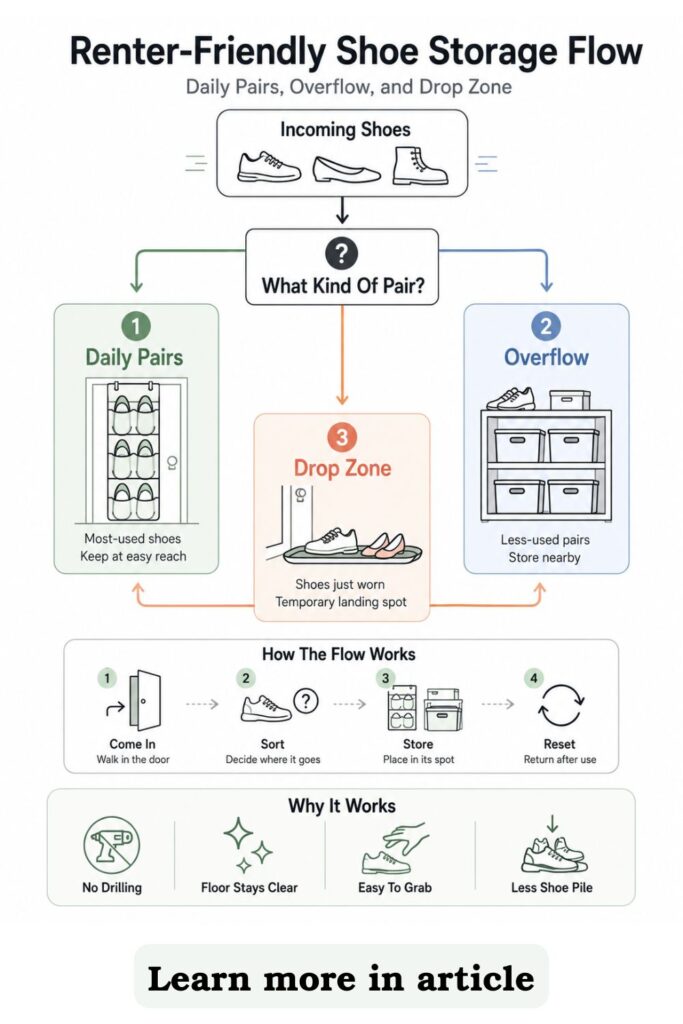
3. Create a “Most-Used Shoes Only” Rule
Limit the door zone to daily pairs: This is the rule that keeps the system from turning into another clutter spot. The door should hold the shoes you actually wear during a normal week, not the full shoe collection.
Think of the door as your quick-access zone. It is for the shoes that keep ending up on the floor because you use them often and need them close.
Good candidates include:
- Everyday sneakers
- Work shoes
- House slippers
- Walking shoes
- Errand shoes
- Kids’ school shoes
- Lightweight sandals
The goal is to make the most common choice easy. When the daily shoes have a clear home, the floor stops being the default storage area.
If you want to get more from your life, and are looking for concrete action steps to get you there, check out our Request a Coach page. It’s a “cut the fence-sitting and take action” way to tackle your issues and actually find success. To get off the fence and start to take action, click or tap here.
Sort shoes by frequency first: Pull out the shoes that currently pile up most often. Do not start with the shoes you wish you wore more. Start with the ones that keep showing up in the mess.
Place the highest-use pairs in the easiest rows. For most people, that means the middle section of the organizer. These rows are easy to see and reach without bending or stretching.
Move occasional shoes somewhere else: Special-event shoes, out-of-season pairs, backup sneakers, and bulky boots do not need prime door space. They can go in under-bed bins, closet shelves, labeled boxes, or a lower closet area.
This keeps the door from becoming too full. It also makes the system faster to use because you are not digging past shoes you rarely wear.
Set a clear pair limit: Decide how many pairs the door can hold comfortably, then treat that number as the limit. If the organizer has 12 pockets, that does not always mean it should hold 12 full pairs.
A realistic limit may be:
- 4 to 6 pairs for a narrow door
- 6 to 8 pairs for a shared bedroom
- 8 to 10 pairs for a larger closet door
- Fewer pairs if shoes are bulky
If you add a new daily pair, move another pair out. That one-in-one-out habit keeps the door zone useful instead of crowded.
4. Arrange the Door So Shoes Are Easy to Grab
Place everyday shoes at hand height: Once you know which shoes belong on the door, arrange them by how often you reach for them. The easiest rows should hold the pairs you wear most.
If you want to get more from your life, and are looking for concrete action steps to get you there, check out our Request a Coach page. It’s a “cut the fence-sitting and take action” way to tackle your issues and actually find success. To get off the fence and start to take action, click or tap here.
This sounds small, but it makes a big difference. If your everyday sneakers are too low, too high, or tucked behind other shoes, you will be tempted to leave them on the floor again.
Put the grab-and-go pairs in the middle rows. These are usually the rows around chest to waist height. They are easy to see, easy to reach, and easy to reset.
Use lower rows for heavier or less-used shoes: Heavier shoes are better near the bottom. This helps the organizer feel more stable and keeps the top from pulling forward.
Lower rows are also useful for shoes you wear often but not every day. For example, you might keep walking shoes, backup flats, or weekend shoes there.
Avoid putting your most-used shoes in the very bottom row unless bending down is easy and natural for you. If it feels like work, the system will not stick.
Group shoes by person or purpose: A door organizer becomes easier to use when the layout makes sense at a glance. You can group by person, by shoe type, or by routine.
Try zones like:
- Work shoes
- Errand shoes
- House shoes
- Walking shoes
- Kids’ shoes
- Gym shoes
- Rain-friendly shoes
For shared spaces, giving each person a row or column can prevent the organizer from becoming a daily shuffle.
If you want to get more from your life, and are looking for concrete action steps to get you there, check out our Request a Coach page. It’s a “cut the fence-sitting and take action” way to tackle your issues and actually find success. To get off the fence and start to take action, click or tap here.
Keep pairs facing the same direction: Consistency makes the door look cleaner and helps you find shoes faster. Put toes facing down, sideways, or outward depending on the organizer style, then keep that pattern across the whole door.
A neat pattern is not just about appearance. It reduces visual noise, which makes the system easier to maintain when you are rushing out the door.
5. Add Hooks for the Small Things That Travel With Shoes
Use renter-safe hooks for shoe extras: Shoes are often part of a leaving-the-house routine. That means the shoe zone can also hold a few tiny items that belong near the shoes.
Use removable hooks or over-the-door hooks for lightweight accessories. This can make the whole door zone more useful without adding another bin or basket to the floor.
Useful items might include:
- Shoe horn
- Lint roller
- Small umbrella
- Reusable shopping bag
- Dog leash
- Walking pouch
- Foldable tote
- Small brush
Keep this simple. The hooks should support the shoe routine, not become a catchall for random things.
Keep hooks lightweight: Renter-friendly hooks work best when they are not overloaded. Adhesive hooks are especially sensitive to weight, paint quality, humidity, and surface texture.
Avoid using them for heavy bags, backpacks, full purses, or anything that could peel paint if it falls. Even if a hook claims to hold more weight, rental walls and doors can be unpredictable.
If you want to get more from your life, and are looking for concrete action steps to get you there, check out our Request a Coach page. It’s a “cut the fence-sitting and take action” way to tackle your issues and actually find success. To get off the fence and start to take action, click or tap here.
For heavier items, use an over-the-door hook rail instead of adhesive. Even then, keep the weight reasonable so the door still opens smoothly.
Place hooks where they do not bump shoes: Hooks are helpful only if they do not interfere with the organizer. Place them along the side edge, above the organizer, or in an open gap where items can hang freely.
Before finalizing placement, open and close the door a few times. Check whether anything swings, knocks, catches, or blocks the closet.
Make the hook zone serve the shoe routine: The best hook items are the ones you often look for right before leaving. If something does not belong to that moment, store it somewhere else.
A door shoe zone works because it removes friction. Every extra item should make the routine easier, not heavier.
6. Make It Renter-Safe Before You Load It Up
Protect the door from rubbing: Over-the-door organizers can shift slightly when the door moves. If the organizer taps, scratches, or rubs, add small protective pieces before loading it fully.
Felt pads, clear bumpers, or soft adhesive protectors can help create a buffer between the organizer and the door. Place them where the organizer touches most often, especially near metal brackets or lower corners.
If you are worried about adhesive on the paint, use removable felt with caution or place a soft fabric strip behind the organizer instead.
If you want to get more from your life, and are looking for concrete action steps to get you there, check out our Request a Coach page. It’s a “cut the fence-sitting and take action” way to tackle your issues and actually find success. To get off the fence and start to take action, click or tap here.
Avoid adhesive on delicate paint: Not all rental paint is strong. Some doors have old paint, glossy paint, peeling edges, or layers that lift easily. In those cases, adhesive hooks can do more damage than expected.
If the surface looks fragile, choose over-the-door hooks instead. They let you add function without sticking anything directly to the door.
Adhesive products may be better for smooth, sturdy surfaces, but always test gently. When in doubt, use the least permanent option.
Check the top edge of the door: The top of the door is where many renter-friendly systems fail. If the hook is too thick, the door may scrape the frame or refuse to close.
Close the door slowly the first time. Do not force it. If it catches, look for thinner brackets or move the organizer to a different door with more clearance.
You should also check whether the organizer makes the door uneven. A door that suddenly needs extra pressure to close is not a good long-term setup.
Test with a few pairs first: Do not fill the entire organizer immediately. Add three or four pairs, then use the setup for a day or two.
Watch for:
If you want to get more from your life, and are looking for concrete action steps to get you there, check out our Request a Coach page. It’s a “cut the fence-sitting and take action” way to tackle your issues and actually find success. To get off the fence and start to take action, click or tap here.
- Scraping
- Swinging
- Sagging
- Door resistance
- Shoes falling out
- Hooks shifting
If everything works, add more pairs gradually. This makes it easier to catch problems before the door is overloaded.
7. Keep the Shoe Zone From Becoming Another Mess
Do a quick weekly reset: Any organizing system can slowly drift if it never gets reset. The good news is that a door shoe zone is small, so the reset can be fast.
Once a week, take two or three minutes to straighten the organizer. Pair up shoes, remove anything that does not belong, and check whether the daily pairs are still in the right spots.
This is not a deep clean. It is just a quick correction before the door turns into another crowded storage area.
A simple reset can include:
- Match loose pairs
- Remove extra items from pockets
- Wipe dirt from lower pockets
- Move seasonal shoes out
- Return daily shoes to the easiest rows
Use a one-in-one-out habit: If you add a new pair to the door, move another pair somewhere else. This rule keeps the organizer from slowly becoming overstuffed.
It is especially useful during seasonal changes. When sandals come out, winter shoes may need to move into backup storage. When rain shoes become daily shoes, another pair may need to leave the door.
The point is not to be strict for no reason. It is to protect the usefulness of the system.
If you want to get more from your life, and are looking for concrete action steps to get you there, check out our Request a Coach page. It’s a “cut the fence-sitting and take action” way to tackle your issues and actually find success. To get off the fence and start to take action, click or tap here.
Create a “not here” rule: Some shoes should not go on the door. Wet shoes, muddy shoes, bulky boots, and shoes with loose dirt can make the organizer unpleasant to use.
Give those pairs a different temporary spot, such as a mat, tray, or washable bin. Once they are dry or clean, they can return to regular storage if needed.
Watch for pile patterns: If shoes still pile up, do not assume the system failed. Look at which shoes are on the floor.
That usually tells you what needs adjusting. Maybe a daily pair is missing from the door. Maybe the organizer is too full. Maybe the shoes are too hard to reach. A small layout change can often fix the problem.
8. Adjust the Setup for Small Apartments and Shared Spaces
Divide the door by person: In a shared space, the door needs clear boundaries. Otherwise, one person’s shoes can quickly take over the whole organizer.
Give each person a row, column, or section. This makes it easier for everyone to know where their shoes belong. It also prevents the daily “whose shoes are these?” problem.
For example:
- Top rows for adults
- Bottom rows for kids
- Left side for one person
- Right side for another
- Middle rows for shared household shoes
If kids are using the organizer, keep their shoes low enough for them to put away on their own.
If you want to get more from your life, and are looking for concrete action steps to get you there, check out our Request a Coach page. It’s a “cut the fence-sitting and take action” way to tackle your issues and actually find success. To get off the fence and start to take action, click or tap here.
Use labels only where they help: Labels are useful when more than one person uses the zone or when the organizer holds several categories. They are not necessary if the setup is obvious.
Simple labels work best. Use words like “work,” “school,” “gym,” “daily,” “rain,” or each person’s name. Avoid over-labeling every pocket, since that can make the system feel fussy.
A label should make the next action easier. If it does not help someone put shoes away faster, skip it.
Keep the visual side tidy: In a small apartment, storage is often visible from multiple angles. If the door faces the bed, living area, or hallway, choose an organizer that reduces visual clutter.
A fabric organizer may look quieter than clear plastic. A neutral color can blend into the door. Fewer pairs can also make the whole setup feel cleaner.
This does not mean the system has to look perfect. It just means the door should not feel like a wall of clutter every time you walk by.
Use the closet floor for overflow only: The door should handle daily shoes. The closet floor, shelf, or bin can hold everything else.
This split keeps the system realistic. Daily pairs stay easy to grab, and less-used shoes still have a place without crowding the door.
If you want to get more from your life, and are looking for concrete action steps to get you there, check out our Request a Coach page. It’s a “cut the fence-sitting and take action” way to tackle your issues and actually find success. To get off the fence and start to take action, click or tap here.
9. When an Organizing Coach Could Help
Use a coach to identify the real drop zone: Sometimes the hardest part of organizing shoes is not choosing a product. It is figuring out why the pile keeps happening.
An organizing coach can help you notice the pattern behind the mess. Maybe shoes pile up because the closet is too full. Maybe the shoe rack is too far from where you take shoes off. Maybe the “official” storage spot looks good but is annoying to use.
A coach can help match the storage to your actual habits instead of forcing a system that only works in theory.
Set a realistic shoe limit together: Many people struggle with shoe storage because every pair feels like it might be useful someday. A coach can help you sort daily shoes, seasonal shoes, special-event shoes, and pairs that no longer earn their space.
This does not have to mean getting rid of everything. It can simply mean deciding what deserves the easiest access.
A helpful sorting process might look like:
- Wear weekly
- Wear monthly
- Seasonal only
- Special occasion
- Backup pair
- No longer needed
Once those categories are clear, the door zone becomes much easier to set up.
Build the habit around your routine: A coach can also help you create the small habit that keeps the shoe zone working. The organizer is only the tool. The routine is what makes it last.
If you want to get more from your life, and are looking for concrete action steps to get you there, check out our Request a Coach page. It’s a “cut the fence-sitting and take action” way to tackle your issues and actually find success. To get off the fence and start to take action, click or tap here.
For example, you might create a simple rule: shoes go back on the door before bedtime, after work, or before starting laundry. Tying the reset to something you already do makes it easier to remember.
Troubleshoot what keeps breaking down: If the door gets messy again, a coach can help you adjust without starting over. Maybe the wrong shoes are on the door. Maybe the organizer is too full. Maybe the best drop zone is actually by the entryway, not the closet.
That outside perspective can be especially useful in small spaces where every inch has to work harder.
10. Simple Upgrades That Make the Door Zone Work Better
Add a small floor mat nearby: A door organizer works best for clean, dry shoes. If you often come in with damp, dusty, or muddy shoes, add a small mat nearby.
This gives dirty shoes a temporary landing place before they go back into storage. It also protects the floor and keeps the organizer cleaner.
Choose a mat that is slim enough not to block the door. If the door swings over the mat, check the clearance before keeping it there.
Keep cleaning supplies close but tiny: A small shoe zone can work even better when basic cleaning items are nearby. You do not need a full shoe-care station. Just one or two tiny tools can help.
Useful options include:
If you want to get more from your life, and are looking for concrete action steps to get you there, check out our Request a Coach page. It’s a “cut the fence-sitting and take action” way to tackle your issues and actually find success. To get off the fence and start to take action, click or tap here.
- Small brush
- Wipe packet
- Odor sachet
- Mini lint roller
- Cloth for quick dusting
Store these in a pocket, on a small hook, or in a nearby basket. Keep it minimal so the organizer does not become crowded with supplies.
Rotate by season: Your daily shoes change throughout the year. The door zone should change with them.
In warm weather, you might keep sandals, flats, and walking shoes on the door. In cooler months, you might switch to sneakers, slippers, or rain-friendly shoes. Bulky boots may still need a separate floor tray or closet bin.
A seasonal reset keeps the door useful instead of packed with shoes you are not currently wearing.
Use the top row carefully: The top row is often the least convenient spot. Use it for lightweight shoes or pairs you wear occasionally.
Avoid placing heavy shoes up high. They can be harder to grab and may pull the organizer forward.
The best door setup is not the one that holds the most. It is the one that makes your daily routine easier every time you use it.
A Door That Finally Gives Shoes a Home
A renter-friendly shoe zone works because it uses space you already have. The back of the door is often ignored, but it can become the perfect spot for the shoes that keep piling up by the closet, bed, or entryway.
If you want to get more from your life, and are looking for concrete action steps to get you there, check out our Request a Coach page. It’s a “cut the fence-sitting and take action” way to tackle your issues and actually find success. To get off the fence and start to take action, click or tap here.
The key is to keep the system small and honest. Store the shoes you actually wear often. Move occasional pairs somewhere else. Protect the door before loading it up. Keep the layout easy enough that putting shoes away feels almost as simple as dropping them on the floor.
This kind of setup is especially useful in rentals because it does not require drilling, permanent shelving, or complicated closet changes. It is also helpful in small apartments where every bit of floor space matters.
Start with one door and a few daily pairs. Test the organizer, adjust the layout, and build the habit slowly. You can always add more later, but the first win is simply getting the most common shoes off the floor.
Once the daily pairs have a clear home, the whole closet area becomes easier to manage. The floor is less crowded. The room looks more put together. And the shoes you need most are right where you expect them to be.
****
Are you all about style, decor and organization? Download a copy of our Clutter Reset Guide.
Need some in depth help with organization and productivity ? Drop on by our directories choc full of productivity coaches, minimalist coaches, and work/life balance coaches to get your life organized! Or click here to have us match you to the best.
If you want to get more from your life, and are looking for concrete action steps to get you there, check out our Request a Coach page. It’s a “cut the fence-sitting and take action” way to tackle your issues and actually find success. To get off the fence and start to take action, click or tap here.
Read this next
Sidecar Cart System for Desks With No Drawer Space
No desk drawers? This sidecar cart setup keeps supplies close, clears the desktop, and makes tiny workspaces feel instantly easier.
Read More
Staying Organized Through a Downsize: How I Won The Battle To Unclutter, Part 1
Tips on how to stay organized in a small space to reduce stress, fatigue, and anxiety!
Read More
The Secret to a Welcoming Fall Porch (That Looks Straight Out of a Hallmark Movie)
Are you all about style, decor and organization? Download a copy of our Decluttering Workbook. **** There’s something about a Hallmark fall porch that feels instantly peaceful. The kind of […]
Read More