


Talk to a coach about Organizational coaching

Jennifer Loehding
Success Architect | Certified DreamBuilder Coach | Certified NEUROFIT Trainer™ | Certified Keto, Carnivore, PSMF and Supplement Coach
Life, business, health, and wellness coaching for balanced personal and...

Crystal Faulk
ACC
I help overwhelmed women in transition gain clarity, confidence, and...

Terrie Hein
Certified Life Coach, Certified Insight Coach Practitioner
Coaching to declutter your life, organize your goals, and cook...

Dr Charlene Ashley
Doctorate - Behaviours
I coach individuals to design fulfilling lives through structure, clarity,...

Paloma Chiara

Lana's Gymnastics Club
"Where the best in gymnastics meets fun. Where every child is a star"
lgclubny.com

Anna Sosnina
ICF (ACC)
ICF ACC certified coach, founder of EssorVie Coaching, passionate about...

Travis Brown
Professional Life coach
With experience in guiding clients to achieve goals, build confidence,...


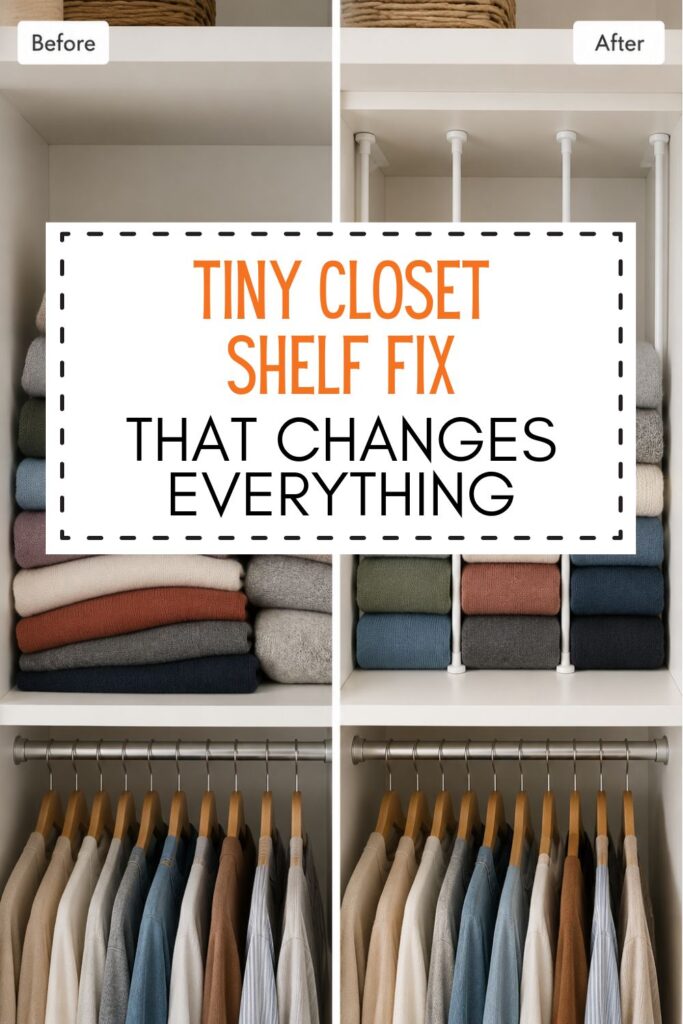
No-Drill Closet Shelf Boost With Tension Poles
Are you all about style, decor and organization? Download a copy of our Clutter Reset Guide.
****
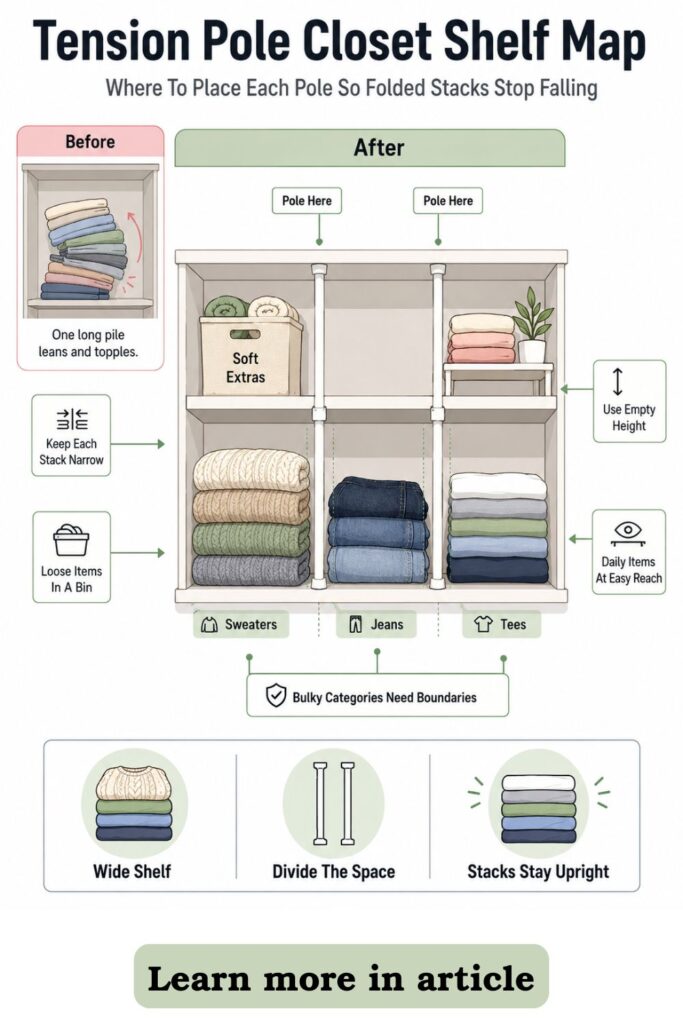
A small closet can start feeling impossible when every shelf turns into one long, unstable pile. You fold the clothes, stack the towels, tuck the extra bedding into place, and somehow the whole thing slides sideways the second you pull one item out.
The issue is not always that you need a bigger closet. Sometimes the real problem is that your shelf has too much open space and not enough structure.
A wide shelf gives folded items room to lean, spread, collapse, and blend together. Sweaters slump into jeans. Towels fall into bedding. Accessories get shoved into the corners. Before long, you are not using the shelf as storage anymore. You are using it as a pile zone.
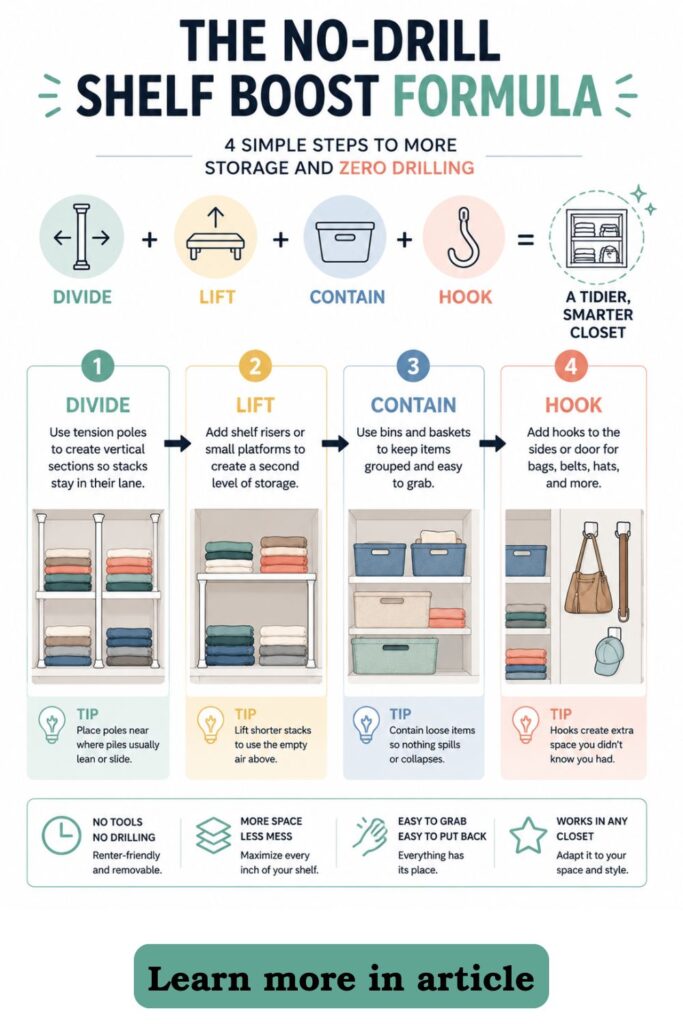
A no-drill shelf boost fixes that by adding removable structure. Tension poles can create upright dividers. Shelf risers can make better use of empty height. Bins can contain small or soft items. Hooks can move clutter off the shelf entirely.
This is especially helpful if you rent, share a closet, or do not want to commit to a built-in system. You do not need power tools, wall anchors, or custom shelving. You just need to make the shelf behave like it has zones.
The goal is not a perfect closet makeover. The goal is a closet that is easier to use on normal days.
If you want to get more from your life, and are looking for concrete action steps to get you there, check out our Request a Coach page. It’s a “cut the fence-sitting and take action” way to tackle your issues and actually find success. To get off the fence and start to take action, click or tap here.
You want folded stacks that stay upright. You want categories that make sense. You want to pull out one shirt without dragging three other things with it.
A few small supports can change the way the whole shelf works. Once each section has a job, the closet becomes much easier to maintain.
Need some in depth help with organization and productivity ? Drop on by our directories choc full of productivity coaches, minimalist coaches, and work/life balance coaches to get your life organized! Or click here to have us match you to the best.
Step 1: Choose the shelf that causes the most collapse
Find the messiest shelf first: Pick the closet shelf where folded stacks lean, fall forward, or blend into each other, because fixing one high-friction area gives the fastest improvement.
Look for the pattern behind the mess: Notice whether the problem is height, width, mixed categories, slippery fabrics, or items being shoved into open space without boundaries.
Start with one shelf, not the whole closet. This keeps the project small enough to finish and helps you avoid pulling everything out at once. A closet can look like one big problem, but there is usually one shelf that causes most of the frustration.
Look for the area that makes you sigh when you open the door. Maybe it is the sweater shelf where every stack leans into the next one. Maybe it is the towel shelf where the pile gets too tall and falls forward. Maybe it is a mixed shelf with leggings, jeans, scarves, bags, and random extras all fighting for the same space.
The best shelf to start with is the one where the mess returns quickly after you clean it. That is a sign the setup is not supporting the way you actually use the closet.
If you want to get more from your life, and are looking for concrete action steps to get you there, check out our Request a Coach page. It’s a “cut the fence-sitting and take action” way to tackle your issues and actually find success. To get off the fence and start to take action, click or tap here.
Before adding tension poles or organizers, ask yourself what the shelf is doing wrong.
Common shelf problems include:
- The shelf is too wide, so stacks spread sideways.
- The shelf is too tall, so empty air above items is wasted.
- The shelf holds too many unrelated categories.
- Soft items slide around because they have no boundary.
- Daily-use items are mixed with rarely-used items.
- Small accessories keep landing on top of folded clothes.
Once you know the main problem, the fix becomes clearer. If stacks lean sideways, you need dividers. If short piles waste height, you need a riser. If loose accessories keep spreading, you need a bin or hook.
Do not start by asking, “What organizer should I buy?” Start by asking, “What is collapsing, spreading, or getting lost?”
That one question will make the whole setup more useful.
Step 2: Measure the shelf height, width, and pressure points
Measure the usable vertical gap: Check the space between the shelf surface and the shelf above it, then choose tension poles, risers, or bins that fit without making items hard to pull out.
Mark where support is needed: Identify the spots where a divider, pole, or small vertical boundary would keep stacks upright without blocking access.
Measuring does not need to be complicated, but it does matter. A no-drill setup works best when the pieces fit the shelf instead of forcing the shelf to fit the pieces.
If you want to get more from your life, and are looking for concrete action steps to get you there, check out our Request a Coach page. It’s a “cut the fence-sitting and take action” way to tackle your issues and actually find success. To get off the fence and start to take action, click or tap here.
Start by measuring the width of the shelf from side to side. Then measure the depth from the front edge to the back wall. Finally, measure the height between the shelf you are organizing and the shelf above it.
That height measurement is especially important if you plan to use vertical tension poles. The pole needs enough pressure to stay secure, but it should not bend the shelf, dent a surface, or make anything feel strained.
Also measure the height of your folded stacks. This tells you whether the shelf problem is caused by piles being too tall or by the shelf having too much unused space above shorter items.
For example, if your folded tees only take up half the shelf height, a shelf riser may help. If your towels already reach close to the shelf above, adding a riser would probably make the space harder to use.
Helpful measurements to take:
- Full shelf width
- Shelf depth
- Height between shelves
- Height of folded stacks
- Width of each category
- Space needed to pull items out comfortably
You can also do a quick pressure-point test. Put your folded items back on the shelf in rough categories, then notice where they begin to fall or merge. That is where a pole or divider may help most.
Avoid dividing every inch of the shelf. Too many small sections can make the closet feel fussy. You only need structure where the shelf is failing.
A good rule is to use the fewest supports that solve the problem. One or two tension poles may be enough to turn a chaotic shelf into three clear zones.
If you want to get more from your life, and are looking for concrete action steps to get you there, check out our Request a Coach page. It’s a “cut the fence-sitting and take action” way to tackle your issues and actually find success. To get off the fence and start to take action, click or tap here.
The point is not to fill the closet with products. The point is to give the shelf just enough shape that it stops working against you.
Step 3: Use tension poles to create vertical dividers
Place tension poles where stacks start leaning: Install slim vertical tension poles between shelves to act like removable dividers for sweaters, jeans, towels, or bags.
Keep each section narrow enough to behave: Make each zone just wide enough for one category, because smaller sections help folded stacks stay upright and easier to grab.
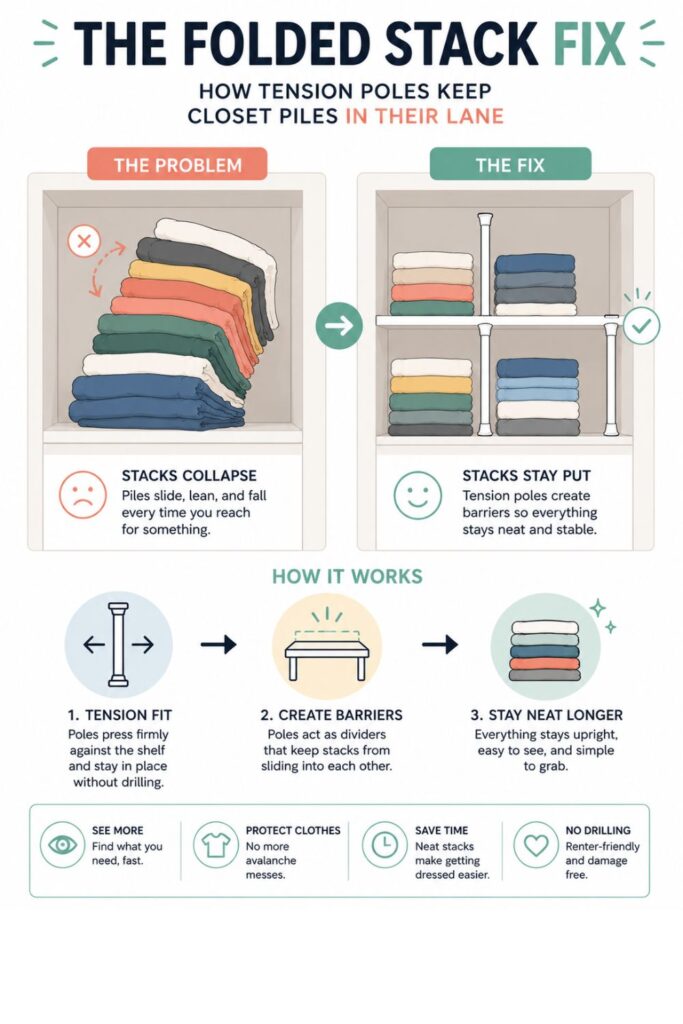
Tension poles are useful because they create boundaries without permanent changes. Instead of drilling into the closet or installing a custom divider, you can use pressure between two surfaces to hold a slim vertical support in place.
Think of each pole as a soft wall. It does not need to carry heavy weight. It just needs to stop folded items from leaning into the next stack.
Start with the widest shelf section. If your jeans and sweaters are sharing a long open shelf, place one pole between them. If towels keep sliding into sheets, place one pole where the two categories meet.
You can create simple zones such as:
- Jeans
- Sweaters
- Workout clothes
- Towels
- Extra bedding
- Handbags
- Seasonal items
The key is to make each zone wide enough to hold the category, but not so wide that the stack starts spreading again. A narrow stack usually behaves better than a wide one.
If you want to get more from your life, and are looking for concrete action steps to get you there, check out our Request a Coach page. It’s a “cut the fence-sitting and take action” way to tackle your issues and actually find success. To get off the fence and start to take action, click or tap here.
Place the pole slightly forward if items tend to fall toward the front. Place it deeper if items mostly lean sideways in the back. You may need to test the position before it feels right.
After placing the pole, pull one item from the middle of the stack. If everything shifts, the zone may still be too wide or too full. Move the pole closer, reduce the stack height, or split the category into two smaller groups.
Tension poles are especially helpful for bulky folded items because those piles rarely stay perfect. Sweaters, sweatshirts, jeans, and towels all benefit from having a side boundary.
Do not expect the pole to make the closet look like a magazine photo. That is not the real win. The win is that the stack stays in its lane.
Once each pile has a side, it becomes easier to put items back without re-folding the entire shelf.
Step 4: Add shelf risers only where height is being wasted
Use risers for short stacks, not tall piles: Add a shelf riser when the shelf has unused air space above short items like folded tees, small linens, or accessories.
Keep heavy items on the bottom level: Place jeans, bulky sweaters, or heavier towels below the riser so the upper level stays easy to use and does not feel unstable.

Shelf risers can be amazing in a small closet, but only when they solve the right problem. They are best for shelves with empty vertical space, not shelves that are already packed too high.
If you want to get more from your life, and are looking for concrete action steps to get you there, check out our Request a Coach page. It’s a “cut the fence-sitting and take action” way to tackle your issues and actually find success. To get off the fence and start to take action, click or tap here.
A riser creates a second level. That can help when you have short stacks, small bins, folded tees, tank tops, washcloths, or accessories. Instead of piling everything higher, you spread items across two usable layers.
This makes the shelf easier to scan. It also prevents the “one tall tower” problem, where the whole pile falls when you pull something from the bottom.
Good uses for shelf risers include:
- Tees on one level and tanks on another
- Washcloths above hand towels
- Leggings above workout tops
- Seasonal accessories above daily basics
- Small bins above folded clothing
- Light scarves above heavier items
Avoid using risers for heavy or bulky piles unless the riser is sturdy and the shelf has enough clearance. Jeans, thick sweaters, and bath towels usually work better on the bottom level.
You also want to make sure you can still reach the back of the shelf. If the riser makes items too deep, too high, or too awkward to remove, it may create more frustration than storage.
A helpful test is to place the riser on the shelf before filling it. Then pretend you are grabbing an item on a rushed morning. Can you remove it without knocking over the level above or scraping your hand on the shelf?
If not, the riser may be too tall, too wide, or in the wrong spot.
One riser in the right place is better than several risers packed into every gap. A small closet still needs breathing room.
If you want to get more from your life, and are looking for concrete action steps to get you there, check out our Request a Coach page. It’s a “cut the fence-sitting and take action” way to tackle your issues and actually find success. To get off the fence and start to take action, click or tap here.
Use risers where they make categories clearer. Skip them where they make the shelf feel crowded.
Step 5: Add bins where piles need containment, not perfection
Choose bins for loose categories: Use small bins or baskets for items that never stay folded neatly, such as scarves, belts, socks, workout gear, or soft accessories.
Label by behavior instead of fantasy: Name each bin based on how the item is actually used, such as “daily tees,” “gym clothes,” “extra towels,” or “winter accessories.”
Not everything in a closet wants to be folded. Some items are too soft, too small, too slippery, or too annoying to stack neatly. That is where bins help.
A bin gives messy categories a boundary. It lets you contain items without expecting them to look perfect every time. This is especially useful for real-life closets where people are busy, tired, or sharing space.
Use bins for categories that tend to spread, tangle, or vanish behind other things.
Good bin categories include:
- Scarves
- Belts
- Socks
- Workout clothes
- Small bags
- Winter accessories
- Extra linens
- Tank tops
- Pajamas
- Swimsuits
- Backup toiletries
Choose the bin style based on how often you use the items. Open bins work well for daily items because you can toss things back quickly. Clear bins work well for backup or seasonal items because you can see what is inside. Shallow bins are better for high shelves because they are easier to pull down.
If you want to get more from your life, and are looking for concrete action steps to get you there, check out our Request a Coach page. It’s a “cut the fence-sitting and take action” way to tackle your issues and actually find success. To get off the fence and start to take action, click or tap here.
Avoid deep bins for daily clothing unless you enjoy digging. Deep bins can hide everything at the bottom, which turns the closet into another search project.
Labels help, but they should be simple. Do not label based on a fantasy version of your closet. Label based on how you actually think when you are putting things away.
For example, “gym clothes” is usually better than “activewear separates.” “Extra towels” is better than “guest linen overflow.” “Stuff I wear at home” may be more useful than “loungewear.”
The point of a bin is to make the next action obvious. When you are holding a scarf, you should know where it goes without pausing.
Bins are not there to make the closet look perfect. They are there to stop loose things from taking over the shelf.
Step 6: Use Command strips and hooks for the small things that clutter shelves
Move hangable items off the shelf: Use adhesive hooks or renter-friendly strips for belts, caps, lightweight bags, scarves, or measuring tapes that keep landing on folded stacks.
Place hooks where the item is naturally dropped: Put hooks near the shelf or door area where the item already tends to pile up, so the new system works with the reader’s habits.
Some closet shelf mess is not really shelf mess. It is hook mess without hooks.
If you want to get more from your life, and are looking for concrete action steps to get you there, check out our Request a Coach page. It’s a “cut the fence-sitting and take action” way to tackle your issues and actually find success. To get off the fence and start to take action, click or tap here.
Belts, caps, small bags, scarves, and lightweight accessories often land on folded stacks because they do not have an easier home. They are not bulky enough to deserve a shelf zone, but they still create clutter when they sit on top of clothing.
Renter-friendly hooks can fix this quickly. Adhesive hooks, removable strips, and over-the-door hooks let you move hangable items off the shelf without drilling into the closet.
Good hook locations include:
- Inside the closet side wall
- The back of the closet door
- A blank vertical strip near the shelf
- The inside edge of a closet frame
- The side of a shelving unit
- Under a shelf lip, if the hook is secure and lightweight
The best spot is usually where the item already gets dropped. If your belt always lands on the right side of the shelf, put a hook near that area. If your everyday bag gets tossed on top of sweaters, give it a hook near the closet opening.
This is not about forcing a new habit from scratch. It is about placing the new home close enough to the old pile that the better choice feels easy.
Be careful with weight limits. Adhesive hooks are best for lightweight items, not heavy bags, coats, or overloaded organizers. Check the product directions and avoid placing anything valuable or breakable on a hook that may loosen over time.
You can also use hooks to support a small routine. One hook can hold tomorrow’s belt. Another can hold a lightweight tote. A third can hold a scarf you reach for often.
When small items leave the shelf, folded stacks have room to stay folded. That one change can make the entire closet feel less crowded.
If you want to get more from your life, and are looking for concrete action steps to get you there, check out our Request a Coach page. It’s a “cut the fence-sitting and take action” way to tackle your issues and actually find success. To get off the fence and start to take action, click or tap here.
Step 7: Repurpose what you already own before buying more organizers
Test the layout with household items first: Try shoeboxes, small baskets, file boxes, gift boxes, or unused drawer organizers before committing to permanent-looking storage pieces.
Upgrade only the pieces that prove useful: Replace temporary containers later if they work, but avoid buying a full matching set before the closet layout has been tested.
It is tempting to buy a full set of matching bins as soon as you decide to organize a closet. The problem is that you may not know what the closet actually needs yet.
Before buying anything, test the layout with items you already own. This lets you figure out the right sizes, categories, and positions without wasting money on organizers that look nice but do not solve the problem.
Repurposed items can work surprisingly well.
Try using:
- Shoeboxes for scarves or socks
- Gift boxes for seasonal accessories
- File holders for clutches or folded leggings
- Small baskets for belts
- Drawer organizers inside shelf bins
- Magazine holders for slim bags
- Plastic food containers for tiny items
- Old storage cubes for soft clothing
The goal is not for the test version to look perfect. The goal is to learn what works.
For a few days, use the closet normally. Notice which containers are easy to maintain and which ones annoy you. If a box is too deep, you will feel it quickly. If a category is too narrow, items will overflow. If a bin is placed too high, you may stop using it.
If you want to get more from your life, and are looking for concrete action steps to get you there, check out our Request a Coach page. It’s a “cut the fence-sitting and take action” way to tackle your issues and actually find success. To get off the fence and start to take action, click or tap here.
Once a temporary setup proves itself, then you can upgrade the pieces you actually need. You may discover that you only need two good bins, one riser, and a couple of poles instead of a full closet system.
This also helps renters because it keeps the setup flexible. If you move, change seasons, or shift how you use the closet, you can adjust without feeling locked into one expensive solution.
Repurposing is especially helpful for small spaces because every organizer has to earn its place. An organizer that takes up more space than it gives back is not helping.
Test first. Upgrade later. Your closet will tell you what is worth buying.
Step 8: Build a simple shelf map before putting everything back
Assign every shelf zone one job: Decide what each pole-divided section, riser level, bin, and hook is supposed to hold before restocking the closet.
Put daily items at the easiest reach point: Keep the most-used clothing and linens in the front, middle, or eye-level areas so the system does not require extra effort every day.
A shelf map is just a simple plan for what goes where. You do not need to draw anything fancy. You only need to decide the job of each zone before everything goes back into the closet.
This step matters because a shelf without assigned jobs slowly turns back into one shared pile. The tension poles, risers, bins, and hooks help, but the categories are what make the system understandable.
If you want to get more from your life, and are looking for concrete action steps to get you there, check out our Request a Coach page. It’s a “cut the fence-sitting and take action” way to tackle your issues and actually find success. To get off the fence and start to take action, click or tap here.
Start by choosing your main shelf zones. Keep them broad enough to maintain.
For example:
- Left zone: jeans
- Middle zone: sweaters
- Right zone: workout clothes
- Top riser: seasonal accessories
- Bottom riser: daily tees
- Open bin: socks or soft accessories
- Door hooks: belts and lightweight bags
The easiest reach point should belong to the items you use most often. For most people, that means the front of the shelf, the middle shelf, or the area closest to eye level.
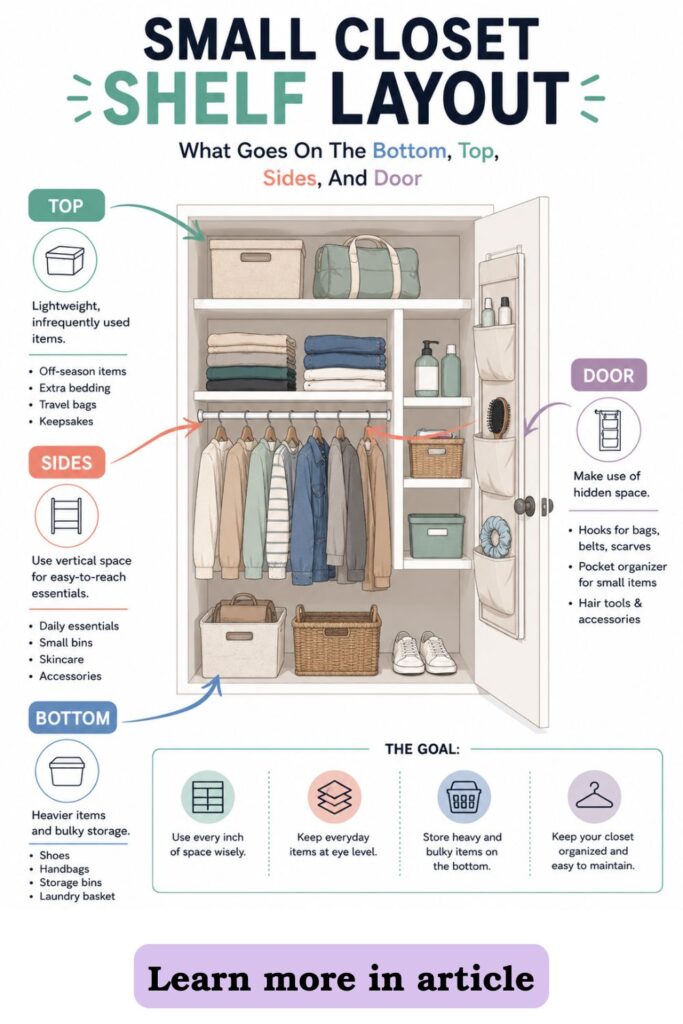
Do not waste prime space on items you rarely use. Extra bedding, off-season clothes, formal accessories, and backup supplies can go higher, farther back, or into labeled bins.
A shelf map also helps you avoid mixing categories that do not behave well together. Sweaters and scarves may seem related, but scarves can slip into sweater stacks. Jeans and leggings may both be bottoms, but leggings may work better in a bin while jeans work better as a folded stack.
Think about how each category acts, not just what it is called.
Once your map is set, put items back in order of importance. Daily items go first. Weekly items go next. Rarely-used items fill the less convenient spots.
Then test the setup by pulling out one item from each zone. If the shelf stays mostly intact, your map is working. If one section collapses immediately, adjust before calling it done.
If you want to get more from your life, and are looking for concrete action steps to get you there, check out our Request a Coach page. It’s a “cut the fence-sitting and take action” way to tackle your issues and actually find success. To get off the fence and start to take action, click or tap here.
A good shelf map makes the closet easier to use without requiring much thought. You know what belongs where because every zone has one clear job.
Step 9: Use a 15-minute setup checklist
Start with a fast reset, not a full closet cleanout: Remove only the items from the target shelf, wipe the surface, sort obvious categories, and install the first tension pole or riser.
Stop when the shelf has clear zones: The goal is not to perfect the whole closet in one session, but to create enough structure that folded stacks stop collapsing.
You do not need a full afternoon to make a small closet work better. In fact, a shorter setup can be more effective because it keeps the project focused.
Choose one problem shelf and give yourself a 15-minute reset. This is enough time to create structure without turning the closet into a huge mess on the floor.
Start by removing everything from that shelf only. Do not empty the entire closet unless you truly have time and energy for it. Wipe the shelf quickly, then group the items into obvious categories.
You are not doing a deep declutter here. You are just sorting enough to see what the shelf needs.
Use this quick checklist:
If you want to get more from your life, and are looking for concrete action steps to get you there, check out our Request a Coach page. It’s a “cut the fence-sitting and take action” way to tackle your issues and actually find success. To get off the fence and start to take action, click or tap here.
- Empty the problem shelf.
- Wipe the shelf surface.
- Group items by type.
- Remove anything that clearly belongs elsewhere.
- Measure the shelf gap.
- Place one tension pole where stacks lean.
- Add one riser if height is being wasted.
- Add one bin for loose items.
- Return daily items first.
- Move small hangable items to hooks.
- Test pulling out one item from each zone.
The final test is important. A closet can look organized when everything is freshly placed, but the real question is whether it works when you use it.
Pull out a sweater. Grab a towel. Take a pair of jeans from the middle of the stack. If the whole section shifts, tighten the category, move the pole, or reduce the pile.
The setup is done when the shelf has clear zones and you can remove an item without causing a mini-collapse.
This quick version is ideal for busy days because it gives you a visible win without demanding a full closet overhaul. You can always come back later to improve another shelf.
Small closet upgrades work best when they are actually finished. One completed shelf is more useful than a whole closet you started but did not have time to put back together.
Step 10: Make the system ADHD-friendly with fewer decisions
Use fewer categories than you think you need: Create broad zones like tops, bottoms, towels, bags, and extras so the closet is easy to reset even on busy days.
Make the right action obvious: Keep bins open, labels plain, hooks visible, and daily items easy to reach so the closet does not depend on memory or motivation.
A closet system is only helpful if it works when your energy is low. That is why fewer decisions can make a big difference.
If you want to get more from your life, and are looking for concrete action steps to get you there, check out our Request a Coach page. It’s a “cut the fence-sitting and take action” way to tackle your issues and actually find success. To get off the fence and start to take action, click or tap here.
If the shelf has too many tiny categories, putting things away becomes a thinking task. You have to remember where each item belongs, decide whether it fits the category, and maybe rearrange a small space to make it look right.
That is too much friction for a closet you use every day.
Instead, use broad categories that are easy to understand at a glance. “Workout clothes” may work better than separate zones for leggings, sports bras, tanks, and shorts. “Winter accessories” may work better than separate bins for gloves, hats, scarves, and ear warmers.
The system should be clear even when you are rushing.
ADHD-friendly closet rules include:
- Keep daily items visible.
- Use open bins for things you grab often.
- Use simple labels with normal words.
- Avoid stacking too many items in one pile.
- Keep backup items higher or farther back.
- Create a small “not sure yet” bin if needed.
- Make categories broad enough to reset quickly.
The “not sure yet” bin can be surprisingly useful. It gives homeless items a temporary place without letting them spread across the whole shelf. The key is to empty it regularly so it does not become a permanent junk bin.
Visible hooks also help because they remove the need to open containers or remember hidden spaces. If you can see the hook, you are more likely to use it.
This kind of closet setup is not about discipline. It is about environment design. The closet should make the next step obvious.
If you want to get more from your life, and are looking for concrete action steps to get you there, check out our Request a Coach page. It’s a “cut the fence-sitting and take action” way to tackle your issues and actually find success. To get off the fence and start to take action, click or tap here.
When the shelf has clear zones, open containers, and fewer choices, putting things away takes less effort. That is what makes the system easier to maintain.
Step 11: Add an over-the-door organizer only if the shelf still feels crowded
Use the door for overflow, not everything: Add a slim over-the-door organizer for accessories, small folded items, shoes, scarves, or extras that are stealing shelf space.
Keep the shelf for folded stacks: Let the door handle small loose items so the main shelf can stay focused on clothes, linens, and categories that need flat storage.
After you add tension poles, risers, bins, and hooks, the shelf may already feel much better. But if it still feels crowded, the closet door may be the next place to look.
The back of the door is useful because it adds vertical storage without changing the shelf itself. It is especially helpful in small closets where every flat surface is already doing too much.
Use an over-the-door organizer for items that are small, flexible, lightweight, or frequently misplaced.
Good door organizer categories include:
- Scarves
- Belts
- Socks
- Small handbags
- Seasonal accessories
- Shoes
- Hair tools
- Backup toiletries
- Cleaning cloths
- Extra linen items
The door should not become a second junk zone. Give each pocket or section a clear job. If the organizer has many small pockets, group similar items together instead of creating a different category for every pocket.
If you want to get more from your life, and are looking for concrete action steps to get you there, check out our Request a Coach page. It’s a “cut the fence-sitting and take action” way to tackle your issues and actually find success. To get off the fence and start to take action, click or tap here.
For example, the top row could hold seasonal accessories. The middle row could hold daily accessories. The bottom row could hold shoes or extras.
Keep heavier items lower when possible. This can help the organizer hang better and make the door easier to open and close.
Before adding one, check that the closet door can still shut comfortably. Some over-the-door hooks are too thick for certain doors or frames. If the door scrapes, sticks, or does not close fully, choose a slimmer option or use adhesive hooks inside the closet instead.
The shelf should remain focused on things that need flat support, like folded clothes, towels, linens, and bins. The door is better for loose items that would otherwise sit on top of those stacks.
This one shift can make the shelf feel less crowded without adding another bulky organizer inside the closet.
Use the door as backup support, not as a place to hide everything.
Step 12: How an organizing coach can help you make the closet easier to keep up
Notice the habit behind the closet mess: An organizing coach can help identify whether the real issue is too many categories, unclear zones, hard-to-reach storage, or a routine that does not match daily life.
Turn the shelf setup into a repeatable reset: A coach can help create a simple closet maintenance plan, such as a weekly five-minute shelf reset or a monthly “remove what no longer fits” prompt.
If you want to get more from your life, and are looking for concrete action steps to get you there, check out our Request a Coach page. It’s a “cut the fence-sitting and take action” way to tackle your issues and actually find success. To get off the fence and start to take action, click or tap here.
Sometimes the closet is not messy because you are doing anything wrong. It is messy because the system is asking too much from you.
An organizing coach can help you look at the closet through the lens of behavior, not just storage. Instead of focusing only on bins and dividers, they can help you notice what keeps happening.
Maybe clean laundry never makes it back to the right shelf because the categories are too specific. Maybe you avoid putting away sweaters because the stack is too high. Maybe bags pile up because the hooks are in the wrong place. Maybe you have too many items for the shelf to hold comfortably.
A coach can help turn those patterns into practical changes.
They might help you:
- Decide what the closet needs to support.
- Set a realistic goal for the space.
- Choose fewer and clearer categories.
- Create a shelf map that matches your routine.
- Build a quick weekly reset.
- Reduce decision fatigue.
- Make the closet easier to use during busy mornings.
- Plan what to keep, move, donate, or store elsewhere.
This can be especially helpful if you have already tried organizing the closet several times and the same mess keeps returning. A recurring mess usually means the setup does not match the habit.
A coach can also help with follow-through. Instead of saying “keep the closet organized,” they can help you define a small action, such as resetting one shelf every Friday or clearing the “not sure yet” bin twice a month.
The goal is not to create a perfect closet. The goal is to create a closet that supports your actual life.
If you want to get more from your life, and are looking for concrete action steps to get you there, check out our Request a Coach page. It’s a “cut the fence-sitting and take action” way to tackle your issues and actually find success. To get off the fence and start to take action, click or tap here.
When the system fits your behavior, it becomes much easier to keep up. You are no longer relying on motivation every time you put something away.
The closet starts doing more of the work for you.
Step 13: Keep the shelf boost working with one simple maintenance prompt
Ask one question when the shelf starts slipping: Use the prompt, “What is landing here because it does not have an easier home?”
Adjust the zone instead of blaming yourself: If the same pile returns, move the bin, widen the section, add a hook, or simplify the category until the system fits the way the closet is actually used.
Even a good closet system needs small adjustments. The first setup is not always the final version, and that is fine.
The easiest way to maintain the shelf is to watch where the mess returns. A repeated pile is useful information. It shows you where the system needs a better answer.
Use this prompt when the shelf starts slipping:
“What is landing here because it does not have an easier home?”
If you want to get more from your life, and are looking for concrete action steps to get you there, check out our Request a Coach page. It’s a “cut the fence-sitting and take action” way to tackle your issues and actually find success. To get off the fence and start to take action, click or tap here.
This question is gentle, but it is also practical. It shifts the focus away from blame and toward design.
If scarves keep landing on folded sweaters, they may need a bin or hook. If jeans keep leaning into workout clothes, the divider may need to move. If a bin keeps overflowing, the category may be too broad or the bin may be too small. If daily items are ending up in front of backup items, the backup items may need to move higher.
Helpful maintenance questions include:
- What keeps falling over?
- What item is always homeless?
- Which zone is too full?
- Which item is too hard to put away?
- What could move to the door?
- What could go in a bin?
- What could be stored higher because it is rarely used?
- Which label no longer makes sense?
Do not treat these adjustments as failure. They are how a closet system becomes more accurate.
A small closet has to work hard. Seasons change, laundry changes, routines change, and the items you reach for most can shift over time.
Once a month, take five minutes to reset the shelf. Straighten the stacks, empty the temporary bin, move anything that does not belong, and adjust one thing that keeps causing friction.
That is enough for most closets. The system does not need constant attention. It just needs a small check-in before the shelf turns back into a pile.
The closet shelf that finally stops fighting you
A small closet does not need a full renovation to become easier to use. Sometimes it just needs a few smart boundaries.
If you want to get more from your life, and are looking for concrete action steps to get you there, check out our Request a Coach page. It’s a “cut the fence-sitting and take action” way to tackle your issues and actually find success. To get off the fence and start to take action, click or tap here.
When a shelf is wide open, folded items have too much room to collapse. Tension poles create dividers. Shelf risers use the empty height. Bins contain the loose things. Hooks move small clutter off the shelf. An over-the-door organizer can catch overflow when the shelf still feels crowded.
Together, these pieces turn one messy shelf into a set of clear zones.
The best part is that the setup can be renter-friendly and removable. You do not have to drill holes, install a custom system, or commit to a permanent closet makeover. You can test the layout, adjust the spacing, and change the categories as your needs shift.
Start with the shelf that annoys you most. Measure it, divide it, add support where the stacks collapse, and give every zone one job.
Keep the system simple enough to maintain on a normal day. Broad categories, visible hooks, open bins, and easy-reach daily items will usually work better than a complicated setup that only looks good right after you arrange it.
The goal is not perfection. The goal is a closet that makes sense when you are getting dressed, putting away laundry, or grabbing towels in a hurry.
A good shelf boost should make the right action feel obvious. Jeans go here. Sweaters stay there. Scarves have a bin. Bags have a hook. Extra items have a place that does not interfere with daily use.
That is what makes the closet easier to keep up.
If you want to get more from your life, and are looking for concrete action steps to get you there, check out our Request a Coach page. It’s a “cut the fence-sitting and take action” way to tackle your issues and actually find success. To get off the fence and start to take action, click or tap here.
The best small closet upgrade is not the fanciest organizer. It is the setup that helps your things stay where you already meant to put them.
****
Are you all about style, decor and organization? Download a copy of our Clutter Reset Guide.
Need some in depth help with organization and productivity ? Drop on by our directories choc full of productivity coaches, minimalist coaches, and work/life balance coaches to get your life organized! Or click here to have us match you to the best.
If you want to get more from your life, and are looking for concrete action steps to get you there, check out our Request a Coach page. It’s a “cut the fence-sitting and take action” way to tackle your issues and actually find success. To get off the fence and start to take action, click or tap here.
Read this next

How to Transform Household Items into Tiny Bathroom Organizing Tools
Small bathrooms don’t have to mean small solutions. In fact, when you start looking at your household items with fresh eyes, you’ll find your home is filled with organizing potential. […]
Read More
4 Christmas Living Room Styles That Reveal Your Holiday Personality
Are you all about style, decor and organization? Download a copy of our Decluttering Workbook. **** Your living room already knows your holiday personality; it shows up in the textures […]
Read More
Before You Make a 2026 Vision Board, Read This
Before you build your 2026 vision board, learn the simple shifts that make it clearer, calmer, and easier to actually use.
Read More