


Talk to a coach about Organizational coaching

Jennifer Loehding
Success Architect | Certified DreamBuilder Coach | Certified NEUROFIT Trainer™ | Certified Keto, Carnivore, PSMF and Supplement Coach
Life, business, health, and wellness coaching for balanced personal and...

Crystal Faulk
ACC
I help overwhelmed women in transition gain clarity, confidence, and...

Mark Gordon
Certified Life Coach (ICF Accredited), Certified Transformation & CBT Life Coach
I empower people in their midlife, who feel stuck, gain...

Michael Muscari
Positive Intelligence Coaching (PQ) | High Flow Coaching | NLP Practitioner | BS Business Management
🔥 Inner Fire Igniter & Transformational Coach | Helping People...

Nikki Babs
The Go-to Career Coach for Executives & Mid-level Professionals, ICF Certified Master Life Coach, MBA, HR
Your rise to Executive Leadership starts here.

Aiden (a.k.a. Sensei Aodhán) Murtagh
Jay Shetty Certified Success & Life Coach
Coach helping high achievers reset, rebuild confidence, and move forward...

Christian Hartley, MSIOP, PCC
Professional Certified Coach
Our partnership will empower you to eliminate fear and doubt...

Dr. Mary Gandhi
PhD-Organisational Psychology+ ACC-ICF Coach+Neuro behavioural coach+mental fitness coach (PQ)+Affirmations Coach
I help high achievers alter their past mindset to improve...


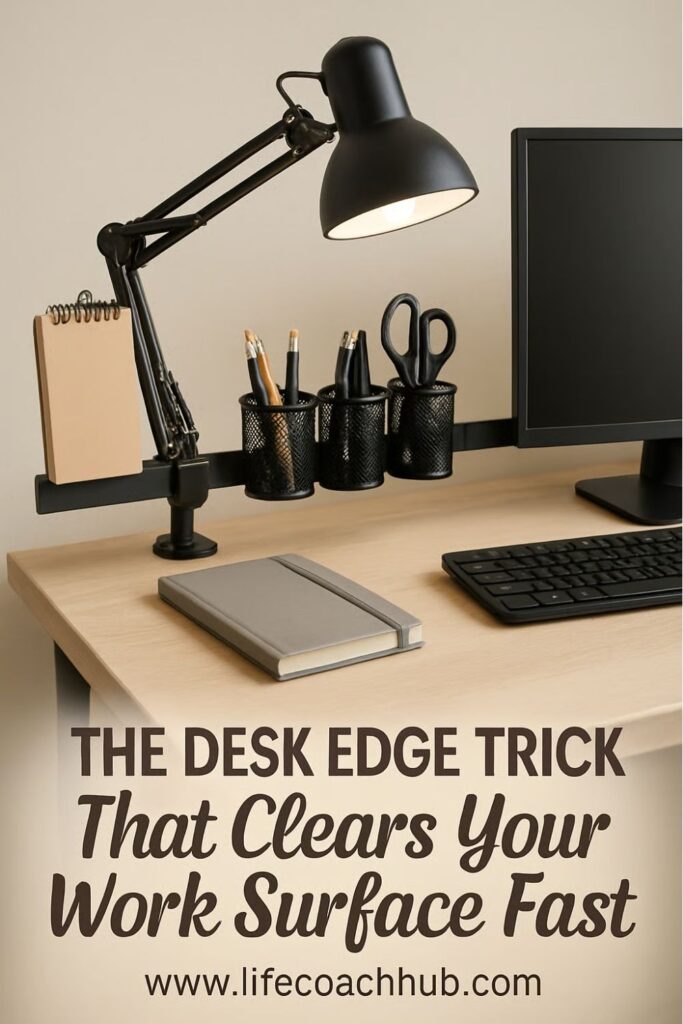
Clamp-On Lighting and Tool Bar for Crowded Desktops
Want to try this at home? No worries! Download a copy of our Clutter Reset Guide.
*****
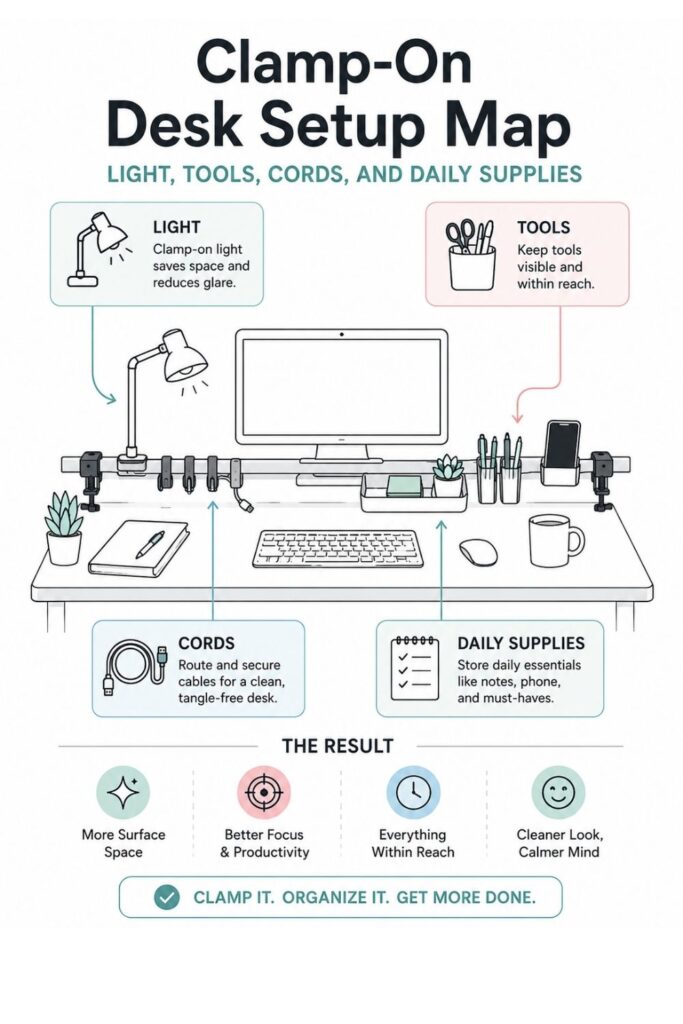
A crowded desktop can make even a simple work session feel harder than it needs to be. When your lamp, pens, phone, headphones, chargers, sticky notes, and small tools are all sitting on the work surface, the desk starts to feel like storage instead of a place to focus.
A clamp-on lighting and tool bar helps solve that problem without replacing your desk or buying a whole new furniture system. Instead of letting bulky accessories take over the top of the desk, you move the essentials to the desk edge, side, or back rail where they stay reachable but out of the way.
This setup works especially well for small desks, shared desks, bedroom workstations, student desks, and work-from-home corners where every inch matters. The goal is not to make the desk look empty or overly perfect. The goal is to create enough open surface area that you can actually use the desk without clearing piles first.
A good clamp-on setup can hold things like:
- An adjustable task lamp
- A pen cup or small supply holder
- A headphone hook
- Charging cables
- A small tray for sticky notes or clips
- A phone ledge
- Lightweight tools you use often
The best part is that most clamp-on pieces are low-commitment. You do not have to drill holes, mount anything permanently, or rearrange the whole room. You can test the setup, shift pieces around, and remove what does not work.
This article walks through how to build a clamp-on lighting and tool bar that actually supports your daily routine. You will start by choosing what belongs on the bar, then decide where it should go, add lighting, organize tools, control cables, and create a quick reset system so the desk stays usable over time.
If you want to get more from your life, and are looking for concrete action steps to get you there, check out our Request a Coach page. It’s a “cut the fence-sitting and take action” way to tackle your issues and actually find success. To get off the fence and start to take action, click or tap here.
Need some in depth help with organization and productivity ? Drop on by our directories choc full of productivity coaches, minimalist coaches, and work/life balance coaches to get your life organized! Or click here to have us match you to the best.
Choose What Actually Belongs on the Clamp-On Bar
Before adding anything new to the desk, start by figuring out what truly needs to be within reach. This step matters because a clamp-on bar can become cluttered too if it turns into a place for every random item that used to live on the desktop.
Clear the work surface: Take everything off the desktop except your main work tools, such as your laptop, monitor, keyboard, mouse, or notebook. Move the lamp, pen cup, chargers, headphones, scissors, sticky notes, mail, small trays, and loose supplies to a separate surface for sorting.
Once the desk is empty, you can see how much space you actually have. This also makes it easier to notice which items were taking up more room than they deserved.
Sort items by how often you use them: Make three quick piles: daily, weekly, and rarely. Daily items are the only ones that should be considered for the clamp-on bar.
For example, a pen you use every morning might belong there. A hole punch you touch twice a month probably does not.
A simple sorting system might look like this:
- Daily: pen, charger, headphones, lamp, sticky notes
- Weekly: stapler, ruler, extra highlighters, label maker
- Rarely: spare cords, old notebooks, backup supplies, decorative extras
Look for bulky surface offenders: Some items are not a problem because they are messy. They are a problem because their base takes up too much space.
If you want to get more from your life, and are looking for concrete action steps to get you there, check out our Request a Coach page. It’s a “cut the fence-sitting and take action” way to tackle your issues and actually find success. To get off the fence and start to take action, click or tap here.
A traditional desk lamp, wide pencil cup, desktop phone stand, or large charging dock can eat up the exact area where you need to write, type, or spread out papers. These are the best candidates to replace with clamp-on versions.
Create a “bar candidate” group: Set aside only the items that could reasonably hang, clip, sit in a small tray, or live in a mounted cup. This usually includes small daily-use items, not everything you own.
If the pile already looks too big, edit again. A clamp-on bar works best when it holds the essentials, not the overflow.
Pick the Right Desk Edge for the Setup
The best clamp-on system starts with the right location. If the bar is placed where it blocks your arms, catches on your chair, or makes the desk feel visually crowded, you probably will not keep using it.
Test your natural reach zone: Sit at your desk the way you normally work. Reach for a pen, your phone, a charger, and your lamp switch without thinking too much about it.
Notice where your hand naturally goes. For many people, the best spot is the back corner or the side edge of the desk. This keeps the center open while still keeping tools close enough to grab.
Check the clamp surface: Look at the thickness and shape of your desk edge before buying accessories. Some clamp-on lights and rails need a flat edge, while others can handle slightly rounded surfaces.
Make sure the clamp will not interfere with:
If you want to get more from your life, and are looking for concrete action steps to get you there, check out our Request a Coach page. It’s a “cut the fence-sitting and take action” way to tackle your issues and actually find success. To get off the fence and start to take action, click or tap here.
- Desk drawers
- Monitor arms
- Keyboard trays
- Chair arms
- Wall clearance
- Cable holes
- Desk legs or supports
If your desk has a thick edge, beveled lip, glass top, or metal frame, check clamp measurements carefully. A tool that works beautifully on one desk may not grip another desk securely.
Protect the desk finish: Clamp pressure can leave marks on soft wood, painted surfaces, or laminate. Add felt pads, rubber pads, cork strips, or a thin protective mat under the clamp if the desk finish matters to you.
This is especially helpful if you rent, share furniture, or are using a desk that needs to stay in good condition.
Keep the main work zone open: Avoid placing the bar where your elbows naturally rest or where papers need to spread out. The clamp-on system should support the workspace, not shrink it.
A good rule is to reserve the center of the desk for active work only. Put clamp-on tools around the edges, where they are reachable but not competing with your main task.
If your desk is very small, choose one side edge instead of trying to use the whole back. One well-placed clamp zone is better than a busy rail that wraps around the entire desk.
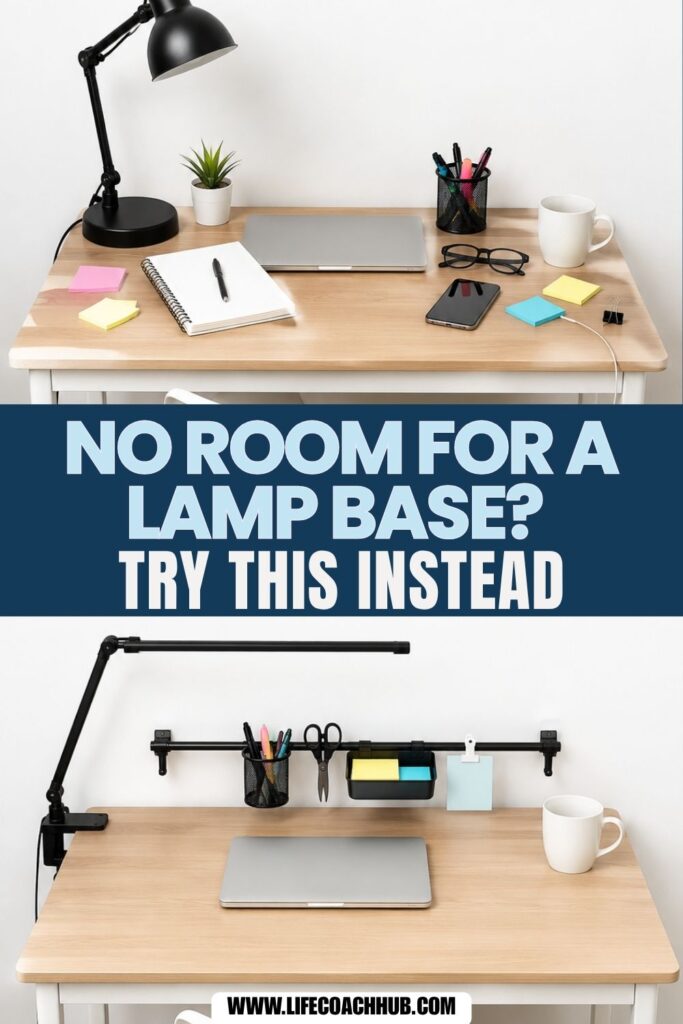
Add Clamp-On Lighting Without Losing Work Space
A lamp is often one of the biggest space stealers on a desk. Traditional desk lamps can have wide bases, awkward cords, and fixed positions that make them hard to work around. A clamp-on lamp gives you the light you need without sacrificing valuable surface area.
Choose a lamp with a narrow clamp base: Look for a clamp-on task lamp with a strong grip, adjustable arm, and head that can tilt or rotate. If you work at different times of day, a dimmable lamp can be especially useful.
If you want to get more from your life, and are looking for concrete action steps to get you there, check out our Request a Coach page. It’s a “cut the fence-sitting and take action” way to tackle your issues and actually find success. To get off the fence and start to take action, click or tap here.
The lamp does not have to be fancy. What matters most is that it stays secure, moves easily, and shines light where you actually need it.
Good features to look for include:
- Adjustable brightness
- Flexible or jointed arm
- Small clamp footprint
- Stable grip
- Easy-to-reach switch
- Cord long enough for your outlet setup
Place the light to reduce shadows: If you write by hand, place the lamp on the opposite side of your writing hand. A right-handed person may prefer the lamp on the left side, while a left-handed person may prefer it on the right.
This keeps your hand from casting a shadow over the page. If you mainly use a keyboard, place the lamp behind or beside the monitor so it lights the work area without shining into your eyes.
Angle the light toward the task: The goal is not to brighten the whole room. It is to support the specific zone where you read, write, plan, sketch, study, or sort papers.
Aim the light toward your active work area, then sit back and check for glare. If the lamp reflects off your screen, move it slightly higher, farther back, or more to the side.
Route the cord immediately: Do not wait to deal with the lamp cord later. A clamp-on lamp solves one kind of clutter, but the cord can quickly become another one.
Run the cord down the back or side of the desk and secure it with clips, Velcro ties, or a cable sleeve. Leave enough slack for the lamp arm to move, but not so much that the cord drapes across the desktop.
If you want to get more from your life, and are looking for concrete action steps to get you there, check out our Request a Coach page. It’s a “cut the fence-sitting and take action” way to tackle your issues and actually find success. To get off the fence and start to take action, click or tap here.
A lamp is usually the anchor piece for this setup. Once it is placed well, the rest of the bar can be arranged around it.
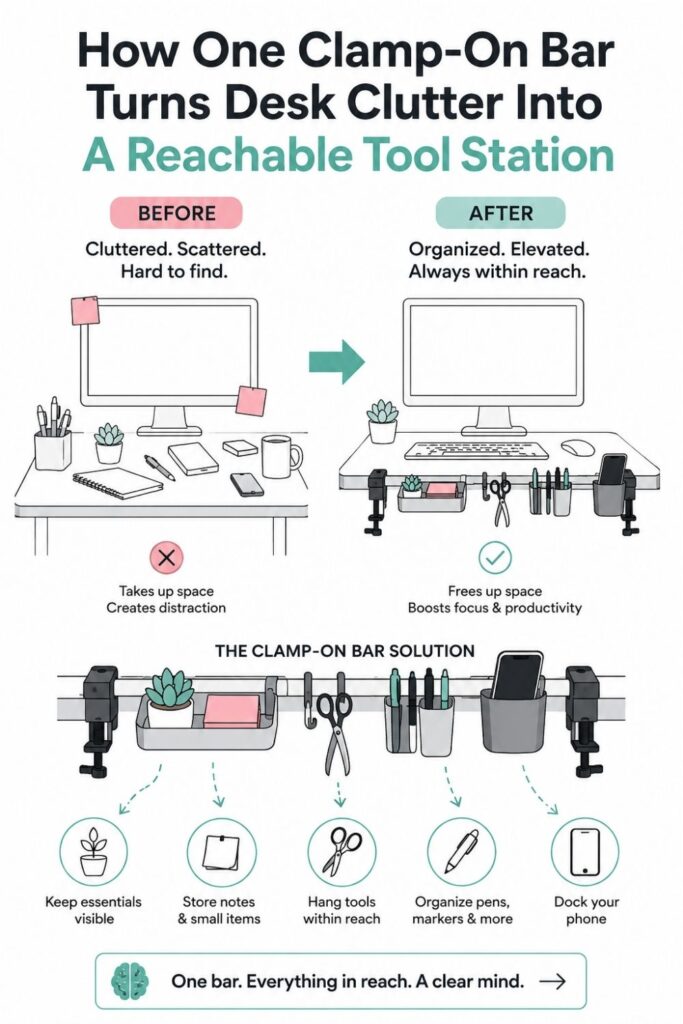
Build a Simple Tool Rail for Everyday Supplies
Once the lighting is in place, the next step is adding a tool rail or clamp-on storage area for small daily supplies. This is where the system starts to feel useful because the desk surface begins to clear up without making important items hard to reach.
Start with one rail or bar: Choose a clamp-on rail, small rod, side organizer, monitor-side attachment, or desk-edge accessory system that fits your desk. It does not need to be large. In fact, a smaller bar often works better because it forces you to choose carefully.
The goal is to create a compact command zone, not another place to pile clutter.
A simple setup could include:
- One clamp-on rail
- One hanging cup
- One side hook
- One small tray
- Two or three cable clips
That is often enough for a crowded desktop.
Add only essential attachments: Match the accessories to your daily-use pile. If you use pens constantly, add a cup. If headphones always end up on the desk, add a hook. If sticky notes and clips scatter everywhere, add a small tray.
Do not add attachments just because they came in a set. Empty storage tends to attract clutter.
If you want to get more from your life, and are looking for concrete action steps to get you there, check out our Request a Coach page. It’s a “cut the fence-sitting and take action” way to tackle your issues and actually find success. To get off the fence and start to take action, click or tap here.
Give every item a fixed parking spot: The bar works best when each item has one clear home. Pens go in the cup. Headphones go on the hook. Sticky notes go in the tray. The charging cable clips to the side.
This makes cleanup easier because you do not have to think about where things belong. You just return them to the same spot each time.
Keep the layout visually readable: Put taller items toward the back or outer edge. Keep hanging items on the side. Place tiny loose items in one contained area instead of spreading them across several small holders.
A tool rail should feel easy to scan. If you have to dig through it, move items around or remove some pieces.
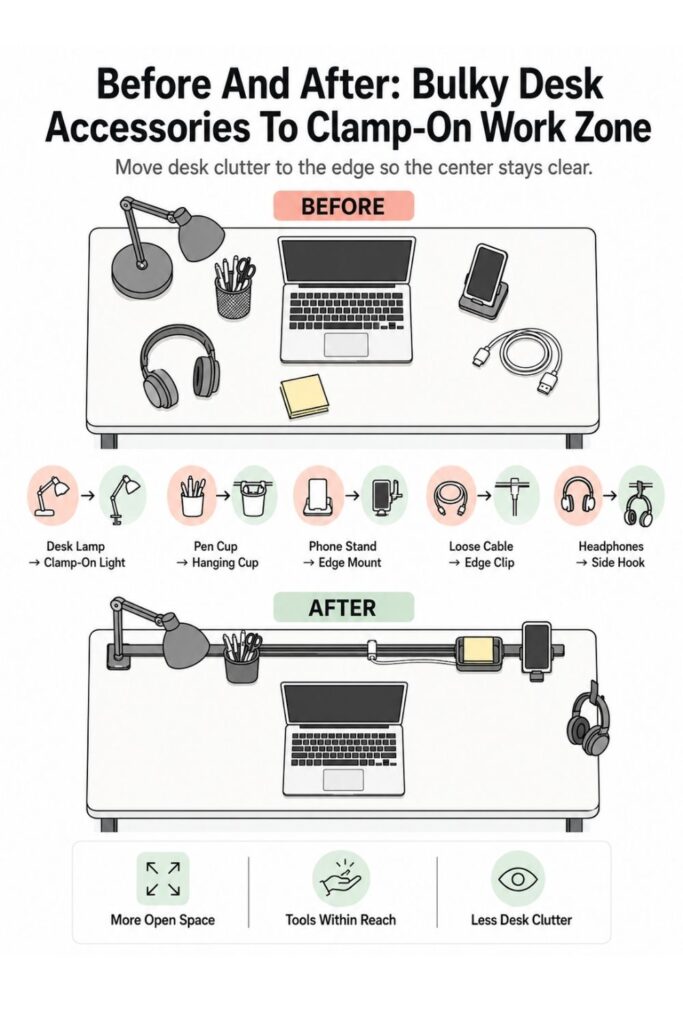
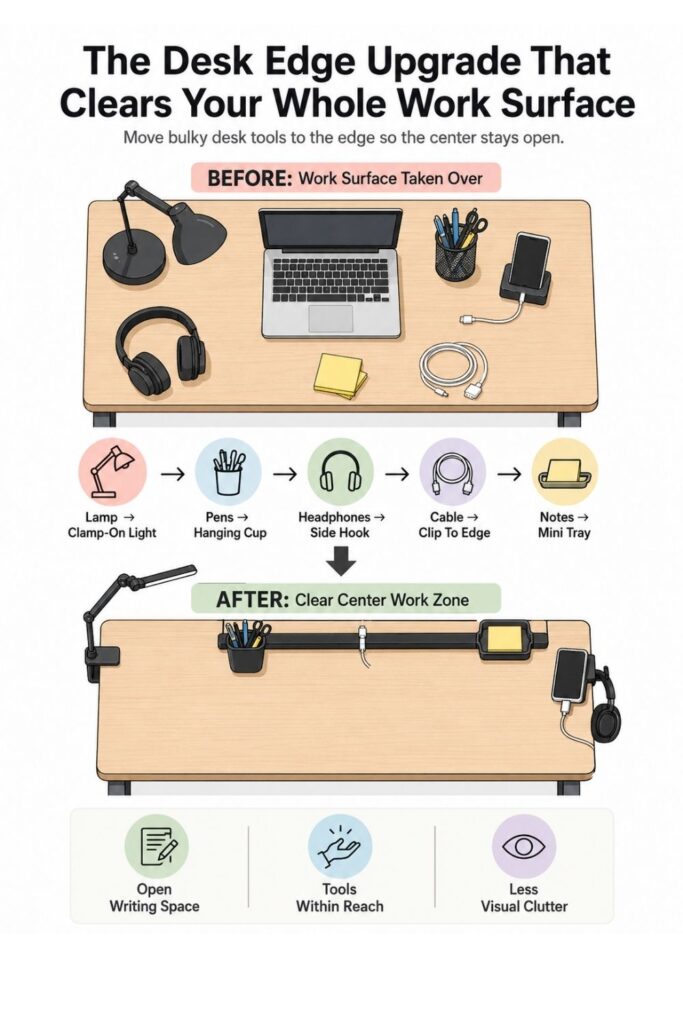
Use Clamp-On Accessories to Replace Bulky Desktop Pieces
The biggest benefit of a clamp-on system is that it lets you replace bulky desktop accessories with slimmer, edge-based versions. Instead of adding more storage, you are changing where the storage lives.
Swap the pen cup for a hanging cup: A regular pencil cup can take up more space than you realize, especially on a small desk. A hanging or clamp-on cup keeps pens upright without using the surface.
Only keep the writing tools you actually use. Two pens, one highlighter, scissors, and a ruler may be plenty. Extra markers and backup supplies can live somewhere else.
Replace the phone stand with a clamp shelf: Phones often end up in the middle of the desk because they need to stay visible. A small clamp-on shelf or side ledge can hold your phone, timer, or mini notepad without letting them slide into your work zone.
If you want to get more from your life, and are looking for concrete action steps to get you there, check out our Request a Coach page. It’s a “cut the fence-sitting and take action” way to tackle your issues and actually find success. To get off the fence and start to take action, click or tap here.
This is especially helpful if you use your phone for reminders, music, calls, or two-factor codes during work.
Move headphones to a side hook: Headphones are awkward because they are bulky but used often. If they sit on the desk, they take up space. If they go in a drawer, the cord or band can get tangled.
A side hook solves this neatly. Place it under the desk edge or along the side of the rail so the headphones are easy to grab but not visually dominating the desk.
Contain tiny extras in one tray: Small items are some of the biggest clutter creators because they seem harmless one at a time. Paper clips, sticky tabs, earbuds, lip balm, erasers, and memory cards can quickly make a desk feel scattered.
Use one small clamp tray for tiny daily items, but keep it limited. If the tray starts filling with random objects, empty it and reset the rules.
Ask yourself:
- Do I use this at the desk every day?
- Does it need to be visible?
- Is this the best place for it?
- Would it be better in a drawer or bin?
The point is not to store more on the desk edge. The point is to remove the right items from the surface.
Keep Cables From Undoing the Whole System
Cables can make even a well-organized desk feel messy. A clamp-on lighting and tool bar should include a simple cable plan from the beginning so cords do not end up draped across the work surface again.
If you want to get more from your life, and are looking for concrete action steps to get you there, check out our Request a Coach page. It’s a “cut the fence-sitting and take action” way to tackle your issues and actually find success. To get off the fence and start to take action, click or tap here.
Decide where charging happens: Choose one charging zone for your phone, tablet, earbuds, or other daily devices. This might be near the clamp tray, next to the lamp, or along the side edge of the desk.
When charging has one home, cables stop migrating everywhere. You also avoid the daily search for “the good charger” because it stays clipped where you need it.
Clip cables to the bar or back edge: Use small cable clips, magnetic cable holders, adhesive guides, or Velcro wraps to keep cords attached to the desk edge. The exact product matters less than the habit of controlling the cord path.
Run cables along the back or side, not across the middle. The desktop center should stay open for work, not become a crossing zone for cords.
Leave only the usable end visible: Pull through just enough cable length to plug in the device comfortably. Coil, wrap, or tie the extra length behind the desk.
This one step can make the whole setup look cleaner instantly. Long loose cords create visual noise, even when everything else is organized.
Label similar cords if needed: If you have several black or white cables, add tiny labels or colored bands near the ends. This is useful for chargers that look nearly identical but work for different devices.
You can label cords by device, such as:
If you want to get more from your life, and are looking for concrete action steps to get you there, check out our Request a Coach page. It’s a “cut the fence-sitting and take action” way to tackle your issues and actually find success. To get off the fence and start to take action, click or tap here.
- Phone
- Tablet
- Lamp
- Headphones
- Backup charger
The cable system does not need to be perfect. It just needs to prevent cords from taking over the same surface you just cleared.
Make the Setup Easy to Reset Each Day
The real test of any desk organization system is not how it looks on day one. It is whether you can reset it when you are tired, busy, or in the middle of a normal week.
A clamp-on system should make that reset easier, not more complicated.
Use a one-minute reset rule: At the end of each work session, spend one minute returning items to the bar. Pens go back in the cup. Headphones go on the hook. The charger clips back into place. Notes go into the tray or the trash.
This small reset keeps the desktop from sliding back into chaos. It also gives you a clearer starting point the next time you sit down.
Keep the desktop center empty: Treat the middle of your desk as an active work zone, not a storage zone. Only the current task should live there.
That might mean:
- Laptop and notebook
- Keyboard and mouse
- One active project folder
- A planner and pen
- A single document stack
When the task is done, the items leave the center. This rule makes the clamp-on bar more effective because it gives everything around the edge a clear purpose.
If you want to get more from your life, and are looking for concrete action steps to get you there, check out our Request a Coach page. It’s a “cut the fence-sitting and take action” way to tackle your issues and actually find success. To get off the fence and start to take action, click or tap here.
Remove anything that keeps drifting: If an item never makes it back to the bar, pay attention. It may not belong there, or the assigned spot may be inconvenient.
For example, if scissors always end up on the desk, maybe the cup is too full. If the charger keeps falling loose, maybe the clip is in the wrong place. If sticky notes scatter everywhere, maybe the tray needs to be closer.
Do a weekly five-item check: Once a week, remove five things that do not belong. This might include old notes, dead pens, extra cords, receipts, wrappers, or supplies that wandered in.
The check should be fast. You are not reorganizing the whole desk. You are simply keeping the system from collecting clutter.
How an Organization Coach Could Help You Make It Stick
A clamp-on lighting and tool bar can make a desk easier to use, but the physical setup is only part of the solution. If clutter keeps returning, it may be less about the desk itself and more about the way work habits, task switching, or decision fatigue show up in the space.
That is where an organization coach can be helpful.
Identify your real work pattern: A coach can help you notice how clutter actually builds. Maybe you leave papers out because you are afraid of forgetting them. Maybe cords pile up because you switch devices often. Maybe the desktop becomes a catch-all because there is no clear end-of-day routine.
The setup works better when it is based on your actual behavior, not an ideal version of how you think you should work.
If you want to get more from your life, and are looking for concrete action steps to get you there, check out our Request a Coach page. It’s a “cut the fence-sitting and take action” way to tackle your issues and actually find success. To get off the fence and start to take action, click or tap here.
Create a system based on friction: A coach may look at where you naturally drop items, what you avoid putting away, and which supplies you reach for most often. Then they can help you place items where the habit is easiest to maintain.
For example, if you always drop headphones on the right side of the desk, the hook should probably go on the right side. If you charge your phone while checking notes, the charger and note tray should be near each other.
Set one simple maintenance habit: A coach can help you choose a reset habit that feels realistic. This might be clearing the center of the desk after work, checking the clamp tray every Friday, or putting away loose papers before opening the laptop.
One habit is easier to keep than a complicated list of desk rules.
Adjust the system after real use: After a week or two, a coach can help you review what is working. The first version of the setup does not have to be perfect.
You might discover that the lamp needs to move, the cup is too crowded, or the hook is awkward. Small adjustments are part of making the system stick.
Smart Add-Ons for Different Desk Setups

A clamp-on lighting and tool bar can work for many kinds of desks, but the best version depends on how the desk is used. A student desk, craft desk, and work-from-home desk all need slightly different support.
For tiny desks: Keep the setup as light as possible. A small desk can feel crowded quickly, even with vertical storage.
If you want to get more from your life, and are looking for concrete action steps to get you there, check out our Request a Coach page. It’s a “cut the fence-sitting and take action” way to tackle your issues and actually find success. To get off the fence and start to take action, click or tap here.
Start with:
- One clamp-on lamp
- One hanging cup
- One side hook
- A few cable clips
Avoid adding large trays or multiple containers unless you truly need them. The goal is to free space, not surround the desk with accessories.
For student desks: Students often need quick access to writing tools, chargers, notebooks, and study aids. A clamp-on bar can keep those supplies close without covering the space needed for textbooks or laptops.
Useful add-ons might include:
- Pen cup
- Flashcard clip
- Phone ledge
- Task light
- Headphone hook
- Small tray for sticky notes
Keep the layout simple enough that it can be reset quickly before bed or before the next study session.
For craft or hobby desks: Craft desks often need tools within reach but also need open space for hands-on work. A clamp-on rail can help keep scissors, rulers, small tools, and lighting nearby without crowding the project area.
Use hooks for hanging tools and small cups for items that need to stand upright. Avoid deep containers that invite too many supplies at once.
For work-from-home desks: A work desk may need to support calls, paperwork, digital devices, and long focus sessions. In this case, the most useful clamp-on pieces are often a lamp, headphone hook, charging cable clips, and a small note tray.
If you want to get more from your life, and are looking for concrete action steps to get you there, check out our Request a Coach page. It’s a “cut the fence-sitting and take action” way to tackle your issues and actually find success. To get off the fence and start to take action, click or tap here.
This setup keeps the desk ready for work without making it feel like an office supply closet.
Keep the Bar Useful, Not Overloaded
Once you realize how much can attach to the edge of a desk, it is tempting to keep adding more. But too many clamp-on accessories can make the desk feel just as crowded as before. The clutter simply moves from the surface to the edge.
Limit the number of attachments: Start with three or four functional pieces. That might be a lamp, cup, hook, and cable clip. Use the setup for a week before adding anything else.
This gives you time to see what you actually need. It also keeps the system from becoming visually busy right away.
Watch for blocked movement: Sit, type, write, reach, and move your chair around after the bar is installed. Make sure the setup does not bump your elbows, block drawers, catch your sleeves, or interfere with your monitor arm.
A desk can look organized but feel annoying to use. Comfort matters.
Match storage to item size: Choose the right kind of holder for each item. Hooks work well for headphones, keys, and small hanging tools. Cups work well for pens, scissors, and rulers. Trays work well for sticky notes, clips, and flat items. Cable clips work well for chargers.
When items are stored in the wrong kind of holder, they become harder to use and harder to reset.
If you want to get more from your life, and are looking for concrete action steps to get you there, check out our Request a Coach page. It’s a “cut the fence-sitting and take action” way to tackle your issues and actually find success. To get off the fence and start to take action, click or tap here.
Edit before adding more: If the bar starts feeling full, remove something before buying another attachment. Ask what is not earning its place.
A useful clamp-on setup should feel:
- Easy to reach
- Easy to reset
- Light enough visually
- Clear in purpose
- Supportive of the work surface
The bar is there to make the desk easier to use. If it becomes another clutter zone, simplify it until the desk feels open again.
The Desk Should Feel Easier to Start Using
A clamp-on lighting and tool bar works best when it quietly removes the small obstacles that make a crowded desktop frustrating. The goal is not to create a complicated workstation or hang every possible accessory from the desk edge. The goal is to give your most-used items a better home.
When the lamp no longer takes up surface space, the pen cup is off the desktop, the headphones have a hook, and the charger stays clipped where you need it, the desk becomes easier to start using. You do not have to clear a pile before opening a notebook. You do not have to move five things just to write something down.
Start small. Choose the desk edge that makes the most sense, add one clamp-on lamp or rail, and move only the daily-use items onto it. Then live with the setup for a few days before deciding what else it needs.
A strong system should make the desk feel more open without making your supplies harder to reach. That balance is what makes clamp-on tools so useful for crowded desktops. They give you access without taking over the surface.
Once the center of the desk is clear, the whole space feels more workable. You can sit down, see what you need, reach for the right tool, and begin without the tiny frustration of clearing your way first.
If you want to get more from your life, and are looking for concrete action steps to get you there, check out our Request a Coach page. It’s a “cut the fence-sitting and take action” way to tackle your issues and actually find success. To get off the fence and start to take action, click or tap here.
*****
Want to try this at home? No worries! Download a copy of our Clutter Reset Guide.
Need some in depth help with organization and productivity ? Drop on by our directories choc full of productivity coaches, minimalist coaches, and work/life balance coaches to get your life organized! Or click here to have us match you to the best.
If you want to get more from your life, and are looking for concrete action steps to get you there, check out our Request a Coach page. It’s a “cut the fence-sitting and take action” way to tackle your issues and actually find success. To get off the fence and start to take action, click or tap here.
Read this next
DIY Shelf Risers That Double Your Small Closet Storage
Double your closet shelf space with one simple DIY riser trick that turns messy stacks into neat, easy-to-reach storage.
Read More
Clearing Out Your Life’s Clutter
Are you overwhelmed and stressed out because of all the clutter in your life?
Read More
Why Your Galentine’s Aesthetic Should Be the First Decision You Make
Are you all about style, decor and organization? Download a copy of our Decluttering Workbook.**** A Galentine’s night isn’t just about pink décor or matching pajamas — it’s about creating […]
Read More