




How to Build a Thanksgiving Table With Pumpkins and Harvest Finds

A Thanksgiving Table That Looks Gathered From the Harvest
A beautiful Thanksgiving table does not have to begin with a cart full of seasonal decorations. Some of the most inviting tablescapes start with things that already belong to the season: pumpkins, apples, pears, herbs, nuts, dried citrus, wheat, branches, and warm natural textures.
The trick is knowing how to arrange those things so the table feels thoughtful rather than random. A pile of pumpkins in the middle of the table can feel heavy. A few pieces of fruit scattered between plates can look accidental. But when you build the table in layers, each part starts supporting the next.
Think of the table as a simple composition. You need a base, a focal point, supporting details, and enough breathing room for the people and food that will eventually fill the space.
Start by gathering more than you think you will use, then edit later. Good possibilities include:
- Mini pumpkins and gourds
- Pears, apples, pomegranates, or figs
- Dried orange or apple slices
- Walnuts, hazelnuts, or chestnuts in their shells
- Rosemary, sage, eucalyptus, or olive branches
- Wheat, dried grasses, or seed pods
- Linen napkins and natural-fiber runners
- Wood, ceramic, brass, or woven trays
The goal is not to use every item. You are creating a small visual vocabulary that can be repeated across the table.
Start with the season, not the store: Look at what you already have in your kitchen, pantry, garden, or local market before buying decorative pieces.
Build in layers: Establish the runner first, then the pumpkins, then fruit and greenery, and finally the smallest details.
Leave room for dinner: A Thanksgiving tablescape still needs to function once plates, glasses, serving dishes, and guests arrive.
If you want to get more from your life, and are looking for concrete action steps to get you there, check out our Request a Coach page. It’s a “cut the fence-sitting and take action” way to tackle your issues and actually find success. To get off the fence and start to take action, click or tap here.
When the table is built this way, it feels abundant without becoming crowded. It also feels more personal because the decorations look connected to the food, season, and gathering itself.
Need some help with style or organization? Drop on by our directories choc full of image coaches, organization coaches and minimalist coaches to help make your spaces beautiful. Or click here to have us match you to the best.
1. Choose Your Harvest Color Story Before You Decorate

Before placing a single pumpkin on the table, decide what colors will guide the arrangement. This one step makes it much easier to combine produce, linens, wood, trays, dishes, and natural materials without ending up with a table that feels visually scattered.
For a classic harvest look, earthy fall colors work especially well. Think rust, warm orange, olive, muted gold, brown, cream, tan, and deeper touches of burgundy. You do not need all of them.
A simple three-color formula keeps things manageable.
Choose one dominant warm shade: Pumpkin orange, terracotta, rust, or golden brown can provide most of the visible seasonal color.
Add one grounding neutral: Cream, beige, wood, soft taupe, or natural linen gives the eye somewhere to rest.
Choose one deeper accent: Burgundy, dark green, chocolate brown, or aged brass can add depth without making the table feel busy.
If you want to get more from your life, and are looking for concrete action steps to get you there, check out our Request a Coach page. It’s a “cut the fence-sitting and take action” way to tackle your issues and actually find success. To get off the fence and start to take action, click or tap here.
Next, look at the pumpkins and produce you already have. Let their natural colors influence the palette rather than trying to force everything to match.
If your pumpkins are mostly cream and sage green, for example, you might create a softer table with tan linen, wood, pears, and olive branches. If you have vivid orange pumpkins, you could lean into rust, burgundy fruit, walnut brown, and warm brass.
Repetition is what makes the palette feel intentional. A color that appears only once can look accidental, while a color repeated in three or four places begins to feel like part of the design.
You might repeat rust in the pumpkins, napkins, and dried leaves. Burgundy could appear in pomegranates, a few dried berries, and a small detail at each place setting.
Do not worry about perfect matching. Natural materials rarely match exactly, and that variation is part of what makes a harvest table feel warm.
Keep the palette slightly restrained: If the table starts feeling busy, remove one color family before removing individual objects.
A strong color story gives everything else a framework. Once it is decided, choosing what belongs on the table becomes much faster.
2. Use the Table Runner to Create the Path of the Tablescape

A table runner can do more than add color or texture. It can act as the visual boundary for your entire Thanksgiving tablescape, giving the pumpkins, fruit, trays, and greenery a clear place to live.
If you want to get more from your life, and are looking for concrete action steps to get you there, check out our Request a Coach page. It’s a “cut the fence-sitting and take action” way to tackle your issues and actually find success. To get off the fence and start to take action, click or tap here.
Without that boundary, decorations often creep outward until the table feels crowded. With a runner, you create a natural decorating lane through the center.
Choose a material that supports the relaxed harvest feeling you want. Linen, cotton, soft gauze, burlap, or another natural-looking fabric usually works well with pumpkins and dried materials.
The runner does not have to be perfectly flat.
A slightly rumpled linen runner can make a rustic table feel warmer and more relaxed. Soft folds also create little places where fruit, nuts, or dried citrus can sit naturally.
Center the runner first: Place it before any other decorative pieces so you can see exactly how much room you have to work with.
Use its width as your limit: Keep most decorative elements inside or very close to the runner so plates and glasses have enough space.
Let the fabric create movement: A few loose folds can keep pumpkins and fruit from looking like they have been placed in a rigid line.
Check the ends of the table: Make sure the runner is not so long or bulky that it interferes with chairs, place settings, or anyone sitting at the ends.
If you want to get more from your life, and are looking for concrete action steps to get you there, check out our Request a Coach page. It’s a “cut the fence-sitting and take action” way to tackle your issues and actually find success. To get off the fence and start to take action, click or tap here.
If you do not own a traditional runner, improvise. A folded linen tablecloth, a long scarf in the right texture, overlapping tea towels, brown kraft paper, or a narrow strip of fabric can create a similar visual effect.
The runner should support the centerpiece, not compete with it. If the fabric has a bold pattern, keep the objects above it simpler. If the runner is plain, you have more freedom to use varied produce and textures.
Once the runner is in place, step back and look at the table from a distance. You should be able to see an obvious central path where the rest of the harvest arrangement can develop.
That path becomes the backbone of the whole design.
3. Build the Pumpkin Centerpiece From the Middle Out

Pumpkins are the natural anchor for this Thanksgiving table, but the goal is not to create one giant pumpkin pile. A better approach is to build a low, flowing centerpiece that feels abundant while still allowing people to see and talk across the table.
Start with one visual anchor near the center. This could be a medium pumpkin, two slightly different pumpkins grouped together, or a low tray holding a small cluster.
From there, work outward.
Place the largest pumpkin first: Give your eye a clear focal point before adding smaller objects.
If you want to get more from your life, and are looking for concrete action steps to get you there, check out our Request a Coach page. It’s a “cut the fence-sitting and take action” way to tackle your issues and actually find success. To get off the fence and start to take action, click or tap here.
Add smaller pumpkins gradually: Use mini pumpkins, gourds, or squash to create a gentle change in size as the arrangement moves toward either end.
Mix shapes: Round, squat, ribbed, and elongated pumpkins create more visual interest than several identical ones.
Keep most pieces low: Thanksgiving dinner involves conversation, so avoid building a centerpiece that becomes a wall between guests.
Color matters here too. If you are using several pumpkin colors, distribute them rather than grouping every orange pumpkin on one side and every cream pumpkin on the other.
Try repeating colors in a loose rhythm. For example, you might place an orange pumpkin near the center, a cream one slightly farther down, then a small green gourd beyond that.
Avoid lining everything up perfectly. Slightly stagger pumpkins from side to side within the runner so the arrangement feels organic.
You can also turn pumpkins at different angles. The most interesting side does not always have to face directly forward.
Once the first arrangement is built, sit at the table. Look across it from several chairs.
If you want to get more from your life, and are looking for concrete action steps to get you there, check out our Request a Coach page. It’s a “cut the fence-sitting and take action” way to tackle your issues and actually find success. To get off the fence and start to take action, click or tap here.
If a pumpkin blocks someone’s view, move it outward or replace it with a smaller one. If one area feels too heavy, remove something before adding more elsewhere.
The best centerpiece usually has fewer objects than the first draft.
Think of the pumpkins as the bones of the design. They establish the Thanksgiving theme and the overall shape, while dried fruit, herbs, nuts, and smaller harvest materials will fill the gaps later.
4. Tuck Dried Fruit Into the Pumpkin Arrangement

Dried fruit adds one of the prettiest details to a harvest tablescape because it brings color, texture, and a subtle handmade feeling without taking up much room.
Dried citrus is especially useful. Orange slices bring warmth, while dried lemon or grapefruit can introduce softer or deeper tones depending on the palette. Dried apples and pears work beautifully in more neutral or rustic tables.
The key is restraint. You want the dried fruit to look discovered within the arrangement rather than sprinkled everywhere.
Create small clusters: Use two or three slices together near a pumpkin, tray, candleholder, or bundle of greenery.
Change the angle: Let some slices sit flat while others lean slightly against a pumpkin or tuck into a fold of the runner.
If you want to get more from your life, and are looking for concrete action steps to get you there, check out our Request a Coach page. It’s a “cut the fence-sitting and take action” way to tackle your issues and actually find success. To get off the fence and start to take action, click or tap here.
Repeat the material: If dried orange appears near the center, use a few more pieces farther down the table so it feels intentional.
Keep food away from open flames: If you are using candles, leave enough distance between the flame and dried materials.
Dried fruit can also help connect areas of the table that otherwise feel separate. A pumpkin on one end and a tray on the other may not seem related at first. Repeating the same dried citrus or apple slices around both creates a visual link.
You can make your own dried fruit ahead of time or use purchased dried slices. Either option works.
If you want the arrangement to feel more rustic, combine the fruit with nuts in shells, cinnamon sticks, wheat, or herbs. For a cleaner look, use fewer supporting materials and allow the fruit to stand out on its own.
Dried fruit also works well at individual place settings. A single orange slice tied to a napkin with twine can echo the centerpiece without adding another separate decorative idea.
When you are finished, step back and look for repetition. You should be able to spot the dried fruit in several places without it becoming the first thing you notice.
That balance is what makes the detail feel layered rather than themed.
If you want to get more from your life, and are looking for concrete action steps to get you there, check out our Request a Coach page. It’s a “cut the fence-sitting and take action” way to tackle your issues and actually find success. To get off the fence and start to take action, click or tap here.
5. Add More Harvest Finds Without Making the Table Busy
Once the pumpkins and dried fruit are in place, the table may still have small gaps that need texture. This is where other harvest materials can help, but it is also the point where overdecorating becomes very easy.
Instead of adding everything that looks autumnal, choose only two or three supporting materials.
Good options include:
- Pears or apples
- Pomegranates
- Walnuts or chestnuts
- Rosemary or sage
- Wheat
- Dried grasses
- Small branches
- Seed pods
- Corn husks
- Dried leaves
Look at what your arrangement already has before deciding what it needs.
If the pumpkins are smooth and rounded, add something lighter and more linear, such as wheat or rosemary. If the table already has lots of greenery, you may need a harder texture like nuts or seed pods instead.
Mix textures deliberately: Pair smooth produce with rough shells, soft fabric, and wispy plant material.
Use clusters instead of even spacing: A few walnuts beside a pumpkin will look more natural than one walnut placed every six inches.
Follow the existing centerpiece shape: Tuck new materials into gaps rather than starting separate mini arrangements all over the table.
If you want to get more from your life, and are looking for concrete action steps to get you there, check out our Request a Coach page. It’s a “cut the fence-sitting and take action” way to tackle your issues and actually find success. To get off the fence and start to take action, click or tap here.
Let some areas remain empty: Negative space helps the eye understand where one element ends and another begins.
Edible produce works particularly well because it strengthens the harvest idea without feeling like conventional decoration. Pears, apples, and pomegranates can provide beautiful color while keeping the table connected to food and abundance.
Fresh herbs are another easy addition. Rosemary and sage bring soft greenery and can be tucked under pumpkins, tied to napkins, or gathered into small bundles.
As you add these materials, stop frequently.
It is tempting to keep filling every visible patch of runner, but a successful table needs breathing room. You should still be able to see the fabric underneath and recognize the individual shapes of the pumpkins.
The finished arrangement should feel full without feeling packed.
If you are unsure whether one more item belongs, leave it out for five minutes. Step away, return, and look again. Most of the time, the table will already feel finished.

6. Use a Tray to Control Smaller Harvest Details
A tray is one of the easiest ways to make a group of small seasonal objects feel deliberate. Instead of having nuts, dried fruit, tiny pumpkins, herbs, or candles scattered across the table, you can contain them in one defined area.
If you want to get more from your life, and are looking for concrete action steps to get you there, check out our Request a Coach page. It’s a “cut the fence-sitting and take action” way to tackle your issues and actually find success. To get off the fence and start to take action, click or tap here.
This also makes the Thanksgiving table more practical. If you need additional room for serving dishes, you can lift the whole grouping away at once.
Choose a tray that blends with the rest of the materials.
Wood works beautifully with rustic and earthy tables. A simple ceramic plate, shallow basket, metal tray, or neutral cutting board can also work if it suits your color palette.
Give the tray one purpose: Decide whether it will hold pumpkins, candles, fruit, or a mixed harvest arrangement.
Start with one taller or larger object: This gives the grouping a focal point and prevents everything from looking equally important.
Add medium pieces next: Mini pumpkins, pears, or small candleholders can build out the shape.
Finish with tiny details: Nuts, dried citrus, herbs, or loose leaves can fill the smallest gaps.
A tray does not need to sit directly in the center of the table. You can place it slightly off center and balance it with a second smaller pumpkin grouping farther down the runner.
If you want to get more from your life, and are looking for concrete action steps to get you there, check out our Request a Coach page. It’s a “cut the fence-sitting and take action” way to tackle your issues and actually find success. To get off the fence and start to take action, click or tap here.
If your dining table is small, one tray may be enough to serve as the entire centerpiece.
The edges of the tray create a useful visual boundary. This is especially helpful if you love an abundant look but tend to keep adding things.
Once the tray is full, stop.
You can also use smaller trays or dishes for practical details, such as salt, butter, or condiments. Choosing pieces that match the overall table style lets functional items become part of the design.
Before dinner, test how easily the tray moves. If the arrangement falls apart when you lift it, simplify it.
A Thanksgiving table should be adaptable. The easier it is to make room when food arrives, the more useful the decoration becomes.

7. Turn Small Harvest Ingredients Into DIY Table Details
The most cohesive tablescapes repeat a few materials in different ways. That means the pumpkins, dried fruit, herbs, and other harvest elements in your centerpiece can also become simple DIY details at individual place settings.
You do not need an elaborate craft project.
If you want to get more from your life, and are looking for concrete action steps to get you there, check out our Request a Coach page. It’s a “cut the fence-sitting and take action” way to tackle your issues and actually find success. To get off the fence and start to take action, click or tap here.
A small natural detail at each seat can make the table feel thoughtful while keeping the decorating process manageable.
Create mini pumpkin place cards: Write each guest’s name on a small tag and tie it around the stem with twine or thin ribbon.
Use fruit as a place marker: Pears or apples can hold small name cards and add another edible element to the table.
Dress up napkins: Tie linen napkins with twine and tuck in rosemary, sage, wheat, or a dried citrus slice.
Repeat one centerpiece ingredient: Choose a material already used in the middle of the table so the place settings feel connected.
Keep these details small enough that guests do not have to dismantle an elaborate arrangement before they can sit down.
A single sprig of rosemary can be enough.
If you are using dried orange slices, punch a small hole near the edge and thread them onto twine. Tie them around rolled or folded napkins for a quick detail that repeats the centerpiece beautifully.
If you want to get more from your life, and are looking for concrete action steps to get you there, check out our Request a Coach page. It’s a “cut the fence-sitting and take action” way to tackle your issues and actually find success. To get off the fence and start to take action, click or tap here.
For a rustic look, handwritten cards often work better than perfectly printed ones. Slight differences between place settings can add charm rather than making the table look unfinished.
You can also involve children or other family members in this part of the setup. Writing names, tying twine, or choosing mini pumpkins for each person can turn the table into part of the Thanksgiving preparation rather than one person’s decorating project.
Do not feel obligated to make every detail from scratch.
The DIY approach here is really about using ordinary materials creatively. You are taking pumpkins, fruit, herbs, paper, and string and giving them a second purpose.
When the same few ingredients appear in the centerpiece and the place settings, the table begins to feel much more coordinated.
It looks planned, even though the actual steps are simple.
8. Check the Table From a Guest’s Point of View
A Thanksgiving table can look beautiful from the doorway and still be frustrating once people sit down.
That is why the final decorating step should be practical rather than decorative. Sit at the table and experience the arrangement exactly as your guests will.
If you want to get more from your life, and are looking for concrete action steps to get you there, check out our Request a Coach page. It’s a “cut the fence-sitting and take action” way to tackle your issues and actually find success. To get off the fence and start to take action, click or tap here.
Start with sightlines.
Sit in several chairs: Make sure pumpkins, candles, branches, or trays are not blocking the person seated across the table.
Check elbow room: Each guest should have enough space to use their cutlery and reach their glass comfortably.
Make room for plates and serving pieces: Decorative objects should not force dishes into awkward positions.
Test the ends of the table: People sitting at the ends often get crowded first, especially if the runner or centerpiece extends too far.
Next, think about how dinner will actually be served.
If every dish will be placed on the dining table, you need significantly more open space than you would for a buffet-style meal. In that case, consider designing the centerpiece in removable sections.
A tray, for example, can be lifted away when the turkey arrives. Smaller pumpkin clusters can also be moved to a sideboard without dismantling the entire table.
If you want to get more from your life, and are looking for concrete action steps to get you there, check out our Request a Coach page. It’s a “cut the fence-sitting and take action” way to tackle your issues and actually find success. To get off the fence and start to take action, click or tap here.
If dinner will be served from the kitchen or buffet, you have more freedom to keep decorative elements in place.
Candles need a practical check too. Make sure sleeves, napkins, dried leaves, wheat, and other flammable materials cannot drift near an open flame.
You can use battery-operated candles if you want the glow without managing fire around dried materials.
Finally, pretend the meal has started.
Imagine someone passing a bowl, reaching for water, or leaning forward to talk. Does the table still work?
A good Thanksgiving tablescape should make the gathering feel more special, not make everyone nervous about touching anything.
If you need to remove three or four decorative pieces to make the table comfortable, do it.
The people sitting around the table are the real focal point. Everything else should support that.
If you want to get more from your life, and are looking for concrete action steps to get you there, check out our Request a Coach page. It’s a “cut the fence-sitting and take action” way to tackle your issues and actually find success. To get off the fence and start to take action, click or tap here.
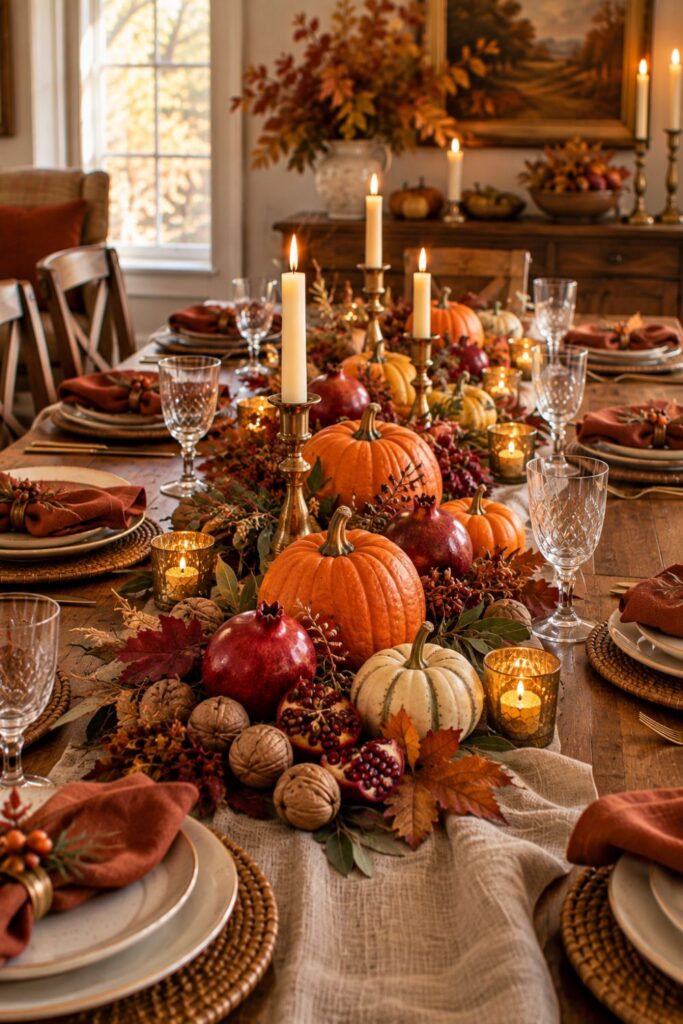
9. Make the Tablescape Work With What You Already Have
One of the easiest ways to make a harvest table feel relaxed and personal is to stop thinking of seasonal decor as something that has to come from the seasonal aisle.
Many of the best pieces may already be in your kitchen, dining room, pantry, linen cupboard, or garden.
Start by shopping your own home.
Look for:
- Wooden cutting boards
- Cake stands
- Shallow bowls
- Linen tea towels
- Neutral plates
- Glass jars
- Small baskets
- Ceramic dishes
- Brass candleholders
- Serving trays
A wooden board can become the base for a pumpkin arrangement. A cake stand can lift one pumpkin slightly above the others. A folded tea towel can work as a short runner beneath a centerpiece.
Use everyday pieces in a new role: You do not need something labeled “Thanksgiving decor” for it to work on a Thanksgiving table.
Choose food that earns its place twice: Apples, pears, pumpkins, herbs, and nuts can decorate first, then be cooked, eaten, or stored afterward.
Use imperfect natural materials: Slightly irregular pumpkins, curling leaves, and crooked branches can make a rustic arrangement more interesting.
If you want to get more from your life, and are looking for concrete action steps to get you there, check out our Request a Coach page. It’s a “cut the fence-sitting and take action” way to tackle your issues and actually find success. To get off the fence and start to take action, click or tap here.
Buy only after the table is mostly finished: You may discover that you need far less than you expected.
This approach also prevents the table from looking overly coordinated. When every object comes from one decor collection, the result can feel more like a display than a gathering.
Mixing everyday pieces with seasonal ingredients creates a more collected look.
You can also borrow from other rooms. A small tray from the bathroom, a basket from the entryway, or a ceramic bowl normally used for fruit may be exactly what the table needs.
Just keep the color story consistent.
Before purchasing anything new, take a photo of the almost-finished table. Photos often reveal gaps or crowded areas more clearly than looking at the table in person.
You may realize that what seemed “unfinished” simply needed one object moved.
The goal is not to prove you can decorate without spending money. It is to build a table where every piece has a reason to be there.
If you want to get more from your life, and are looking for concrete action steps to get you there, check out our Request a Coach page. It’s a “cut the fence-sitting and take action” way to tackle your issues and actually find success. To get off the fence and start to take action, click or tap here.

10. How an Organizing Coach Could Help You Create a Repeatable Holiday Table System
Seasonal decorating can become surprisingly stressful when every holiday starts with digging through bins, forgetting what you own, buying duplicates, and wondering where everything should go afterward.
An organizing coach can help turn Thanksgiving decorating into a repeatable system instead of a yearly scavenger hunt.
The first step would be identifying your foundation pieces.
These are the items that can work across multiple seasons, such as:
- Neutral table runners
- Linen napkins
- Wood trays
- Candleholders
- Serving boards
- Ceramic bowls
- Glass jars
- Neutral dishes
Separate reusable basics from holiday-specific decor: Keep the versatile pieces easy to access and store the truly seasonal items together.
Create a clear storage limit: Decide how much physical space you are willing to dedicate to fall and Thanksgiving decorations.
Document what worked: Take a photo of the finished table and make a short note about the runner, color palette, centerpiece formula, and materials you used.
Plan the reset before the holiday ends: Know what will be eaten, composted, stored, donated, or returned to everyday use.
If you want to get more from your life, and are looking for concrete action steps to get you there, check out our Request a Coach page. It’s a “cut the fence-sitting and take action” way to tackle your issues and actually find success. To get off the fence and start to take action, click or tap here.
This kind of system reduces decision fatigue the following year.
Instead of opening several boxes and starting from zero, you can look at last year’s photo and decide whether to repeat the same formula or make one small change.
For example, you might keep the same runner, wood tray, and neutral dishes but switch from orange pumpkins to cream and green ones.
An organizing coach could also help identify why seasonal decor keeps expanding. Maybe you are buying items before checking what you already own. Maybe decorations are stored in too many different places.
The solution does not have to be complicated.
A simple system might include one Thanksgiving bin, one neutral entertaining shelf, and a photo album on your phone showing successful setups.
The goal is to make decorating easier each year, not to create another system that requires constant maintenance.
When the storage process is simple, you can spend more time enjoying the table and less time managing the things that go on it.
If you want to get more from your life, and are looking for concrete action steps to get you there, check out our Request a Coach page. It’s a “cut the fence-sitting and take action” way to tackle your issues and actually find success. To get off the fence and start to take action, click or tap here.

A Table That Feels Like Thanksgiving
The strongest Thanksgiving tables do not necessarily have the most decorations. They have a clear idea that is repeated thoughtfully from one end of the table to the other.
For this tablescape, that idea is the harvest.
Pumpkins establish the season immediately. Dried fruit, herbs, grains, nuts, and produce add texture and abundance. The runner gives those materials a defined path, while trays and small clusters keep everything from feeling scattered.
The final step is editing.
Keep the pumpkins as the anchor: They should remain the clearest seasonal element rather than disappearing beneath too many smaller decorations.
Repeat a few harvest materials: Dried citrus, herbs, nuts, or fruit should appear in more than one place so the table feels connected.
Remove anything that competes with the main idea: If an object is beautiful but does not support the harvest story, save it for another table.
Protect the gathering space: Leave enough room for food, glasses, conversation, and movement.
If you want to get more from your life, and are looking for concrete action steps to get you there, check out our Request a Coach page. It’s a “cut the fence-sitting and take action” way to tackle your issues and actually find success. To get off the fence and start to take action, click or tap here.
A good test is to look at the table from across the room.
You should be able to understand the overall idea immediately. It should read as warm, autumnal, abundant, and welcoming.
Then move closer.
That is where the smaller details can reveal themselves: the dried orange tucked beside a pumpkin, the rosemary tied around a napkin, the walnuts nestled into a tray, or the handwritten place card attached to a mini gourd.
Those small discoveries are what make a simple table feel thoughtful.
Most importantly, give yourself permission to stop before everything feels perfectly styled.
Thanksgiving is already full of preparation. The table should add warmth to the day rather than becoming another complicated task.
Use what the season gives you. Repeat a few beautiful ingredients. Keep the arrangement low, practical, and relaxed.
If you want to get more from your life, and are looking for concrete action steps to get you there, check out our Request a Coach page. It’s a “cut the fence-sitting and take action” way to tackle your issues and actually find success. To get off the fence and start to take action, click or tap here.
When your guests sit down, the table should feel special without feeling untouchable.
That is what makes a harvest tablescape work. It looks beautiful, but it still feels like a place where people can settle in, pass the food, talk for hours, and enjoy Thanksgiving together.
Need some help with style or organization? Drop on by our directories choc full of image coaches, organization coaches and minimalist coaches to help make your spaces beautiful. Or click here to have us match you to the best.
If you want to get more from your life, and are looking for concrete action steps to get you there, check out our Request a Coach page. It’s a “cut the fence-sitting and take action” way to tackle your issues and actually find success. To get off the fence and start to take action, click or tap here.
Read this next

Sentimental Father’s Day Keepsakes That Mean Something
Engraved, handmade, and photo-based keepsakes organized by sentiment level and turnaround time. You know that weird gift-buying moment when you want something meaningful for Father’s Day, but every “gift idea” […]
Read More
10 DIY Closet Organization Ideas That Make Everyday Storage Easier
A practical roundup of DIY closet upgrades that solve clutter, messy piles, and hard-to-reach storage without requiring a full custom build. You know that annoying moment when getting dressed should […]
Read More
Career Vision Board Ideas for People Who Want Clarity, Not Just Motivation
Turn a pretty career vision board into a clear next-step plan that helps you stop guessing, choose your direction, and move forward with focus.
Read More